Hello everyone, and welcome to the Hogwarts Legacy Deck Dive!
Today, we’re going to take something that could barely run well on an RTX4080 at launch, to something that can immerse you in the Wizarding World from beginning to end, anywhere you happen to be playing. Before we begin, let's get into the testing methodology:
Testing Methodology
Testing was done with the following configuration:
- A Q3 512GB Steam Deck
- SteamOS 3.4.6
- Hogwarts Legacy Build ID 10678877
- Proton 7.0-6e
- Mesa 23.1.0-devel (git-16283f7b97)
- VKD3D 2.6.0/1.3.238
The game file used was my wife Crystal’s completed file, with 100% done. This ensured that we had the fastest broom to stress the Deck with, we’d seen every location to know what to test, and we had the most populous overworld.
As a note on this, big thanks to her for doing about a million of these benchmarks.There were several mishaps that caused re-testing to be needed and she pulled a few late nights to make it happen.
Speaking of testing, each test was done by starting in Upper Hogsmeade, following the road North, then west, entering Hogsmeade Valley, getting on the fastest broom in the game, flying full speed near the ground, diving to the ground in the outskirts of the Forbidden Forest, and then running to the Puffskein Den in the forest itself.
The testing brings out the absolute worst in performance in Hogwarts Legacy, with dense crowds, pushing asset streaming to the limits, forcibly making a major scene change to dense foliage to flood VRAM, dense particle effects and dense fog. I compared the results to just about every other location on map, notably the southeastern region, and Hogwarts itself, so I’m very confident that performance will be equal to, or better than, the test itself.
Now, let’s move on to getting a baseline!
The Baseline
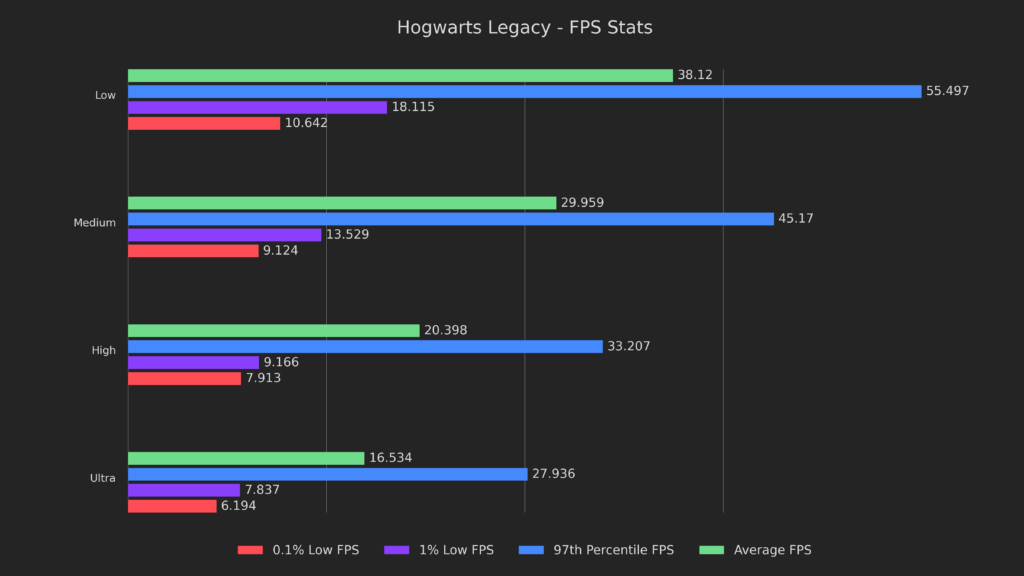
There’s nothing too surprising here, but it’s noteworthy that the lows are pretty bad, even after the patches that were supposed to fix them. The Low preset can ALMOST maintain 40, but not quite, and the performance is pretty bad by bumping it up to just the medium preset.
It’s clear that we have our work cut out for us here if we want to play with decent settings, so let’s identify the bottleneck!
Identifying a Bottleneck
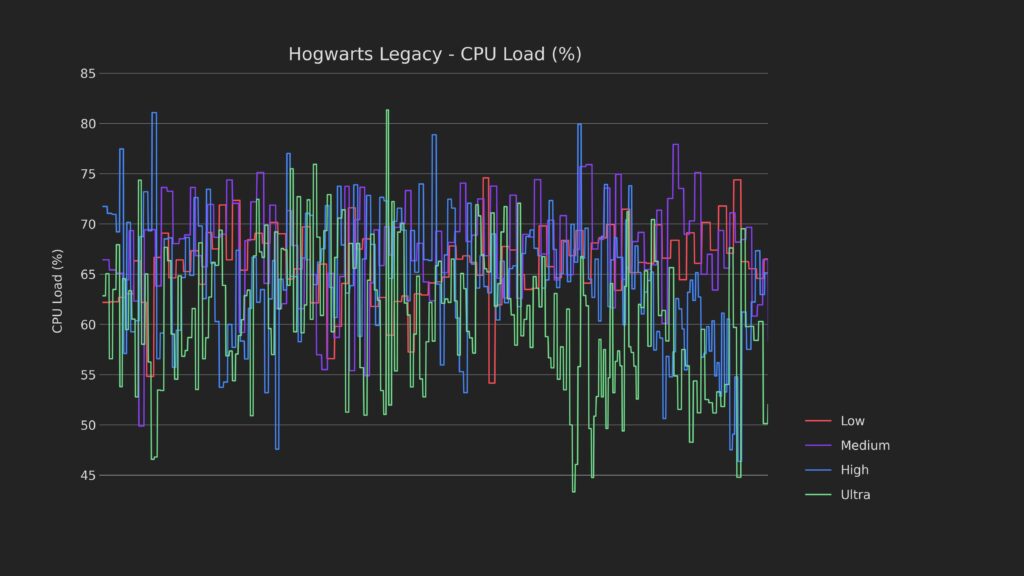
CPU load is pretty high, but it never really tops out, so lets move on.
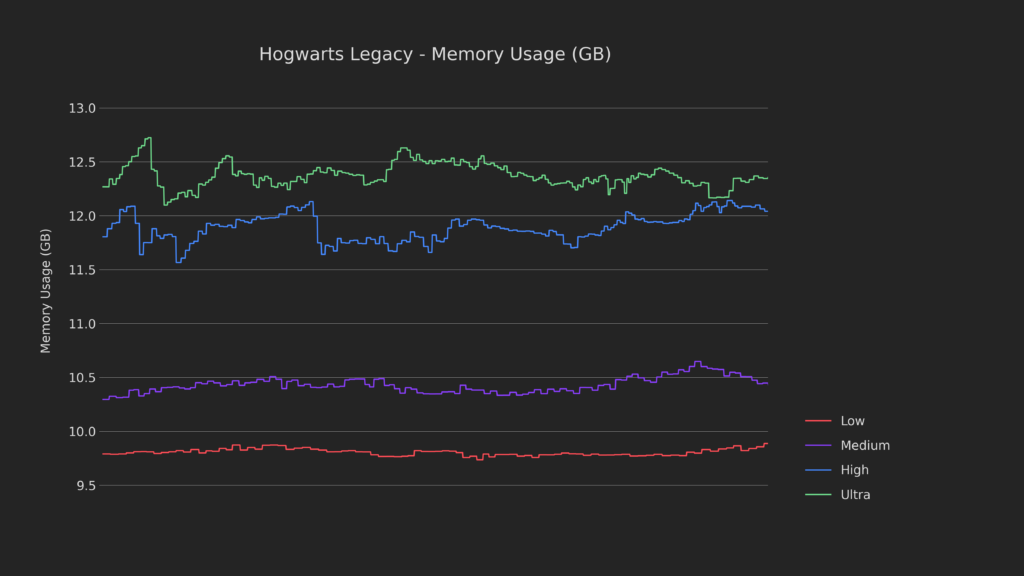
Memory usage is also high, but never really using everything available.
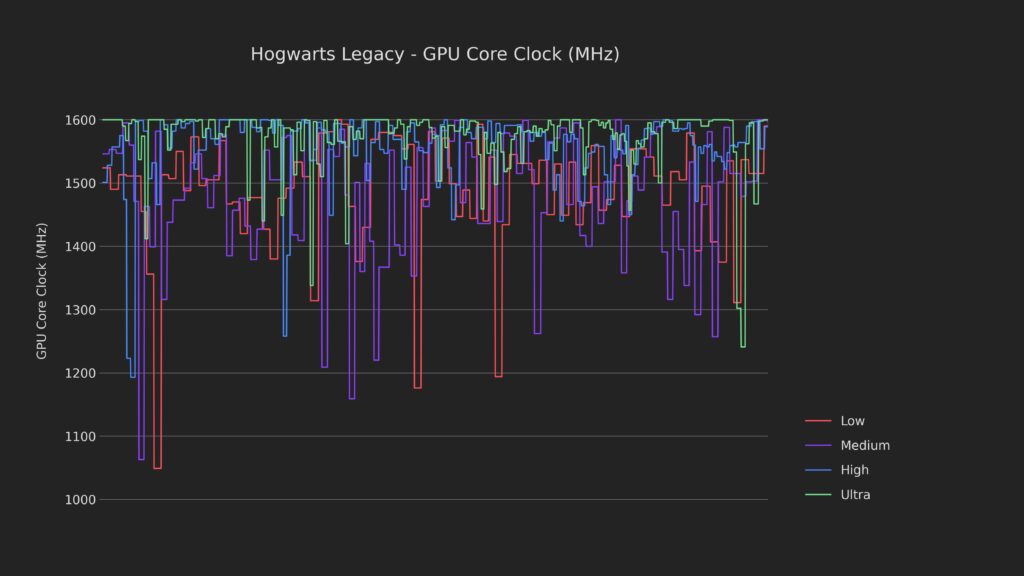
And I think we found the bottleneck. Call this Texas, because the GPU is getting absolutely massacred here. I’m pretty confident this is it, but let’s check on one more thing anyway, just to make sure.
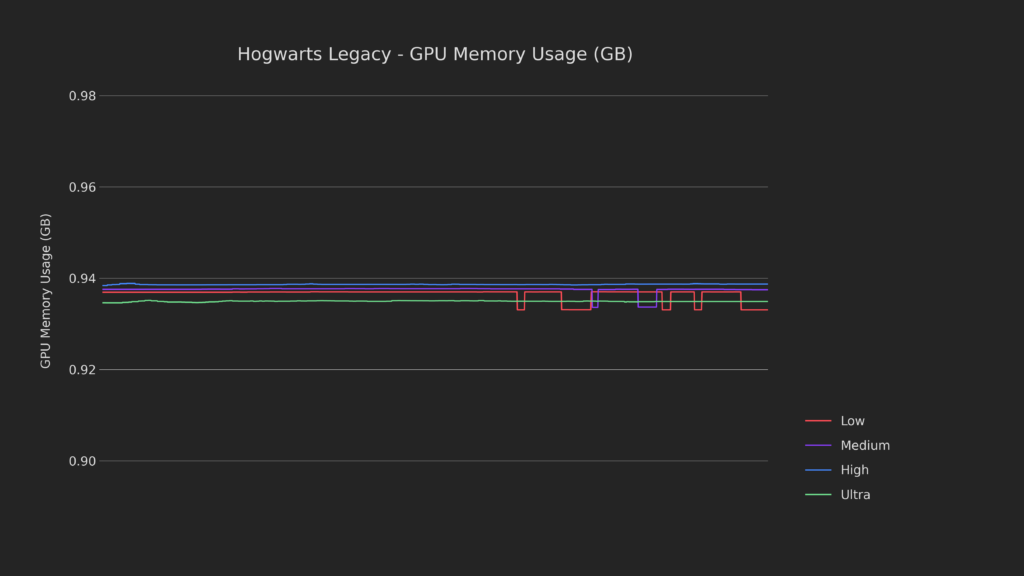
The VRAM utilization could also be an issue, utilizing the entirety of the reservation, so we’ll definitely need to look into expanding it and giving the GPU some breathing room.
If you haven’t seen my CryoUtilities 2 announcement video, I recommend watching that. We will be using CU2 for our configurations.
Optimizations (May Change)
CU2 + 4GB VRAM
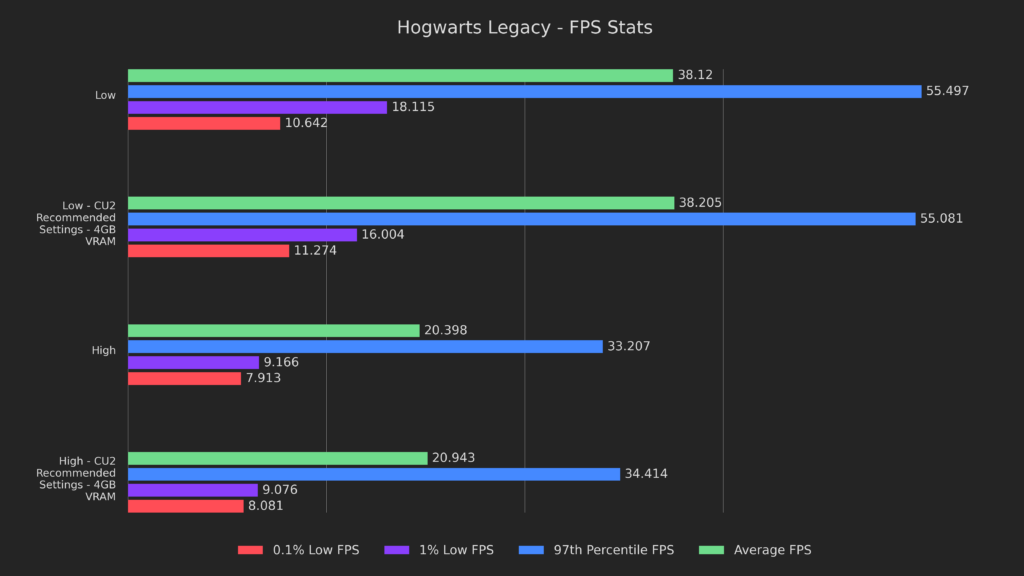
Enabling all of my recommended settings in CryoUtilities 2 and swapping to 4GB of minimum VRAM keeps basically every result within margin of error, but the 0.1% lows are ever so slightly higher and the 1% lows are slightly lower. The one exception to this is the 1% lows on the low preset, which took a 12% hit.
I wasn’t able to replicate this, but I believe it’s indicative of the major issue with this game, stutter, so I decided to leave this result in.
GPU Pinned @ 1600
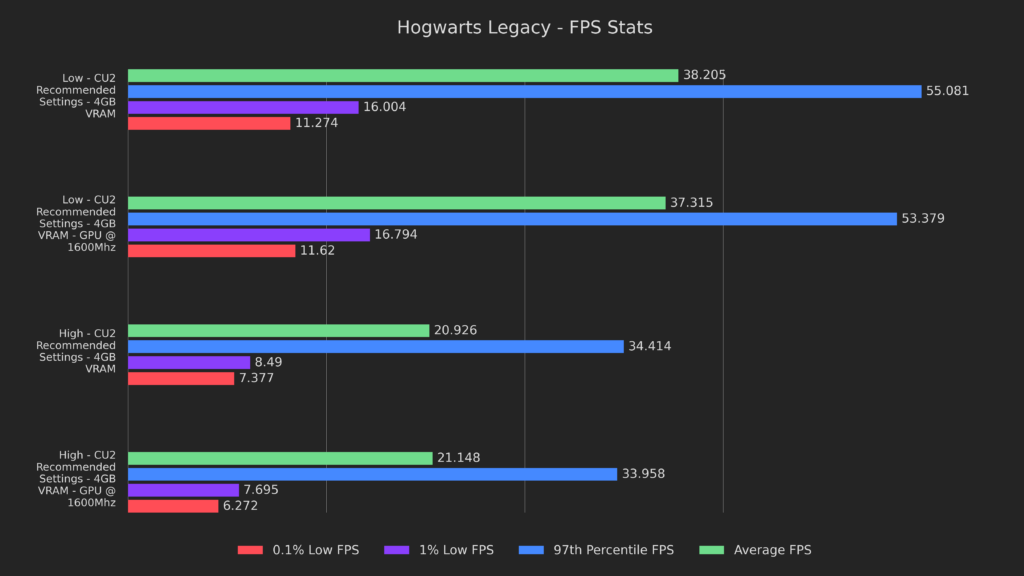
Back on to testing, here we can see that pinning the GPU did VERY little, even harming the 97th percentile results and the lows on the high preset.
It’s clear that this isn’t the way to go, so let’s move on.
Proton GE
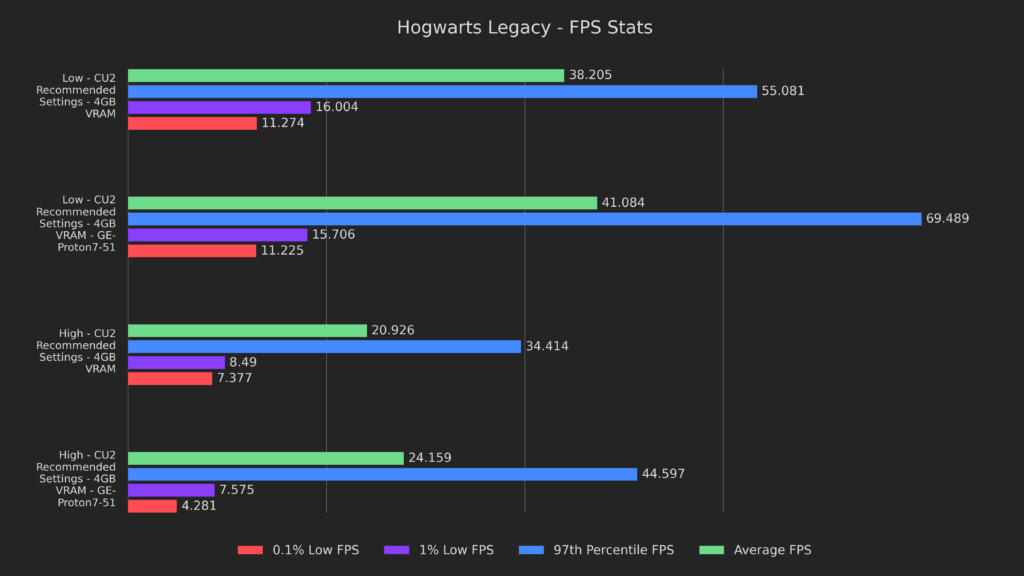
Next up is Proton GE, which was version GE-Proton7-51 at the time of testing.
As you can see, it resulted in much better performance on averages and 97th percentile but had worse lows on the high preset. I decided that the higher averages are good enough that we should use them for now, so we’ll use this as our new baseline.
To install Proton GE, you can follow SteamDeckHQ's Guide on how to install and update it!
Performance Governor
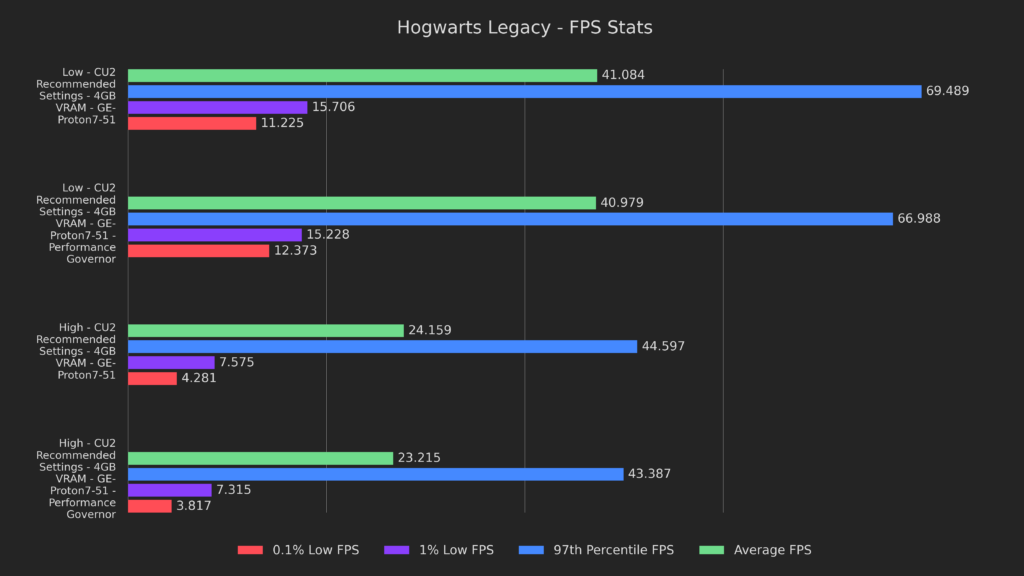
Next up I wanted to test the performance governor, which is something that helped a lot on Final Fantasy 13.
Unfortunately, since the CPU isn’t the bottleneck here, it didn’t do us any favors and was a bad choice all around, let’s move on.
CPU Frequency Limiter
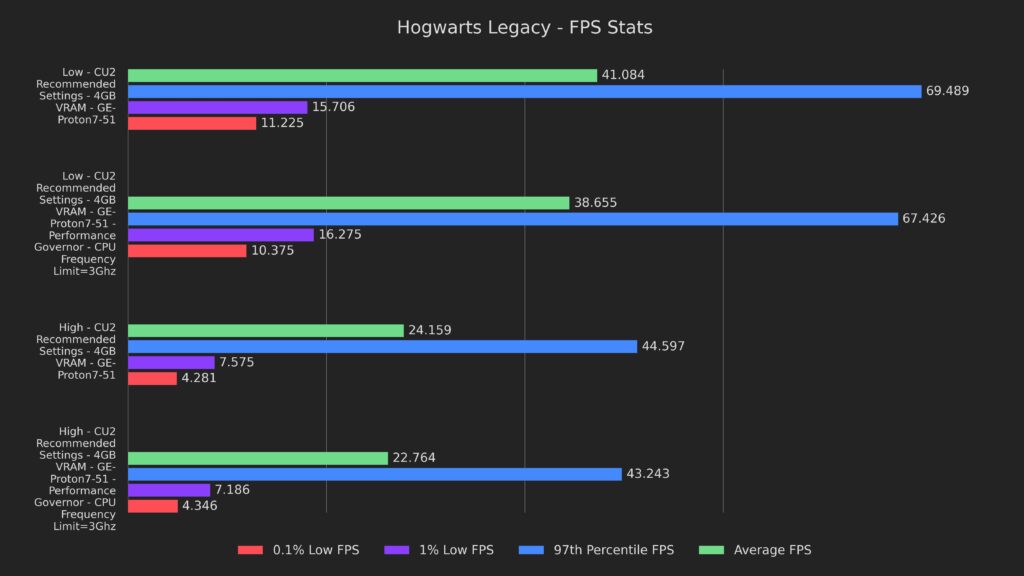
Going in the other direction, I attempted to limit the CPU frequency to give the GPU a bit more breathing room.
I tried a bunch of different limits, but 3Ghz performed the best, and as you can see it was another unfortunate outcome, with slightly lower results across the board.
FSR
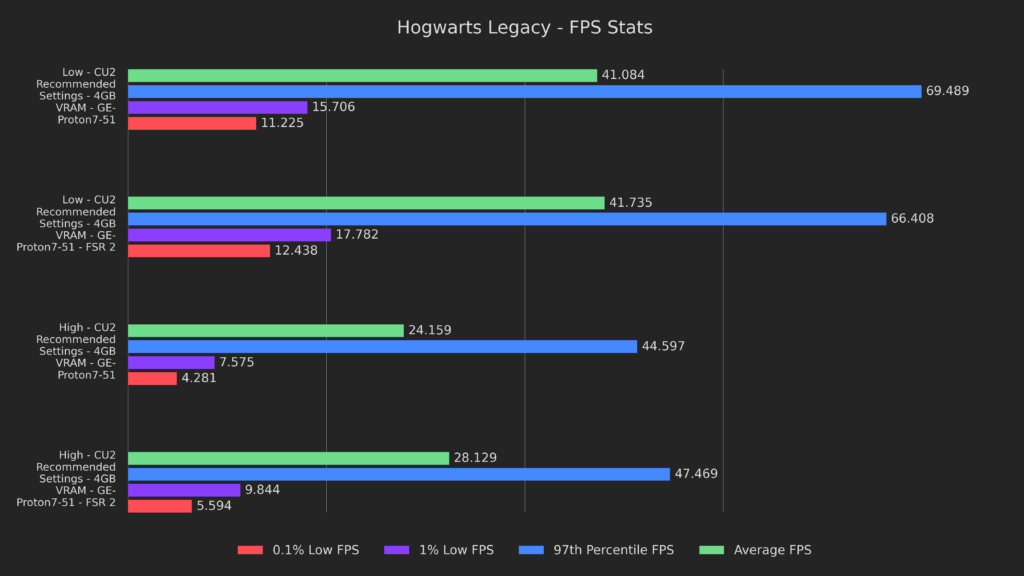
Here we can see the first positive change in a while, and it’s with FSR 2!
We can see decent improvements to the lows on both presets, and averages on the high preset are 15% higher, almost hitting 30 FPS.
It’s pretty clear that FSR is going to be a major boon, so let’s use this as our new baseline and find a new bottleneck!
Identifying a new bottleneck
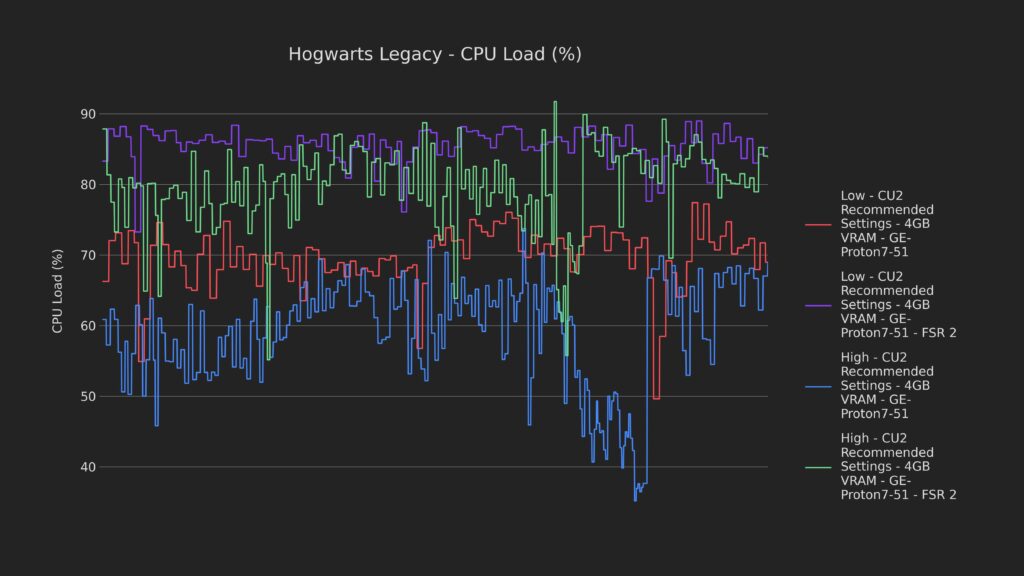
The CPU is doing MUCH more work with FSR enabled in both the low and high presets, bringing it up high enough to make it a candidate for the bottleneck.
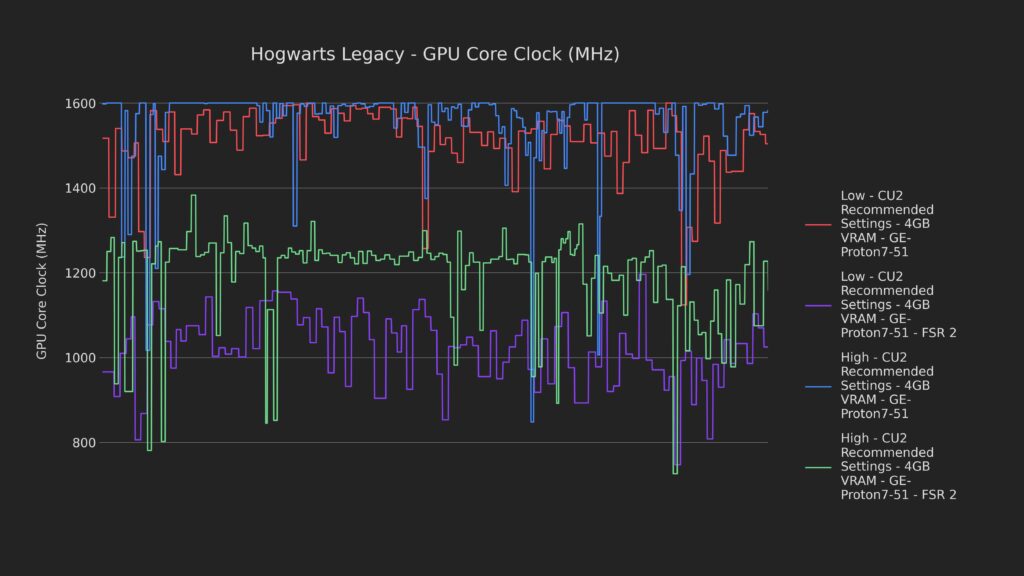
The GPU is on a family vacation to Disney World, with both FSR-based presets coming in at around 60-75% GPU utilization.
FSR + GPU Pinning @ 1400Mhz
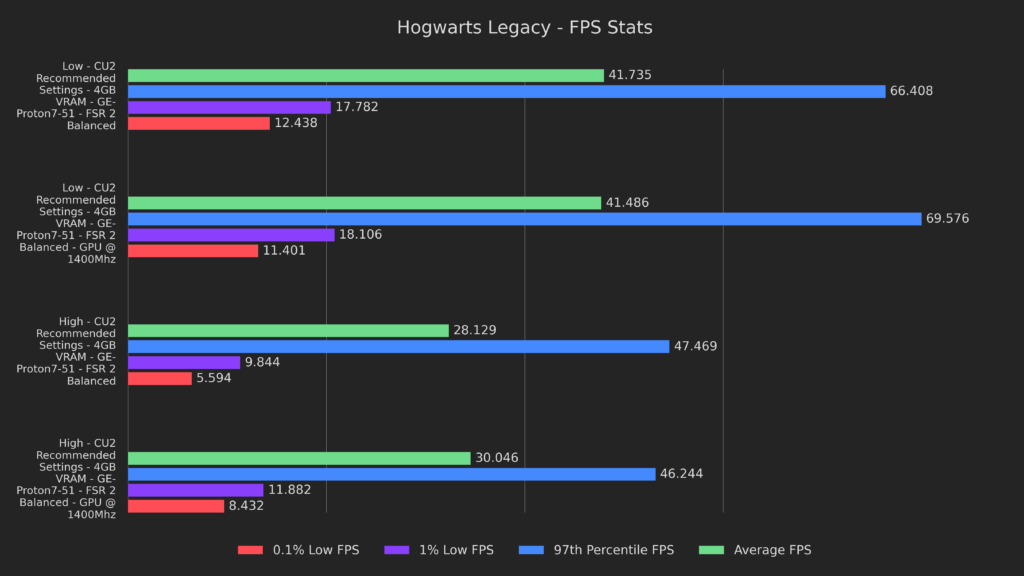
Going off of the high-CPU-and-low-GPU utilization, I thought that pinning the GPU low might help, and I was right! Pinning the GPU to 1400Mhz while using FSR boosted almost every result, with the exceptions of 0.1% lows on the low preset and 97th percentile on the high preset.
The averages on low were within margin of error, but the averages on High FINALLY touched 30 FPS, which is awesome news!
Overclocking and Undervolting
Lastly, something you’ve all been waiting for, undervolting and overclocking results. This testing in particular was done with a Q1 2023 256GB Steam Deck, as it got fairly middle-of-the-road overclocking results during my testing.
If you want to know how to do this, why it works, or what to expect in other games, make sure to check out my undervolting and overclocking video.
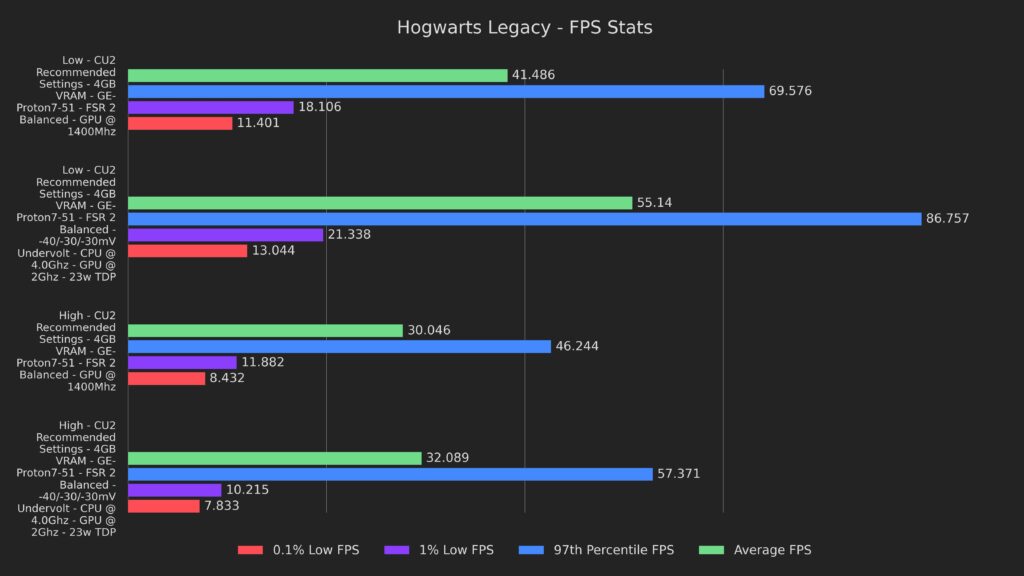
As you can see, the gains are huge, and you can understand why I rearranged the video order in order to show the other video first. Averages got 33% and 7% boosts and 97th percentile got 25% and 24% boosts on the low and high presets respectively.
The lows on the high preset suffered a little bit, but the lows on the low preset each got a 2-3 FPS bump.
Compare best results
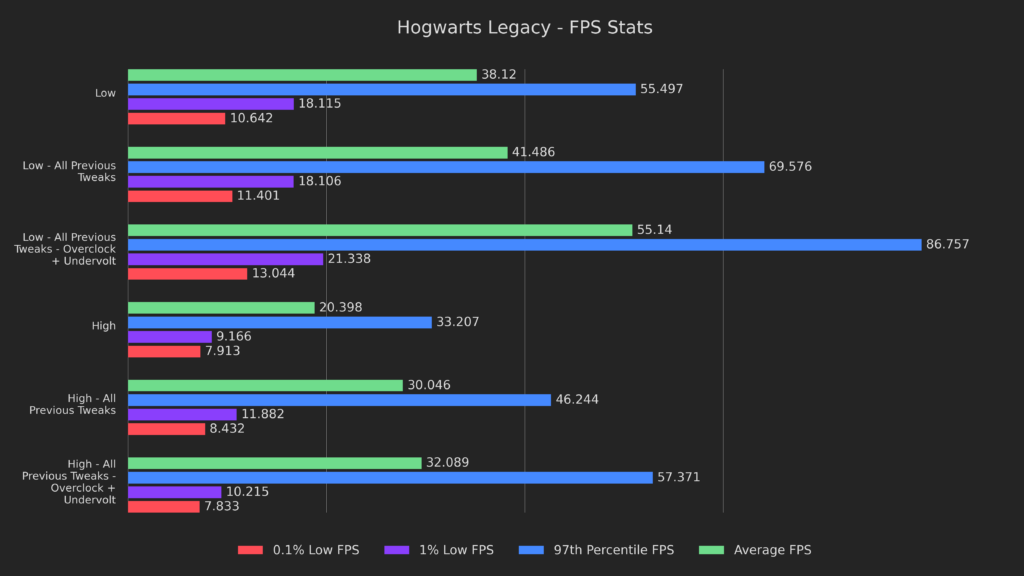
Apologies for the cramped graph, but I wanted to show the differences in performance with full context.
Here we can see that we took the low preset from a shaky mid-30s all the way to a pretty solid 40 with normal tweaks, and all the way to mid 50s when overclocked. The high preset went from a measly 20 FPS all the way up to a fairly stable 30 with tweaks, and a slightly more stable 30 with overclocking. When in a single environment framerates tend to be very high, but when moving we drop to near the average, and during fast movement we get the stutter evident in the graph.
Based on that and everything else we’ve seen, I’m confident that the issue we’re seeing is that we simply can’t get enough VRAM, and assets are constantly cycling in memory. Unfortunately there’s not much we can do about that, and it’s a problem with high end graphics cards as well, but I’m happy with the results we have, regardless of that!
Other Things I Tried
As always, here are some other things I tried:
- SMT + Core manipulation
- Worse to identical performance
- ZRAM
- Worse to identical performance
- GPU pinning @ 800, 1000, 1200, 1300, 1350, 1450, 1500 and 1600 Mhz
- Worse to identical performance
- CPU pinning @ 2, 2.5, 3, 3.3, 3.4 and 3.5 Ghz
- Worse to identical performance
- Downgrading the game and using custom .ini files for engine tuning (including Ascendio mod)
- This was broken in the latest updates, hence the downgrade
- Worse performance
- CPU Governors
- Worse to identical performance
- HRS, XeSS, FSR 1
- Worse to identical performance, quality loss with FSR 1
- Allow Tearing
- Undervolting only
- Worse performance (dependent on values used)
- Overclocking only
- Identical performance (dependent on values used)
- Overclocking and overvolting
- Better performance, but highly unstable
The Presets
I have 2 notes for these presets:
First, as mentioned before, there is stutter present when loading new assets. You can mitigate most of it by either walking, or flying high up when on your broom. Flying near the ground definitely causes the most stutter due to the highest quality assets being loaded in quickly and constantly.
Second, this is the first game where I’ll be providing overclocked results. Please keep in mind that overclocking results will vary based on the silicon lottery, so yours may differ from mine, for better or worse. Every preset will have 2 options, stock or tuned.
Stock is exactly as it sounds, while tuned will show whether to favor an undervolt or overclock.
Battery Saver
First up is battery saver, where we try to get the most battery life possible while retaining a solid 30 FPS. If you want your Deck to last the entire ride from King’s Cross to Hogsmeade, use these settings.
Stock
On Deck:
- CryoUtilities 2.0 Recommendations
- 4GB UMA Frame Buffer Size
- GE-Proton7-51 or higher
In Game:
- Low Preset
- FSR 2 - Performance
Deck overlay:
- FPS limit: 30
- Refresh rate: 60Hz
- TDP Limit of 9 watts
Expected Performance:
- Locked 30, with drops during heavy asset loads
Expected battery life:
- 2 hours 51 minutes
Tuned
On Deck:
- CryoUtilities 2.0 Recommendations
- 4GB UMA Frame Buffer Size
- GE-Proton7-51 or higher
Tuning:
- Undervolt
In Game:
- Low Preset
- FSR 2 - Performance
Deck overlay:
- FPS limit: 30
- Refresh rate: 60Hz
- TDP Limit of 7 watts
Expected Performance:
- Locked 30, with drops during heavy asset loads
Expected battery life:
- 3 hours 25 minutes
Smoothest
Next is smoothest, where every frame is sacred, no matter the fidelity cost. If you want your experience to play like it was just dipped in Crisco, then use these settings.
Stock
On Deck:
- CryoUtilities 2.0 Recommendations
- 4GB UMA Frame Buffer Size
- GE-Proton7-51 or higher
In Game:
- Low Preset
- FSR 2 - Performance
Deck overlay:
- FPS limit: 60
- Refresh rate: 60Hz
- Pin GPU @ 1400 Mhz
Expected Performance:
- 40-60 Hogwarts, 30-45 Hogsmeade, 40+ exploration, stutters when loading assets
Expected battery life:
- 1 hour 36 minutes
Tuned
On Deck:
- CryoUtilities 2.0 Recommendations
- 4GB UMA Frame Buffer Size
- GE-Proton7-51 or higher
Tuning:
- OC or OC+UV
In Game:
- Low Preset
- FSR 2 - Performance
Deck overlay:
- FPS limit: 60
- Refresh rate: 60Hz
Expected Performance:
- 50-60 Hogwarts, 40+ Hogsmeade, 50+ exploration, stutters when loading assets
Expected battery life:
- 1 hour 25 minutes
Balanced
Third we have the balanced preset, where I focus on getting a good compromise of fidelity and performance by targeting 40 FPS. If you want your gaming to be perfectly balanced, as all things should be, use these settings.
Stock
On Deck:
- CryoUtilities 2.0 Recommendations
- 4GB UMA Frame Buffer Size
- GE-Proton7-51 or higher
In Game:
- Effects Quality: Medium
- Material Quality: High
- Fog Quality: Low
- Sky Quality: Low
- Foliage Quality: Low
- Post Process Quality: Medium
- Shadow Quality: Medium
- Texture Quality: Medium
- View Distance Quality: Medium
- Population Quality: Low
- FSR 2 - Balanced
Deck overlay:
- FPS limit: 40
- Refresh rate: 40Hz
Expected Performance:
- 40 outside of Hogsmeade, 30-40 Hogsmeade, with drops during heavy asset loads
Expected battery life:
- 1 hour 49 minutes
Tuned
On Deck:
- CryoUtilities 2.0 Recommendations
- 4GB UMA Frame Buffer Size
- GE-Proton7-51 or higher
Tuning:
- OC or OC+UV
In Game:
- Effects Quality: Medium
- Material Quality: High
- Fog Quality: Medium
- Sky Quality: Medium
- Foliage Quality: Medium
- Post Process Quality: Medium
- Shadow Quality: Medium
- Texture Quality: High
- View Distance Quality: Medium
- Population Quality: Low (Medium outside of Hogsmeade)
- FSR 2 - Balanced
Deck overlay:
- FPS limit: 40
- Refresh rate: 40Hz
Expected Performance:
- 40 outside of Hogsmeade, 35-40 Hogsmeade, with drops during heavy asset loads
Expected battery life:
- 1 hour 41 minutes
Prettiest
Fourth we have the prettiest preset, where we focus on getting a locked 30 at the highest settings possible. If you want to experience the full beauty of the Wizarding World without booking a trip to Orlando, use these settings.
Stock
On Deck:
- CryoUtilities 2.0 Recommendations
- 4GB UMA Frame Buffer Size
- GE-Proton7-51 or higher
In Game:
- Effects Quality: Medium
- Material Quality: High
- Fog Quality: Medium
- Sky Quality: Medium
- Foliage Quality: Medium
- Post Process Quality: Medium
- Shadow Quality: Medium
- Texture Quality: High
- View Distance Quality: Medium
- Population Quality: Medium
- FSR 2 - Quality
Deck overlay:
- FPS limit: 30
- Refresh rate: 60Hz
Expected Performance:
- Locked 30, with drops during heavy asset loads
Expected battery life:
- 1 hour 40 minutes
Tuned
On Deck:
- CryoUtilities 2.0 Recommendations
- 4GB UMA Frame Buffer Size
- GE-Proton7-51 or higher
Tuning:
- OC or OC+UV
In Game:
- Effects Quality: High
- Material Quality: High
- Fog Quality: Medium
- Sky Quality: Medium
- Foliage Quality: High
- Post Process Quality: High
- Shadow Quality: Medium
- Texture Quality: High
- View Distance Quality: High
- Population Quality: Medium
- FSR 2 - Quality (Or set to Medium preset with no FSR)
Deck overlay:
- FPS limit: 30
- Refresh rate: 60Hz
Expected Performance:
- Locked 30, with drops during heavy asset loads
Expected battery life:
- 1 hour 32 minutes
Docked
Lastly, we have the docked preset, where we aim for the best 1080p results possible, to make for the best TV experience. If you want to play like you’re one of those boats that the first years use to get to the castle, but like the other 99% of the time, use these settings.
Stock
On Deck:
- CryoUtilities 2.0 Recommendations
- 4GB UMA Frame Buffer Size
- GE-Proton7-51 or higher
In Game:
- Effects Quality: Medium
- Material Quality: Medium
- Fog Quality: Low
- Sky Quality: Low
- Foliage Quality: Medium
- Post Process Quality: Medium
- Shadow Quality: Medium
- Texture Quality: Medium
- View Distance Quality: Medium
- Population Quality: Low
- FSR 2 - Balanced
Deck overlay:
- FPS limit: 30
- Refresh rate: 60Hz
Expected Performance:
- Locked 30, with drops during heavy asset loads
Expected battery life:
- N/A
Tuned
On Deck:
- CryoUtilities 2.0 Recommendations
- 4GB UMA Frame Buffer Size
- GE-Proton7-51 or higher
Tuning:
- OC or OC+UV
In Game:
- Effects Quality: Medium
- Material Quality: High
- Fog Quality: Medium
- Sky Quality: Medium
- Foliage Quality: Medium
- Post Process Quality: Medium
- Shadow Quality: Medium
- Texture Quality: High
- View Distance Quality: Medium
- Population Quality: Medium
- FSR 2 - Balanced
Deck overlay:
- FPS limit: 30
- Refresh rate: 60Hz
Expected Performance:
- Locked 30, with drops during heavy asset loads
Expected battery life:
- N/A
Conclusion
And there you have it, Hogwarts Legacy running MUCH better than stock on the Deck, in some cases rivalling mid-range gaming PCs, albeit at a lower resolution.
I’d like to thank all of my patrons, YouTube members and Super Thanks donors for the support!
If you want to watch me optimize another next-gen game beyond what you thought possible, then definitely check out my Witcher 3 next-gen update Deck Dive here. https://www.youtube.com/watch?v=9Z2b2-o5qTA
If you enjoyed this article, be sure to check out the rest of the content on SteamDeckHQ! We have a wide variety game reviews and news that are sure to help your gaming experience. Whether you're looking for news, tips and tutorials, game settings and reviews, or just want to stay up-to-date on the latest trends, we've got your back!

