Today we're covering a game that's been requested quite a lot, Final Fantasy 13. The tests were all done with the following configuration:
Q3, 512GB Steam Deck
SteamOS 3.4.4
DXVK 1.10.3
Proton 7.0-6e
Mesa 22.2.0-devel
Final Fantasy 13, build 463513.
Each test was done in Gran Pulse on the Archylte Steppe, and took about 104 seconds to complete. It consisted of loading into the game fresh, running into a group of nearby flan, fighting them, running to a group of nearby gorgonopsids fighting them, and then running back to the save point. The testing shows off the largest open expanse in the game, a variety of AI, battle transitions, and heavy particle effects. I also cross-referenced with the first two hours of gameplay and an end game fight to check that my results were consistent.
Each round of testing was done with two presets, what I'll call low and ultra, both at 720p since it was the intended resolution for the game at the time of release. Low is done by setting the shadow resolution to 512 and MSAA to 2x in the launcher, while Ultra was done by setting the shadow resolution to 8192 and MSAA to 16x. The game doesn't have any in-game graphics configuration to speak of, so these were the only settings changed between presets.
Alright, now let's move on to getting a baseline.
The Baseline Test
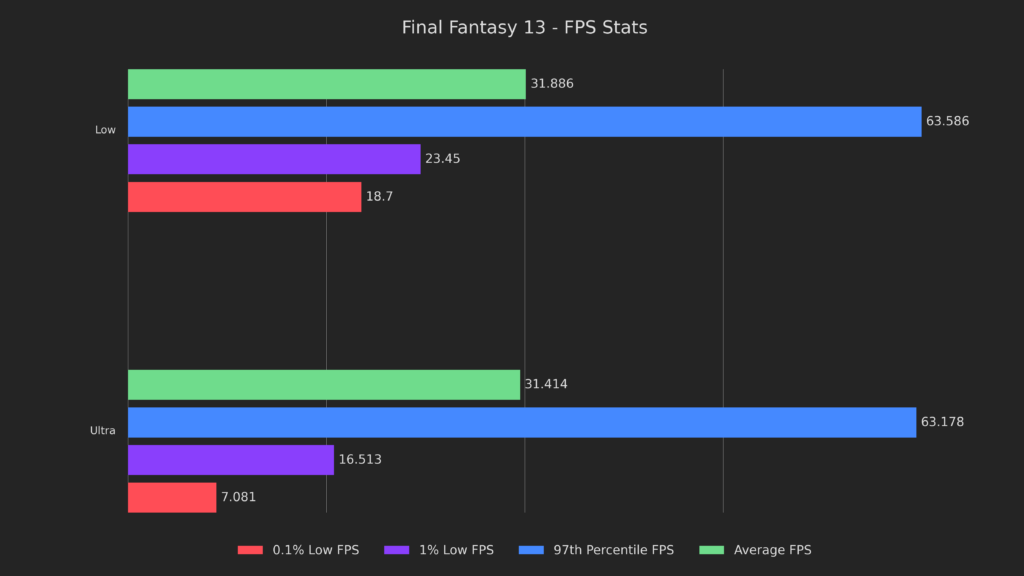
So the first thing you may notice is that the only difference between low and ultra settings are the lows. We'll come back to that in a minute, but first, let's look at the frames over time.
So this probably looks a bit weird to most PC players. We can see that there are three categories of frame rates.
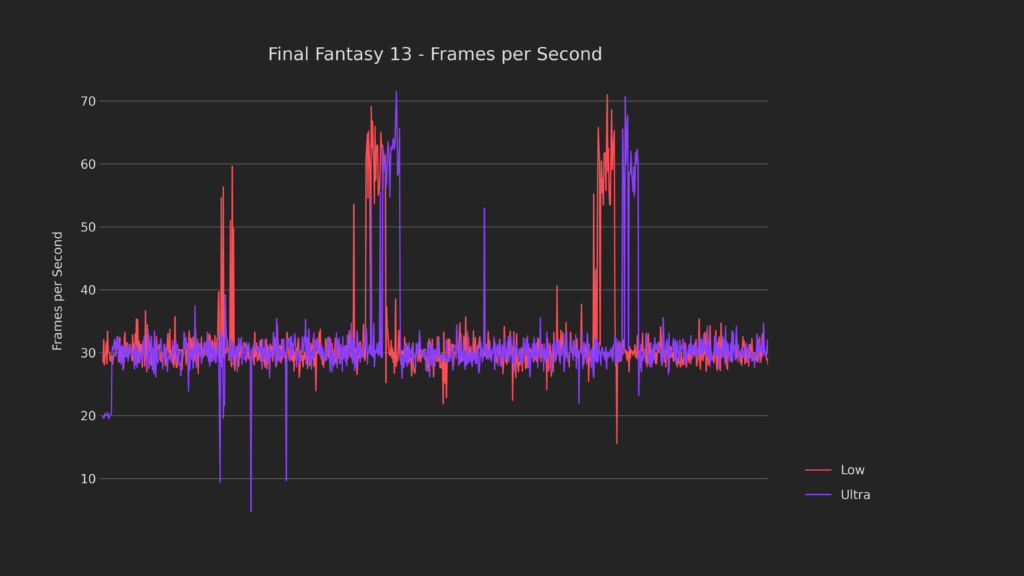
- The normal 30 FPS frame rate is most gameplay.
- The second category, large spikes upwards, are menus and battle complete screens.
- The last category is large spikes to downwards.
Those are almost completely new shaders, getting streamed in from getting into battles or seeing battle effects. The takeaway from this graph is that in the default game, you're getting 30 FPS at almost all times no matter what.
So how do we fix that? We use a mod.
FF13Fix - An Essential Mod
The mod in question is an absolute necessity while playing Final Fantasy 13's PC Port, FF13Fix, and installing it is incredibly easy.
First, go ahead to the release page and download the latest zip file.
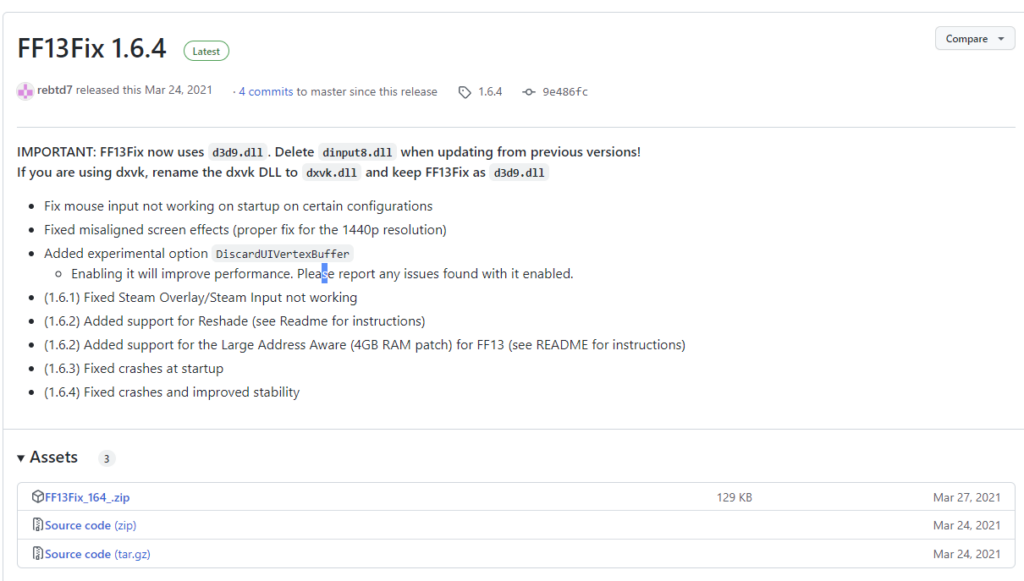
Third, open the zip file and go to the install directory for Final Fantasy 13. Then go into white_data/prog/win/bin and drag d3d9.dll and ff13fix.ini from the zip file alongside the existing files.
home/.local/share/Steam/steamapps/common/FINAL FANTASY XIII/white_data/prog/win/bin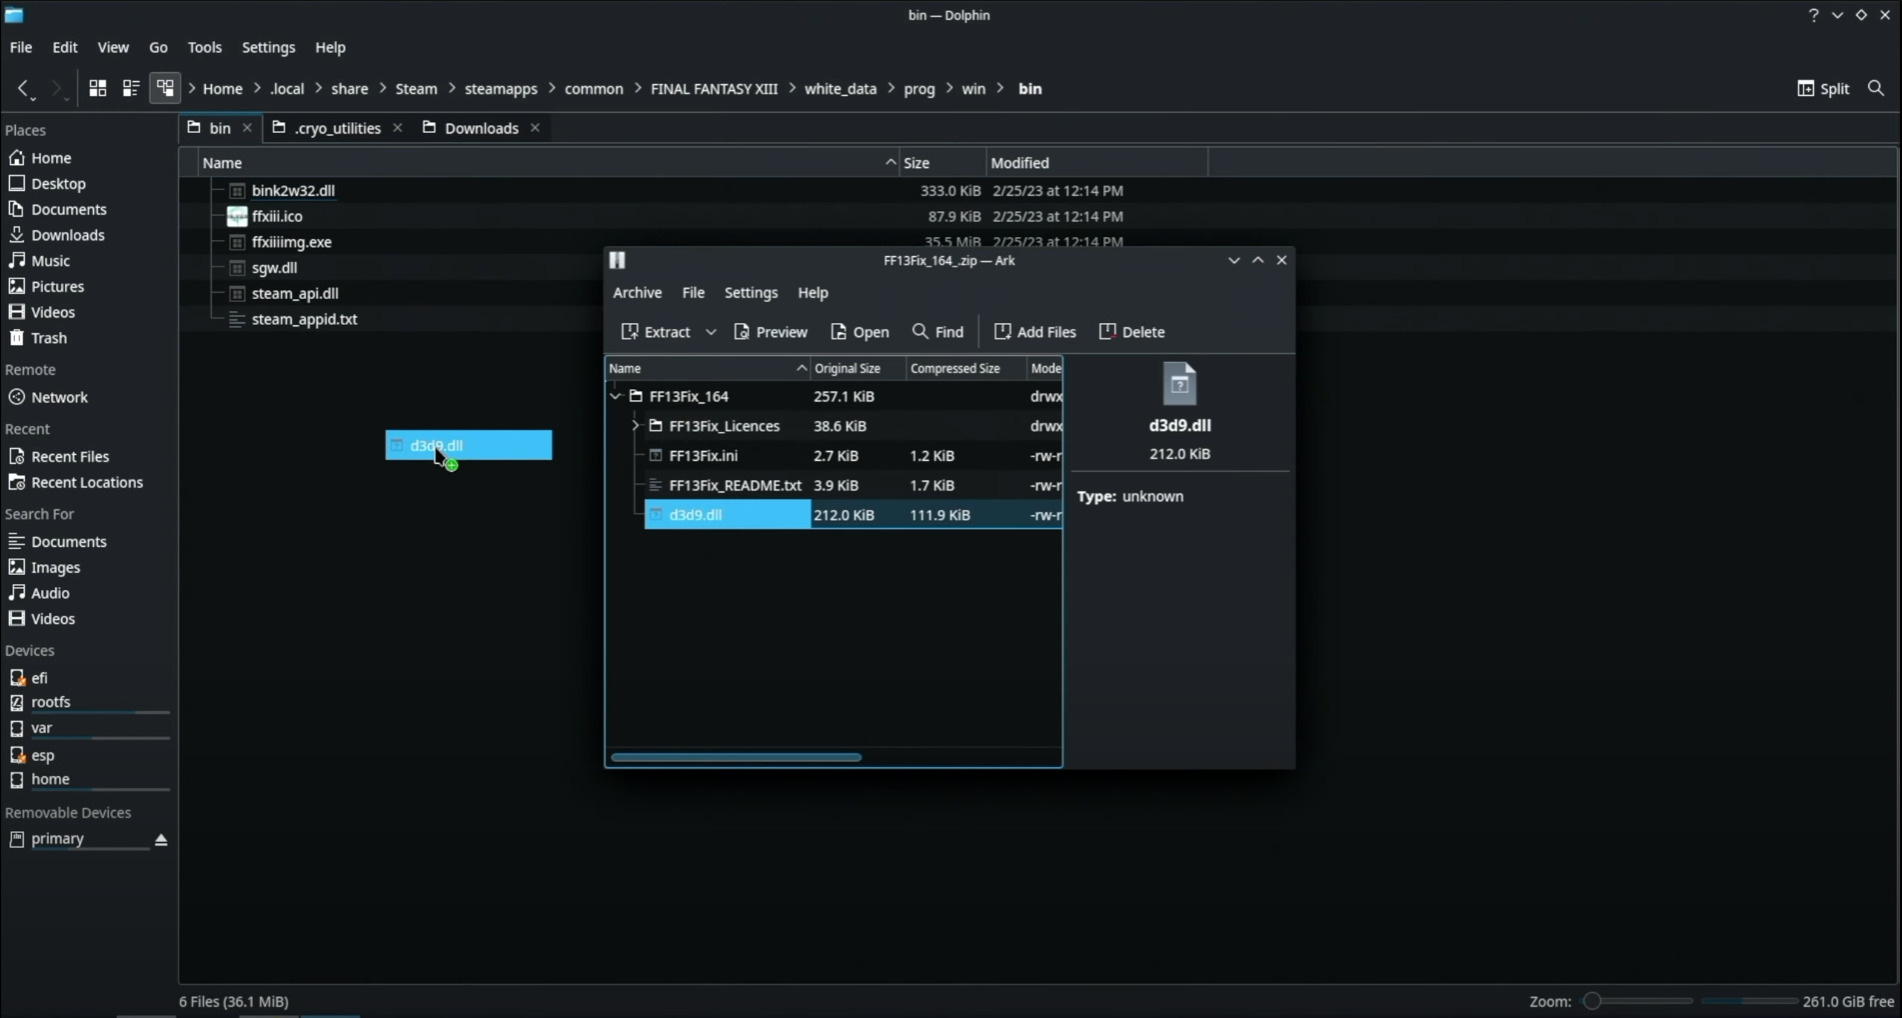
That's all you need to do, hop back into game mode and boot the game up.
So here you can see exactly why we installed FF13Fix.
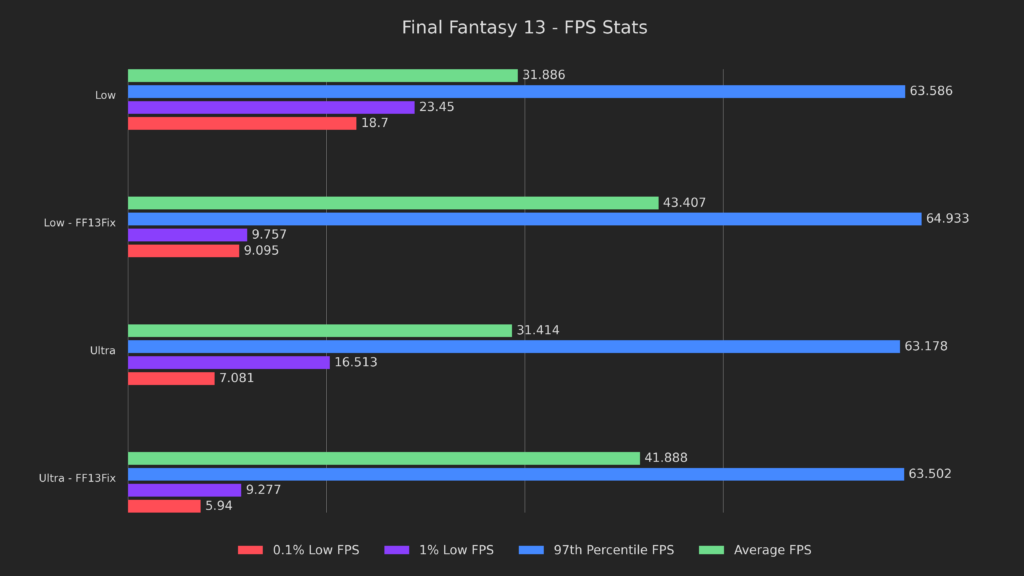
The averages are 31% and 33% higher for low and ultra respectively. Interestingly, the lows are much lower on both presets. While we are at it,let's look into why that may be by identifying a bottleneck. This graph is a bit messy, but I wanted full granularity, so stick with me.
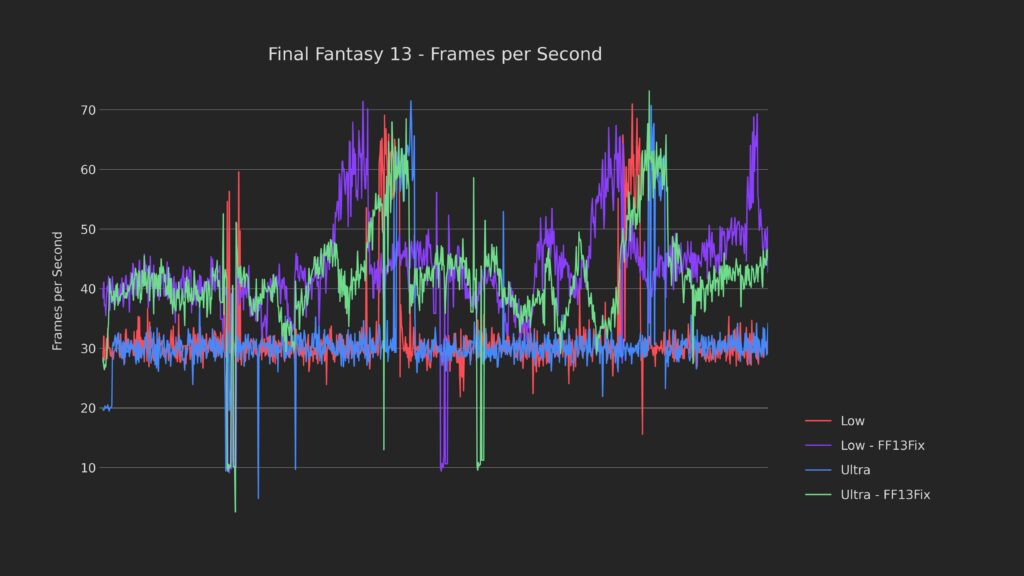
As we can see both FF13Fix runs had more dips explaining why the lows were so low. Now the question is WHY it's dipping so much more, which brings us to our next change, making the game large address aware.
Basically, a lot of games made in this era were 32 bit, but couldn't use the entire 32 bit address space because of Windows limitations at the time. What this means is that they could only use about 2GB of memory instead of the 4GB that it theoretically should be able to use.
Thankfully, Setting a game to be large address aware is super simple with Proton.
Large Address Aware = Large Gains
Just open up the game properties and add this line to the launch parameters box.
PROTON_FORCE_LARGE_ADDRESS_AWARE=1 %command%That's it! Now let's see how it performs.
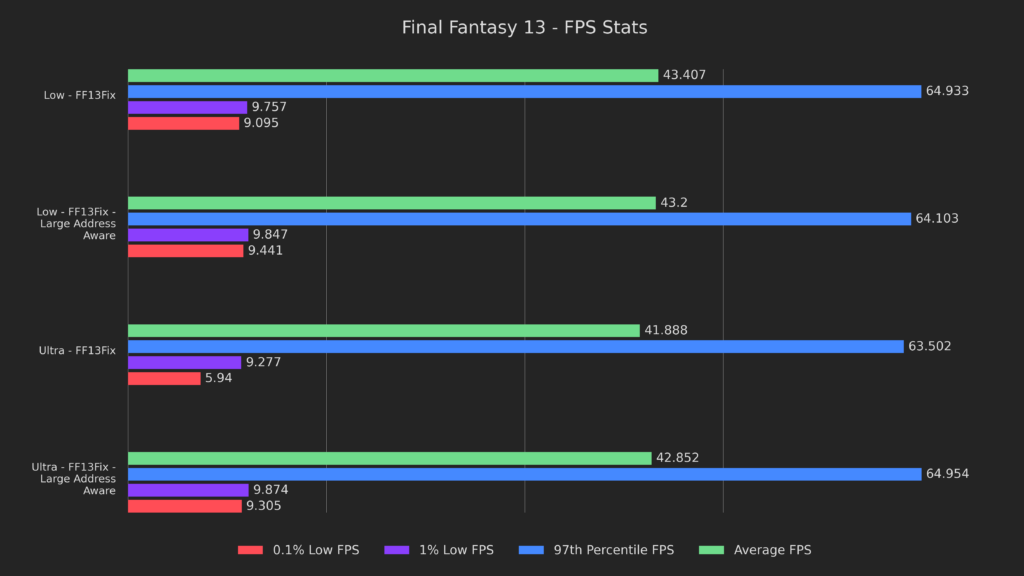
The differences here are minor, but perceptible. The 0.1% lows are 4% higher on low, then Ultra has 6% higher 1% lows, and 57% higher 0.1% lows. This may not look like much, but it definitely felt a little bit better and it'll be very important for some stuff later, so let's keep it enabled and move on to the next result, CryoUtilities 2.
If you haven't already watched the announcement video on CryoUtilities 2, I highly recommend that you do so now. It's super easy to use and improves performance in many games.
The bottleneck here clearly isn't memory management since the results aren't massively different, but it's still an incremental boost.
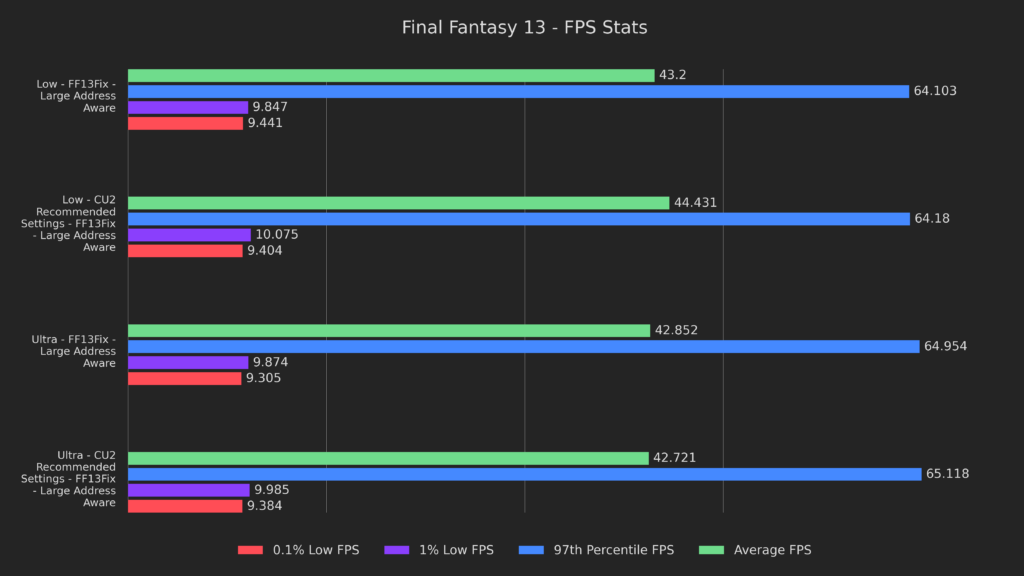
The low preset had a boost to averages of 3%, but most everything else is within margin of error. Since nothing is notably worse than before and there are incremental improvements, this is definitely our new baseline.
Let's move on to our next test, Proton-GE.
Proton-GE Time
Firstly, this was done with Proton-GE 7.0-49. You can check out how to get Proton-GE from SDHQ's Proton-GE Guide.
Secondly, this was a massive improvement in many regards.
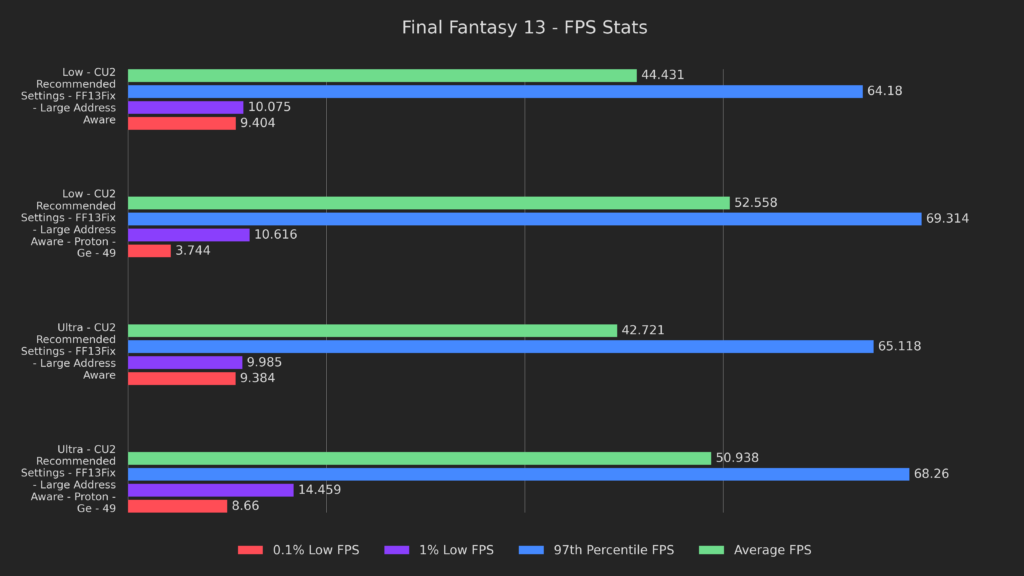
Averages are 18% and 19% higher, and 1% lows are 5% and 45% higher. Curiously, 0.1% lows are much worse, so let's look into why that might be by identifying a new bottleneck:
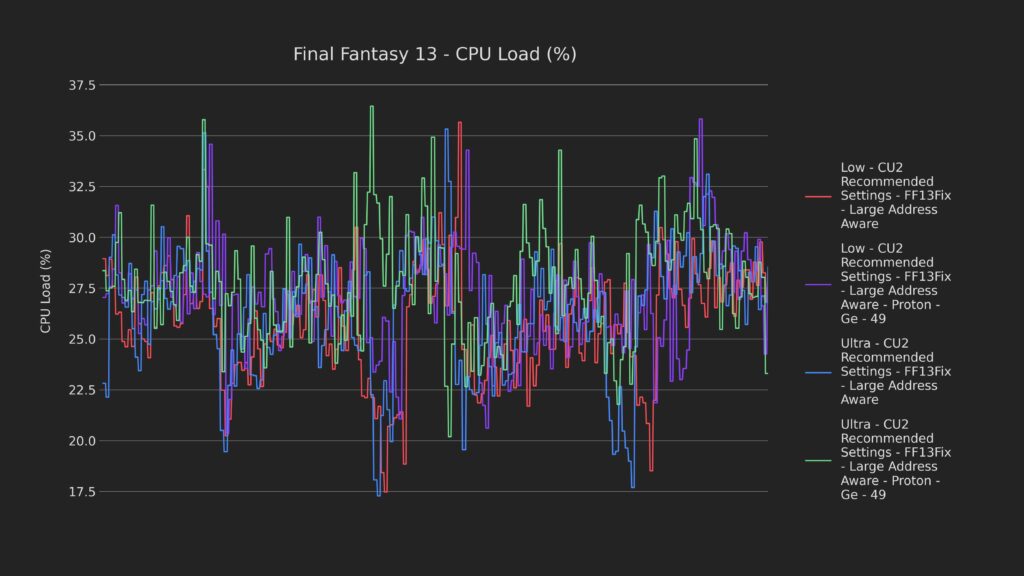
- No bottleneck is present on the cpu, which isn't even half utilized.
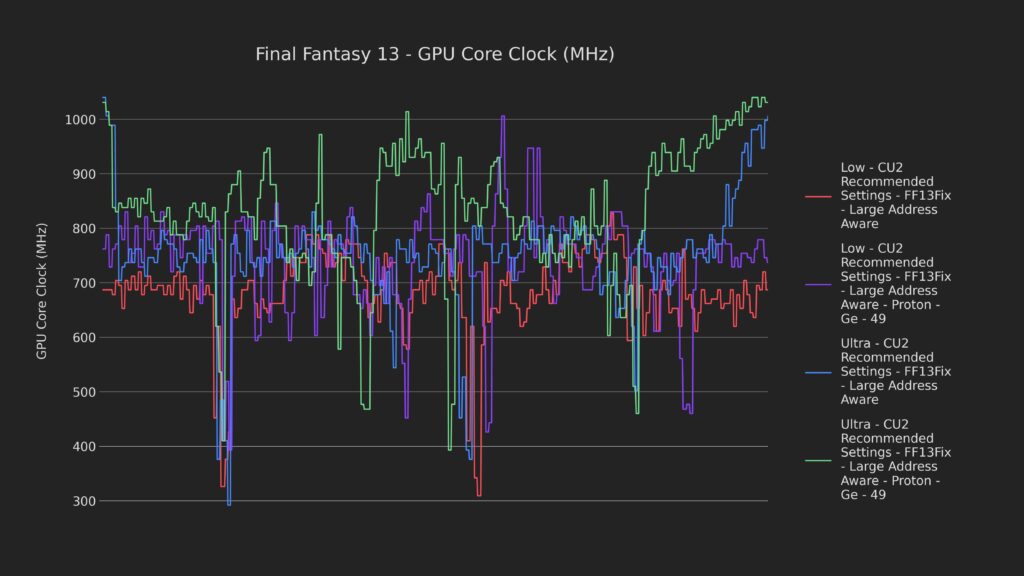
- The GPU is sipping a latte.
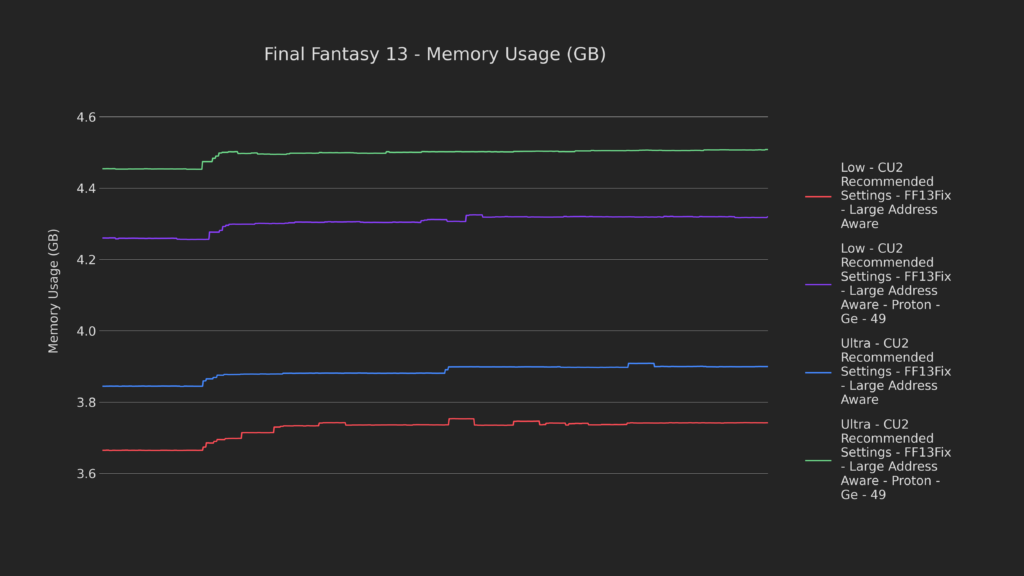
- The RAM is currently on a seven day fast.
Heck, even the temperatures are in the running to replace the polar bear as the new Coca-Cola mascot.
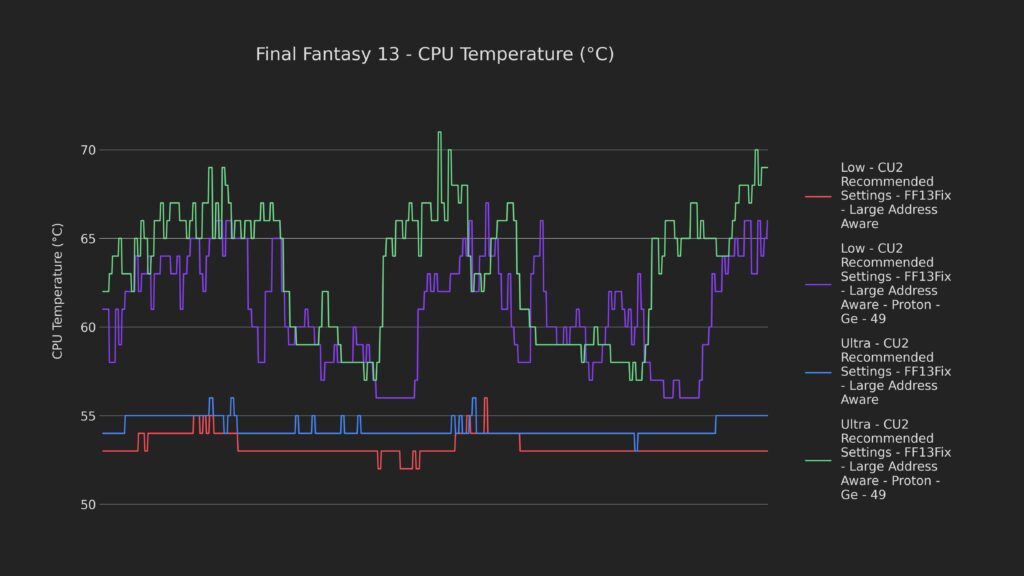
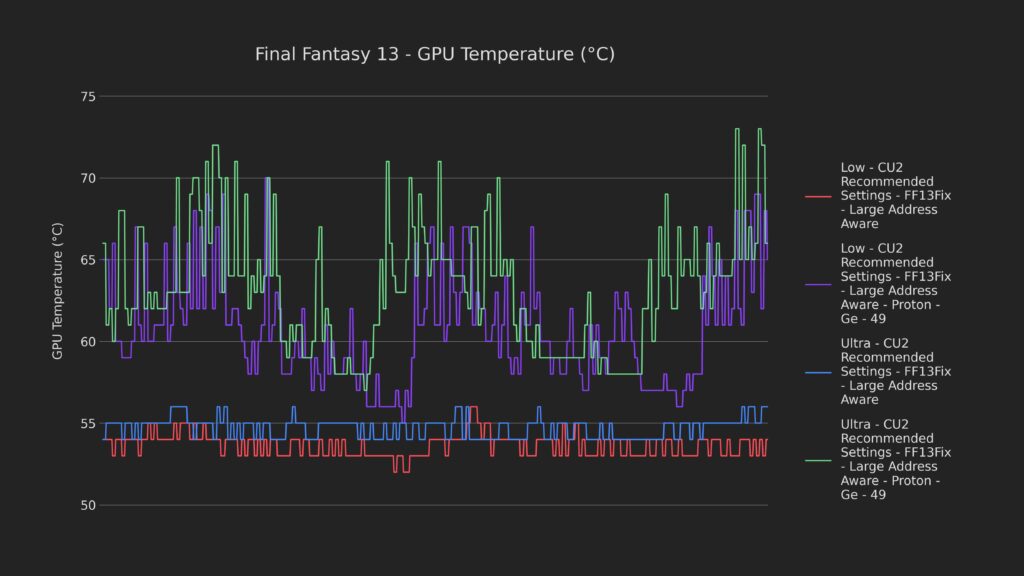
So what's the issue then?
My theory is that the port of the game is to blame, specifically the frame limiter. I think that the frame limiter is artificially holding too much data back until the very last moment. This is letting both the GPU and CPU downclock much more than they should, and also making stutter in game much more severe.
How do we fix it? With a few more tweaks to the .ini.
Tweaking the .ini
Open up the FF13Fix.ini we dragged into the folder earlier and change these settings.
Set PresentationInterval to -1, TripleBuffering to 0, and IngameFrameRateLimit to -1. With these three settings changed, we disabled all in-game V-sync and frame limits.
So, what are the results?
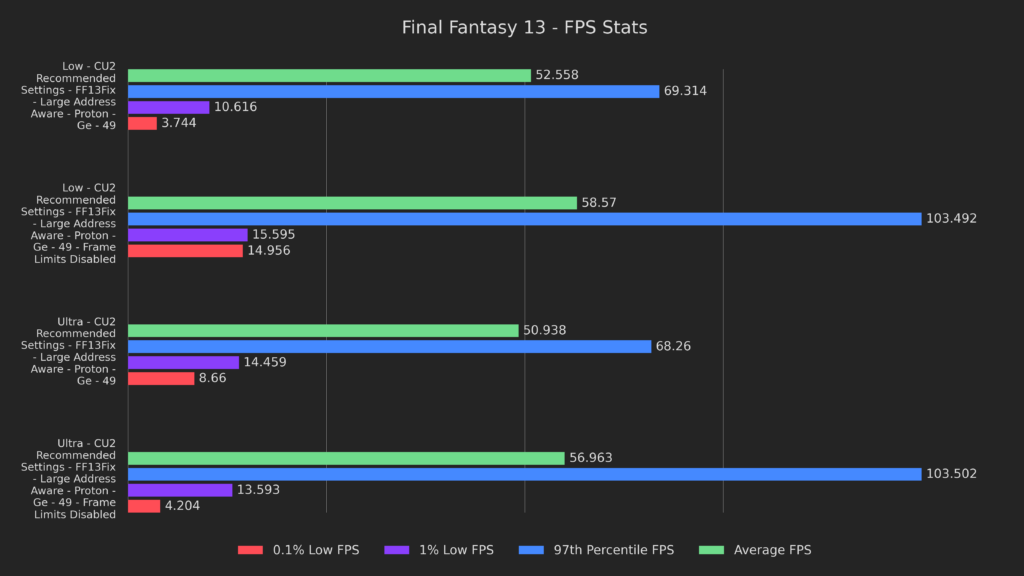
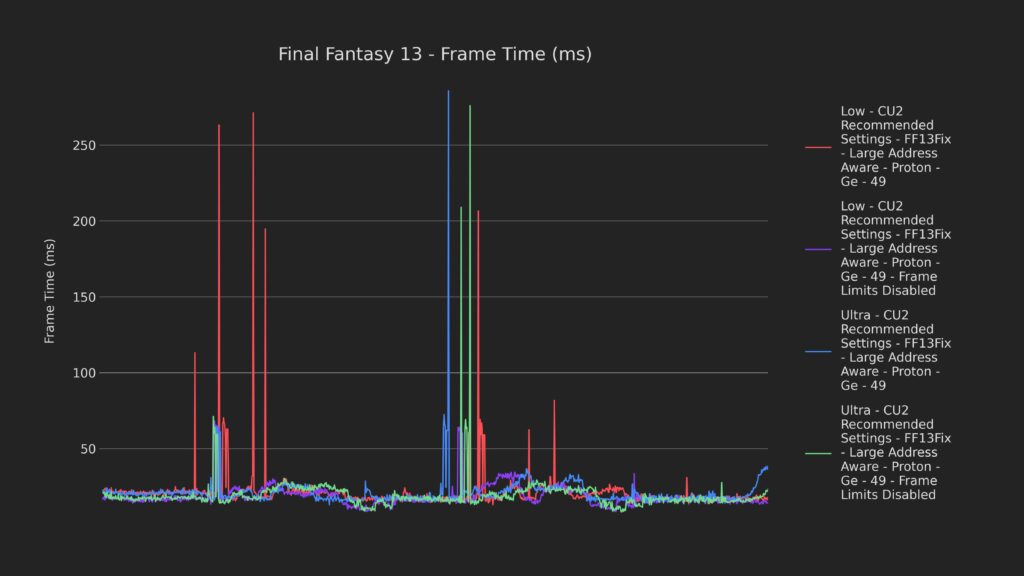
Averages are 11% and 12% better on low and ultra respectively. The 97th percentile results are 49% and 52% higher. The lows on the low preset are 47%, and a whopping 299% higher. However, the lows on the ultra preset are 6% and 52% lower.
I reran this test four more times, and each time the lows on ultra were wildly inconsistent, ranging from this at worst to the same as the low preset at best. Basically, it seems like getting into battles will always have some latency spikes, at least as configured here.
But something struck me as odd, I've seen similar behavior before, usually in emulation. That gave me an idea.
SMT and CPU/GPU Improvements
For the next test I chose to disable SMT.
To do this, install Decky Loader and the PowerTools plugin. From there, go to the power tools menu, toggle SMT off, then scroll down and enable Persistent, which will keep it disabled each time you launch the game.
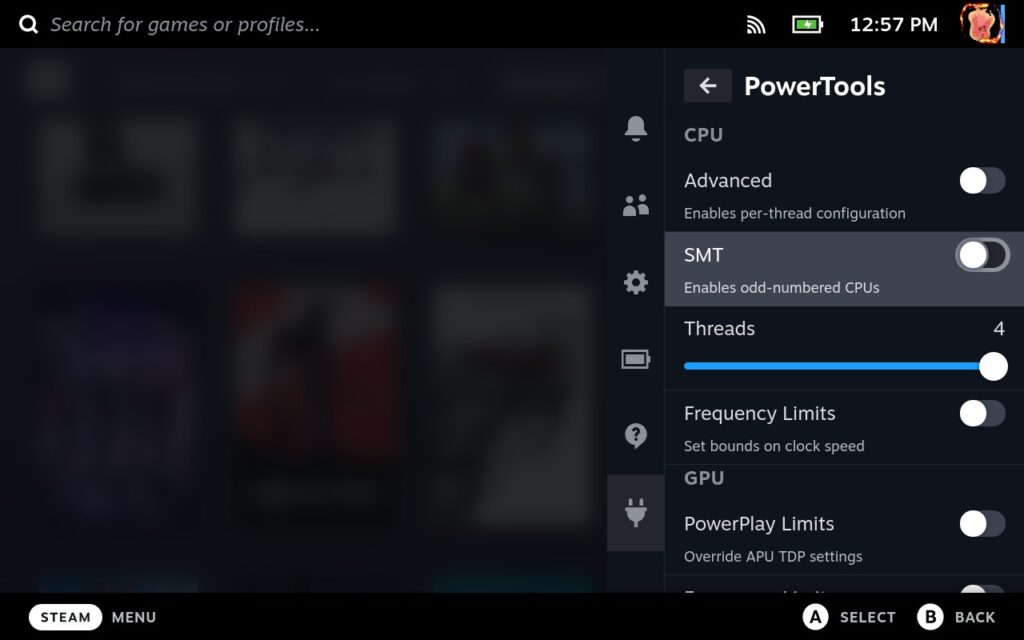
With SMT disabled, let's look at the results.
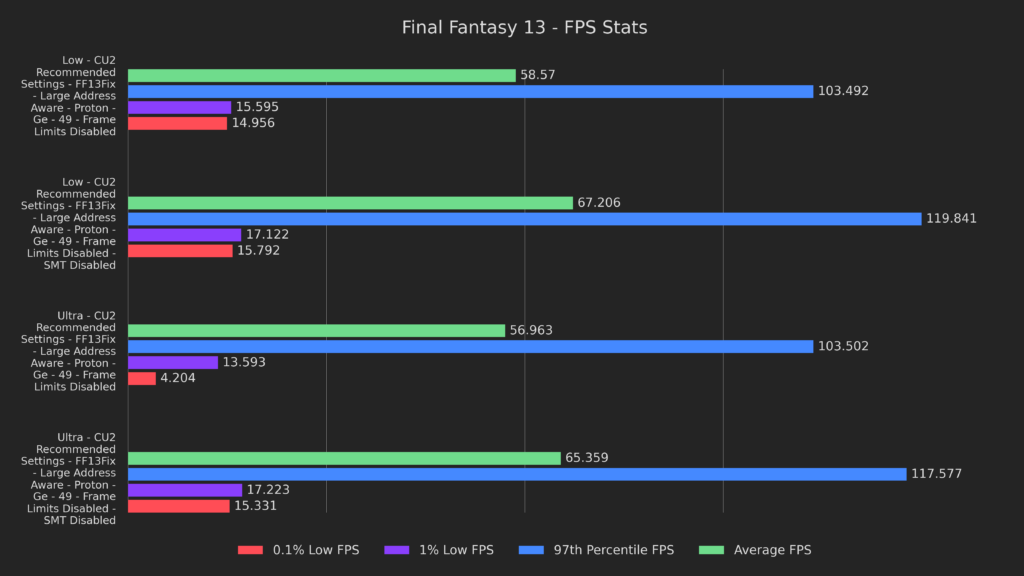
And with this, we finally broke the 60 FPS average mark with both low and ultra gaining 15%. 97th percentile results are 16% and 14% higher, and 1% lows are 4% and 27% higher for low and ultra respectively. The 0.1% lows didn't gain much on the low preset with only a 5% boost, but ultra had a huge 265% boost.
These results are much better across the board, and it's definitely clear that this game was developed with a low core count CPU in mind.
For the next test, I wanted to see if we could push the CPU even further.
The CPU governor is what tells the Linux kernel how to allocate tasks to the CPU. The default, schedutil, is fairly conservative and is tuned for multiple processes. By going back to the PowerTools menu and changing the governor to performance, we can change the governor to optimize for single process performance and hopefully squeeze a bit more outta the CPU.
Let's see what it gets us.
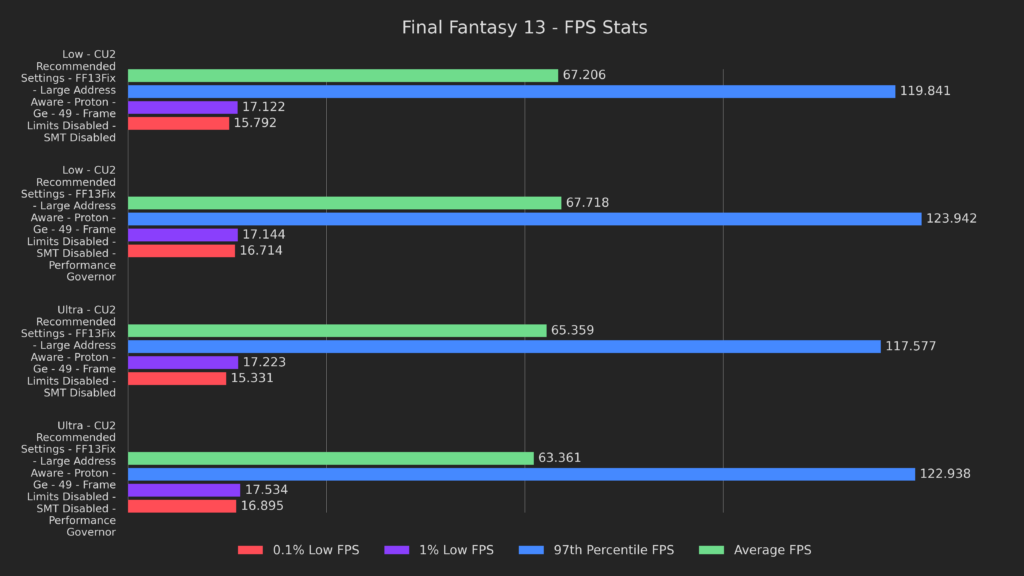
As you can see, there's a very minor improvement everywhere, especially in the 97th percentile results, where raw CPU performance clearly makes a difference. The one exception to this is a 3% decrease to the averages on the ultra preset, but considering that they're still above 60 FPS, I consider it a worthwhile trade for the higher lows.
Next I wanted to test pinning the GPU to 1600Mhz. To pin the GPU, just open the quick access menu, go down to Manual GPU Clock Control, turn it on and set it to 1600.
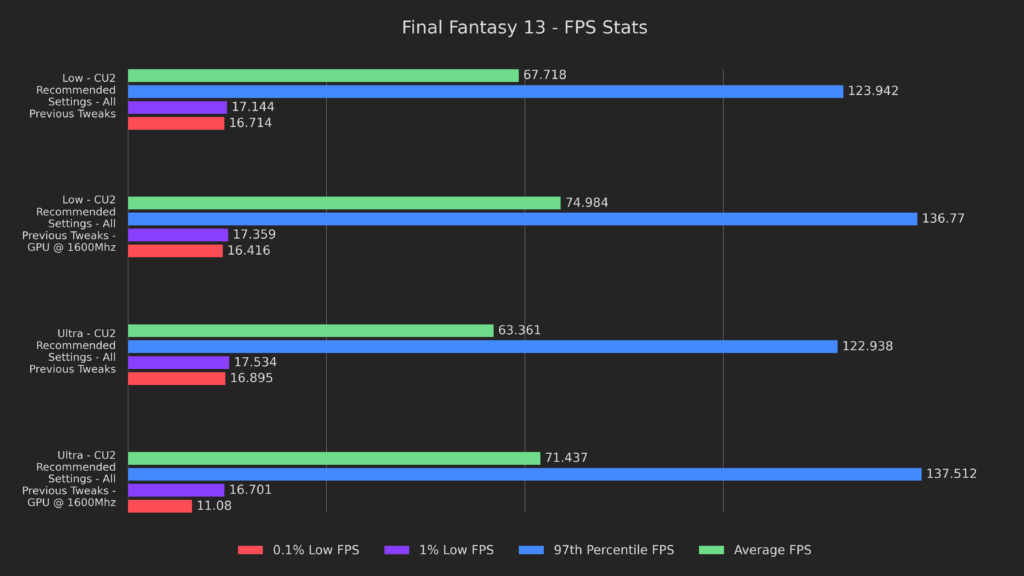
Averages rose by 11% and 13%, and 97th percentile results rose by 10% and 12% for low and ultra respectively. Lows for the low preset were within margin of error, but lows for ultra were a decent amount worse.
So now that I've gotten really good baseline performance and nothing seems to help the lag spikes when getting into battle, I decided to try to push the game to the limit visually.
Making FF13 Gorgeous - Optional, but Recommended
I downloaded the Final Fantasy 13 HD project to a Windows computer with Final Fantasy 13 installed, then used the tools provided and the install guide to upscale all the assets. I then transferred the files over the ones installed to my Deck to install the mod on the deck itself.
I then did a similar process for the Final Fantasy 13 HD Full Motion Video mod and the Better Quality Audio for Pre-rendered Movies mod.
A tutorial is beyond the scope of this article, but the process was very simple by following the installation guides on the mod’s pages.
So with the mods installed, how did it run? Well, it ran almost the same.
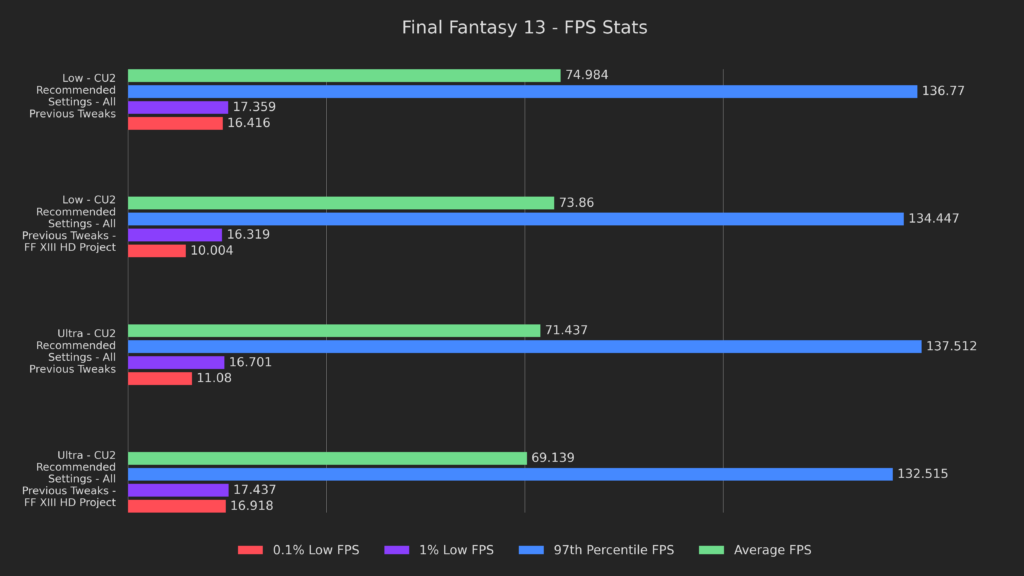
There were very minor decreases of 1-3% on averages, but they're still well over 60 FPS. So you might be asking why I would bother with this incredibly overkill mod for a 720p screen.
Because we don't have to settle for 720p.
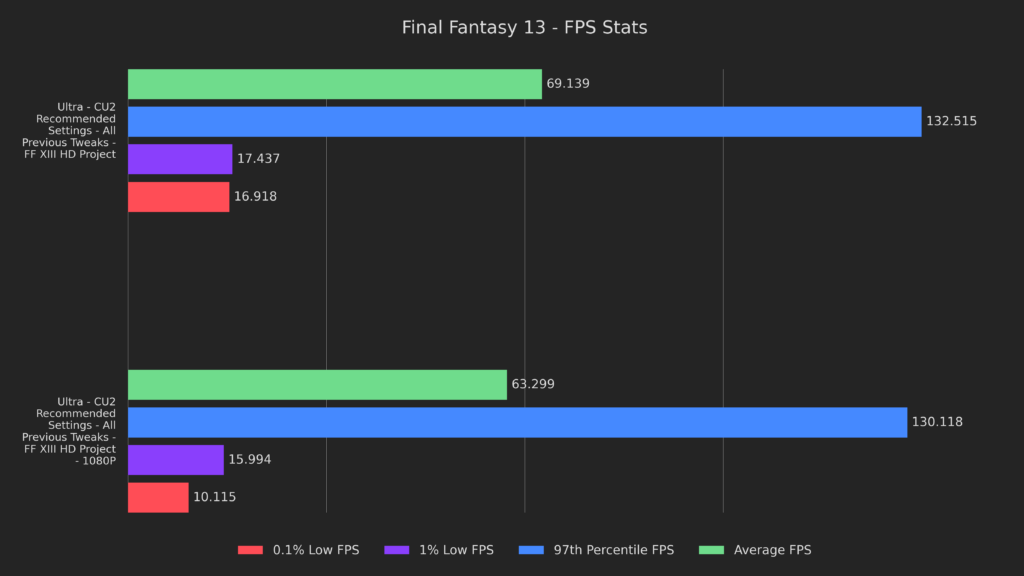
The 1080p results are still great, although it's definitely not a locked 60. If you're okay with limiting the frame rate a little lower, it looks amazing.
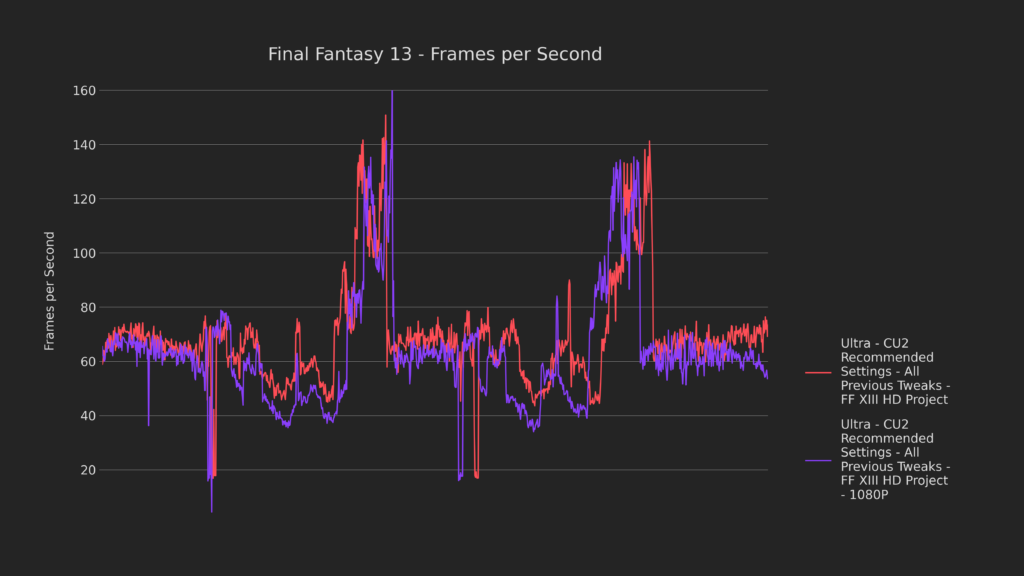
Here we can see that FPS is always over 30, with the exception of getting into battles. Aside from that, it's even above 40 most of the time and stays at 60 or above during about half of the game play.
So, 1080p looks great, but we still don't really use the full benefit of the 4K mod, right?
That's why we're gonna play in 4K.
To make this work I needed to lower MSAA in the launcher to 4x, and the shadows to 4096. The stutter is a bit worse, but let's do a quick comparison.
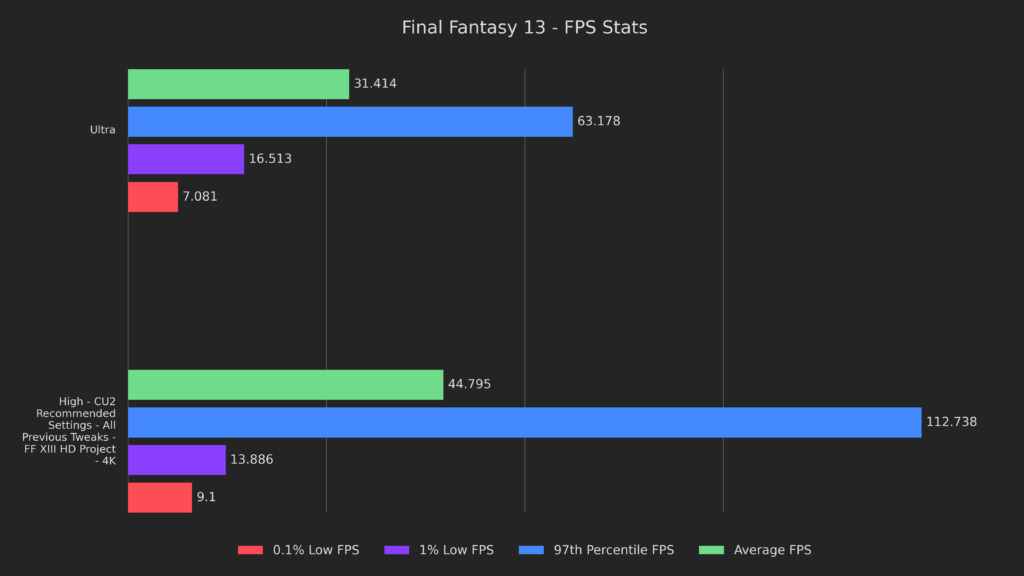
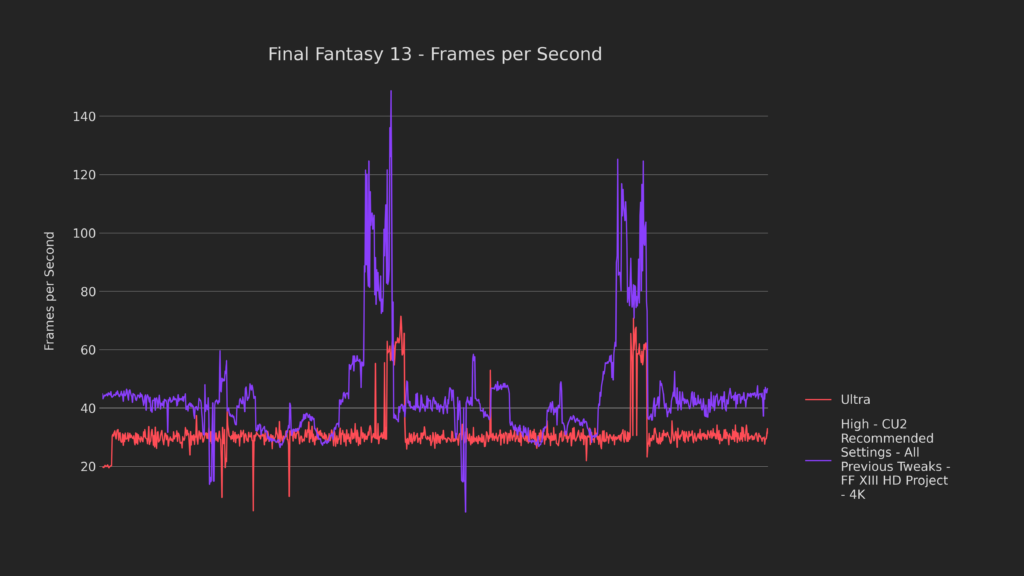
Compared to our original baseline, you can see that we're running much better than default while pushing nine times as many pixels. Averages are 43% better, 97th percentile are 78% better and 0.1% lows are 29% better. The only facet that's worse is the 1% lows, which take a 16% hit. Comparing frames over time, you can see that the tweaked 4K version runs better at nearly all times with the exception of transitions into battle, which don't obstruct the flow of gameplay.
Let's do a quick visual comparison of the stock gameplay versus our tweaked version.
(Images showing visual comparison)
Hopefully you can see just how far we've been able to push this gane. As always, here's a list of other things I've tried:
- Zram and Zswap had identical performance.
- CPU pinning at 2, 2.2, 2.4, 2.6, 2.8, 3, 3.2, 3.4, and 3.5 gigahertz had degraded performance.
- GPU Pinning at 800, 1000, 1200 and 1400 megahertz had degraded to identical performance.
- Using 1, 2, 3, 4, 5, 6, and 7 CPU threads, aside from SMT manipulation, had degraded performance.
- And fan curve tuning had identical performance.
Alright, now that we have all the testing done, let's get into the presets.
The Presets
I have two special notes for them:
First, all of them will experience drops when loading into battle or the very first time you see in effect. As you play, drops from effects will become much less frequent, but drops when getting into battle seem to be inevitable.
Second, there seems to be a drop in FPS when an interact icon is on screen. The only solution I've found is to cap MSAA to 8x. The fidelity doesn't take a very big hit and it prevents the issue entirely.
Battery Saver Preset
If you want the battery to last long enough to watch a single cutscene in Final Fantasy 13, these settings will be best for you.
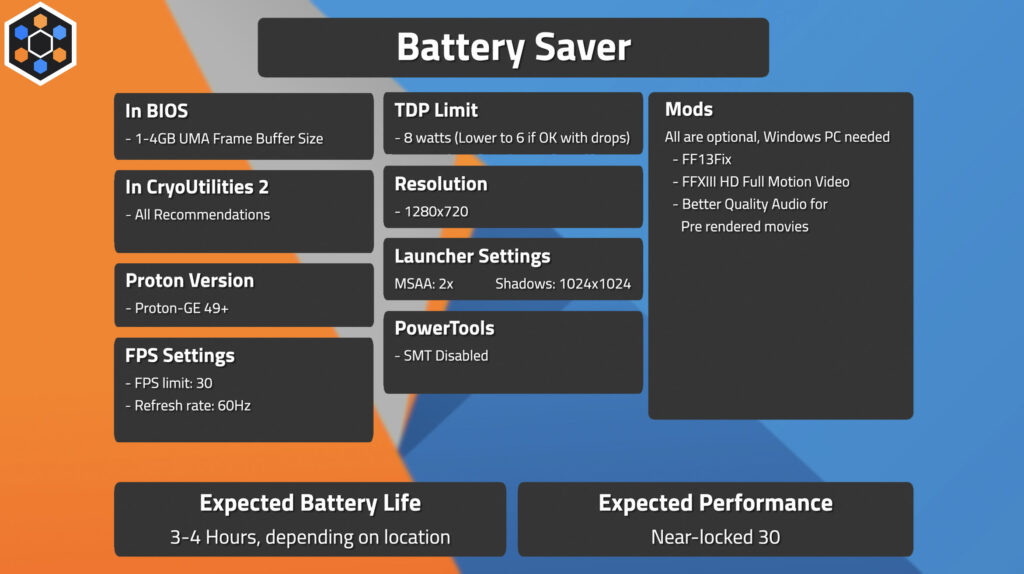
The expected performance is a locked 30 with drops during transitions, and the expected battery life is 3-4 hours, depending on location.
Smoothest Preset
If you want to feel as smooth as Macaulay Culkin's face from that one scene In Home Alone, use these settings.
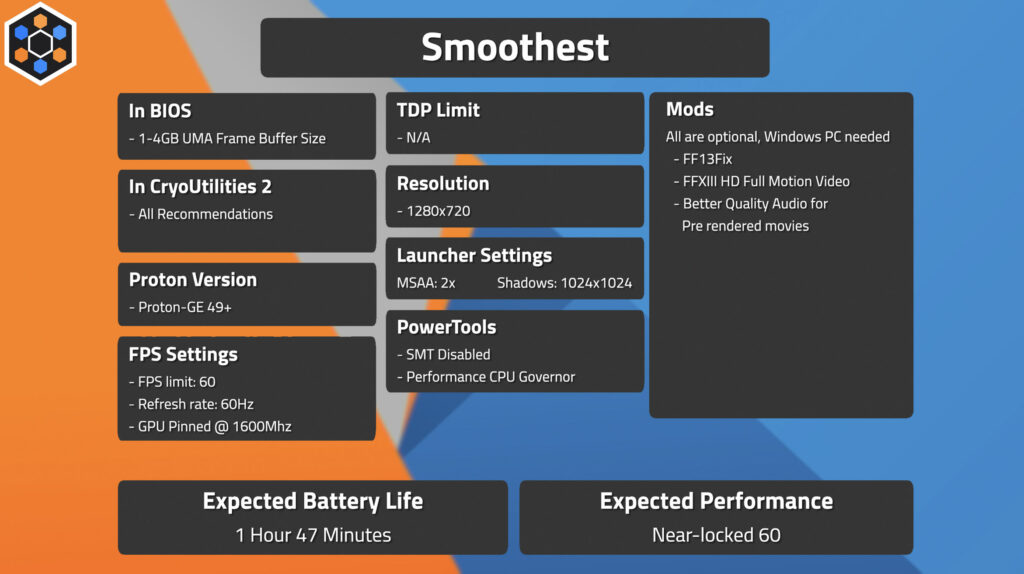
The expected performance is a near locked 60 with drops during transitions, and the expected battery life is 1 hour and 47 minutes.
Recommended Preset
If you want your game to play better than the original and experience the full glory of female Cloud, use these settings.
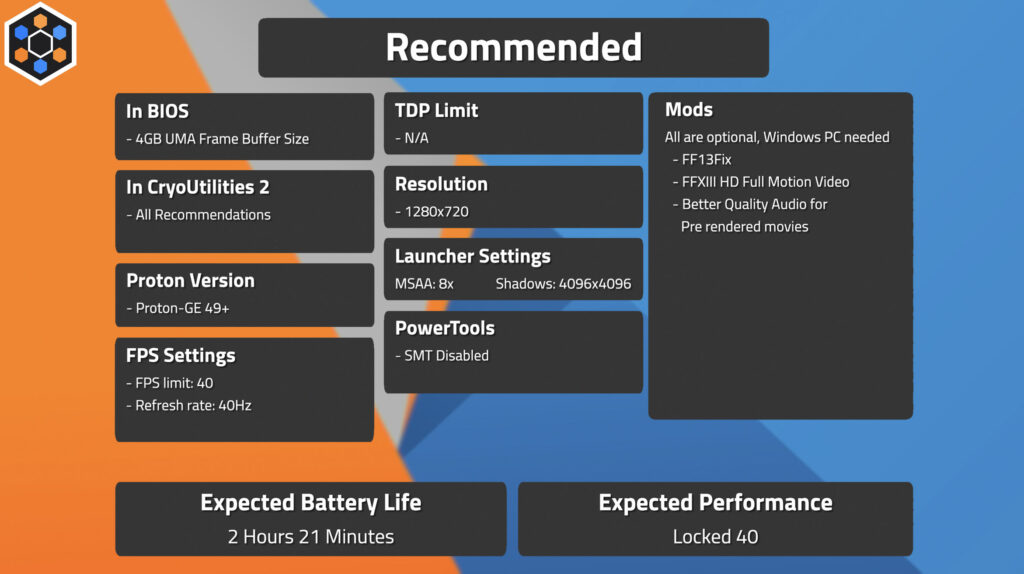
The expected performance is a locked 40 with drops during transitions, and the expected battery life is 2 hours and 21 minutes.
Docked 1080p Preset
If you wanna play the game and make it feel as young as you wish you did, use the settings on screen now.
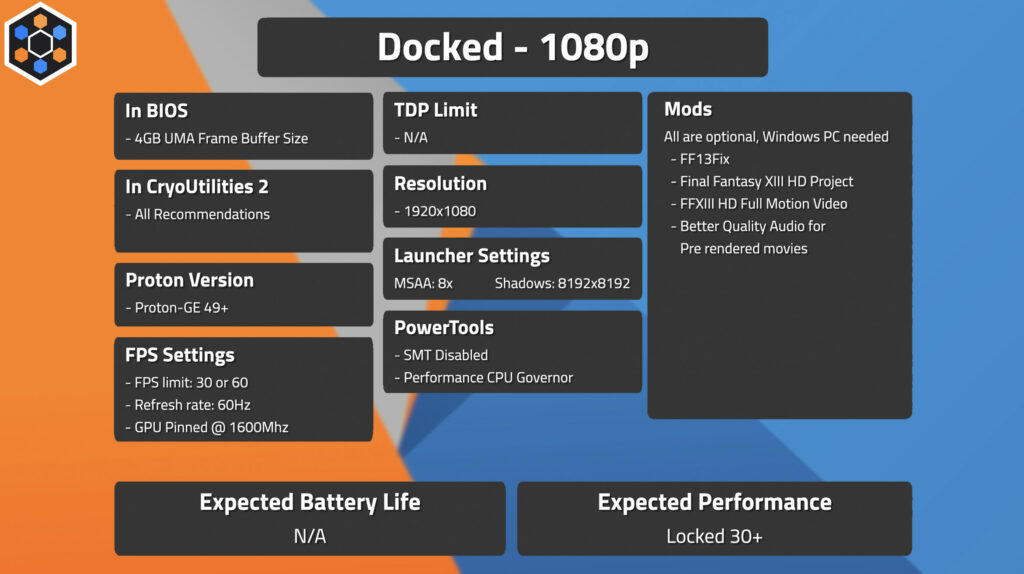
The expected performance is a locked 30 if you choose a 30 FPS limit, or a near 60 if you choose a 60 FPS limit with drops during transitions.
4K docked preset.
If you wanna experience a 13 year old game, like it just walked down the catwalk, use these settings.
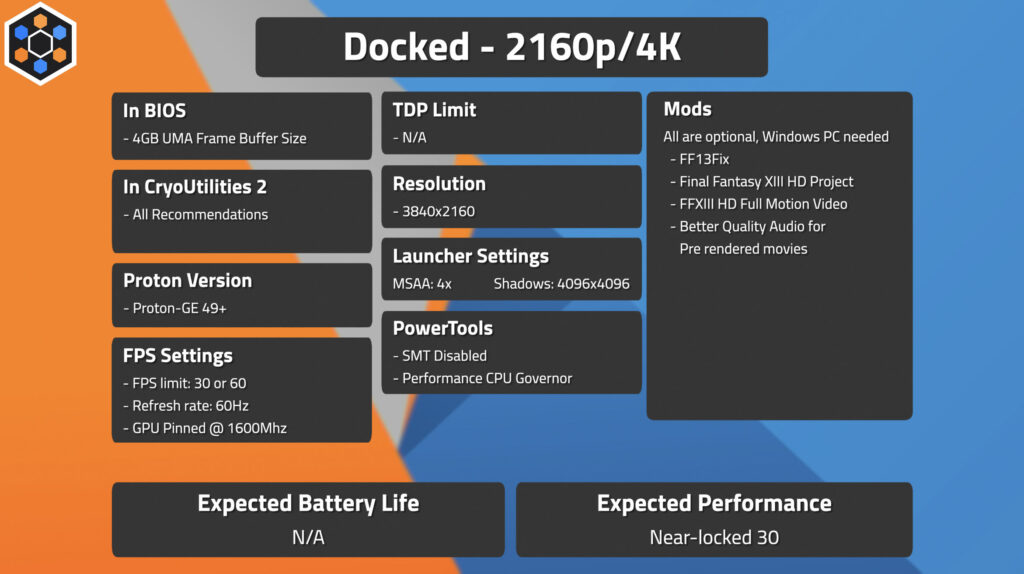
The expected performance is a locked 30 with drops during transitions.
Thank you to everyone for reading my first article on SDHQ! I’m very excited to be able to create written-form content with the help of Noah, and help even more people play the games they want!
If you want to see a video where I push another game to be better-than-default, consider watching my video on Breath of the Wild.
If you’re interested in supporting me or my work, then please consider watching my YouTube channel! or donating to my Patreon to get exclusive benefits, including early access!



For lighting returns where exactly in the files did I put the pcfix
I don't have the game installed anymore, but it should be in /SOMETHING_data/prog/win/bin. I forget the codename, but FFXIII is white_data and XIII-2 is alba_data.
Once you use the Cryoutilities application, if you later upgrade your operating system SteamOs do you have to reconfigure all over again using Cryoutilities? or the settings remain?
The settings should remain as far as I am aware, but I will check with Cryobyte33 to confirm.
Awesome work. I will definitely try FF13 on the Deck after I finish some games this summer. Hopefully you can try out XII-2 and Lighting returns.
Thanks for reading the article! I seem to have missed it here, but posted in the YT description, that I actually tested 13-2 and Lightning Returns as well!
It was a brief sanity check since I want to re-experience the trilogy as a whole, but both ran great with the same set of tweaks 🙂
Finally the type of review I was expecting. Been a bit disapointed with this site lately as the methodology seemed very superficial. this is what I was expecting. eagerly waiting for more.
Hi there! Would you be willing to explain why it feels superficial? I would be happy to answer some questions you may have about our methodology!
Awesome work on this, welcome to the team! The ability to squeeze so much out of this port in particular is mad impressive, you're definitely built different.
One thing you mentioned on the YT video was that this should work with 13-2 and Lightning Returns as well. For Lightning Returns in particular, have you sussed out a way to turn off the FPS cap on the Steam deck? it's 30 by default and the only way to adjust that is through the menu you can't reach on the deck itself.
Hey, thanks for reading!
I only tested Lightning Returns very briefly since I want to re-experience the entire trilogy and never beat it prior, but I was able to hit a pretty solid 60 with everything set to my recommendations in the article.
FF13Fix doesn't mention it on the homepage, but there's actually an open issue* saying that it works on Lightning Returns, albeit with a few bugs that I didn't notice during my testing.
* https://github.com/rebtd7/FF13Fix/issues/45
Thanks for the response, I'll have to check it out! I suppose unlocking the 60fps to begin with would be in the portion where we adjust the ini, then?
Correct, I just copied the same .ini and .dll that I used for 13 over to the other games. Curiously, PCGamingWiki lists LR as a 60 FPS game, so I'm not sure if that's a bug or not, though.