Do you have a Steam Deck? Do you own Minecraft? Do you want to play said game on said device? Well follow our guide and now you can!
This guide will get you running on the latest version of Minecraft Java Edition, complete with working controls for your Steam Deck.
Installing Minecraft:
The first thing you need to do is switch over to Desktop mode. Here, you'll want to boot up the "Discover" store and search for "Prism Launcher", this is an application that handles installing Minecraft for you, and it's a really handy tool. So go ahead and install it.
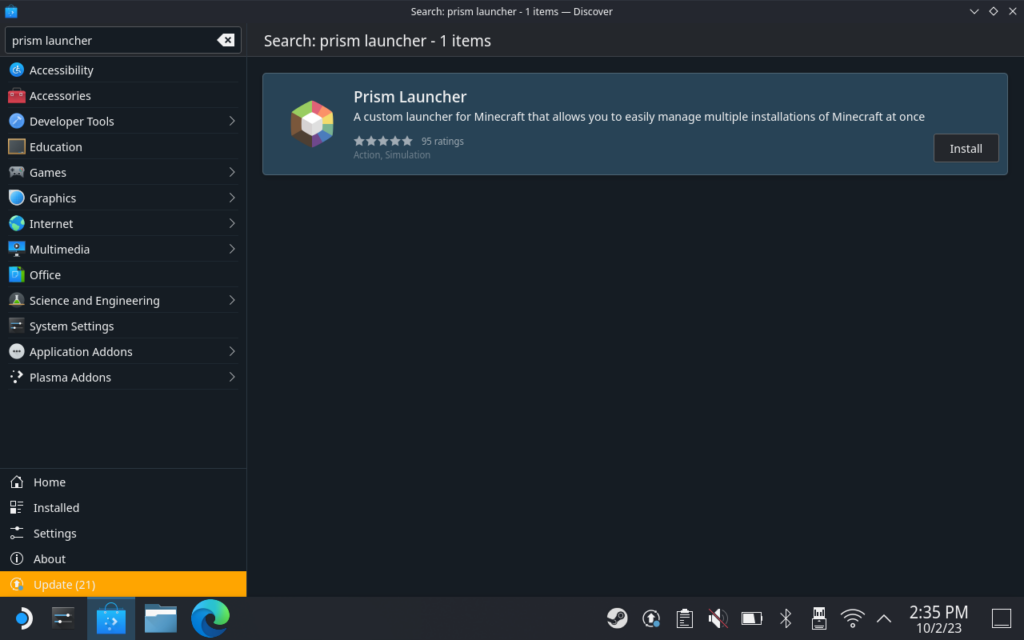
After Prism has been installed, go ahead and launch it (It'll be under "Games" in your applications/start menu).
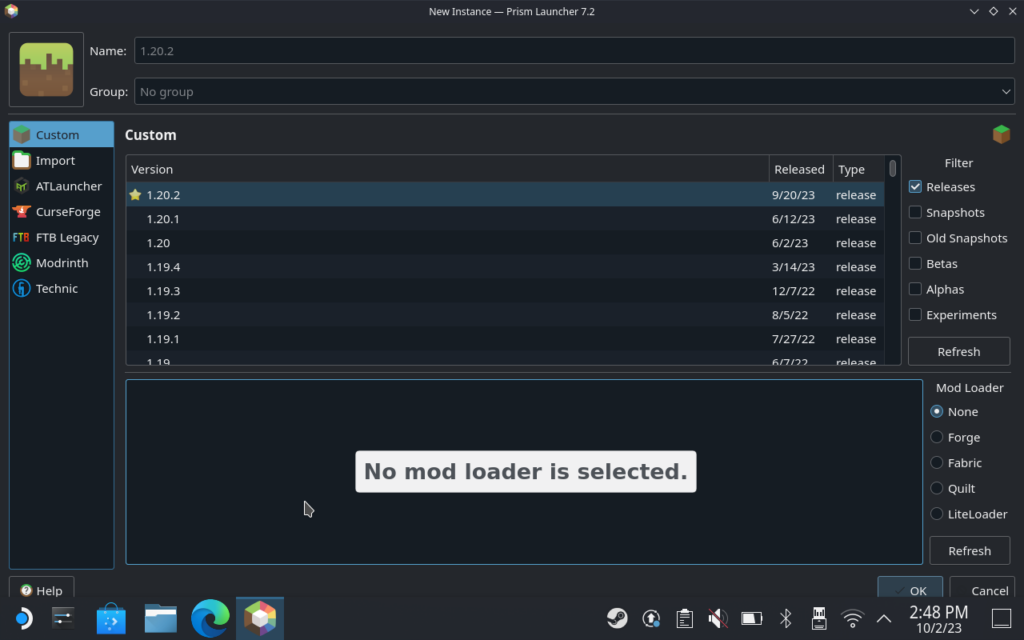
Once Prism has booted, click on the "Add Instance" button at the top right, at this point, you'll be asked what version of Minecraft you want to install, and any mod launchers you want as well. This guide is just dealing with the latest Vanilla version, so select that for now for click on "OK".
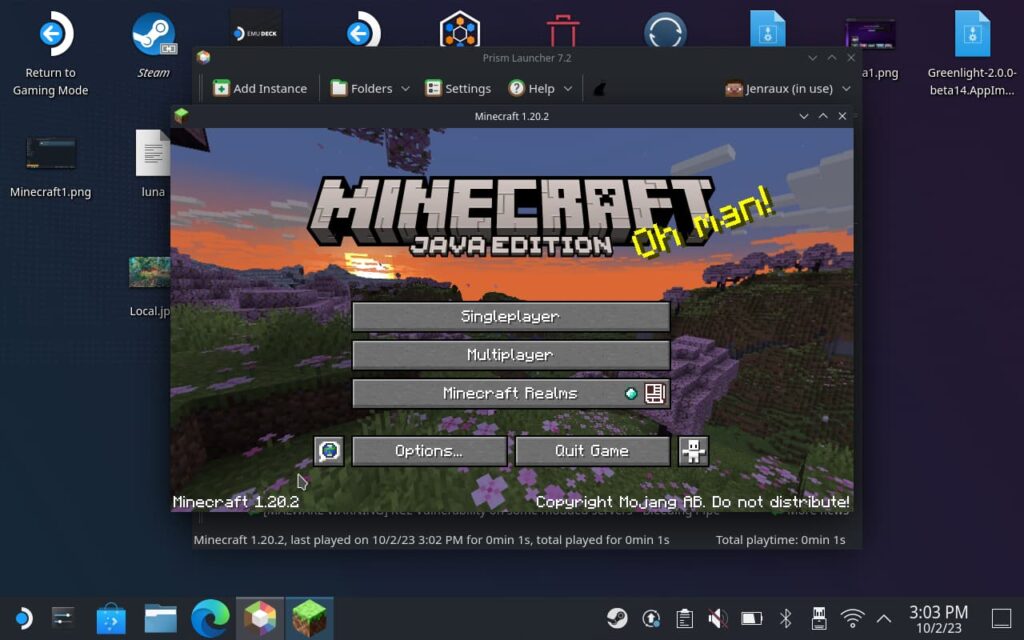
You'll be taken back to the main Prism screen, select the instance you just added, and hit the "Launch" button on the right-hand side. At this point, you will be asked to add your Microsoft account to the launcher so it can verify that you own the game. Select "Yes" to open the Account Manager, and click on "Add Microsoft" at the top right, then follow the steps it gives you. After completing the sign-in process, you can close the account manager, and Minecraft should install and boot.
Configuring Minecraft:
We haven't got the game fully configured yet, so exit the game once you reach the main menu.
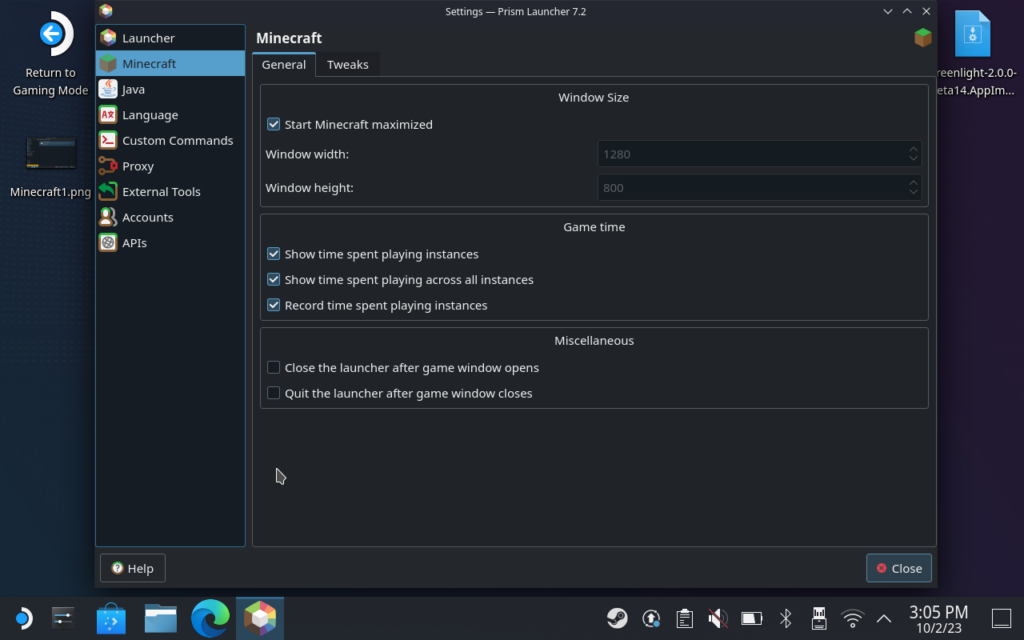
Click the "Settings" button in Prism Launcher and navigate to "Minecraft", make sure the "Start Minecraft Maximized" is ticked.
Back on the main screen of Prism, go over to the right side, click on the "Create Shortcut" button, and put a shortcut to the instance on your desktop. Once the shortcut has been created on your desktop, right-click it and click on "Add To Steam".
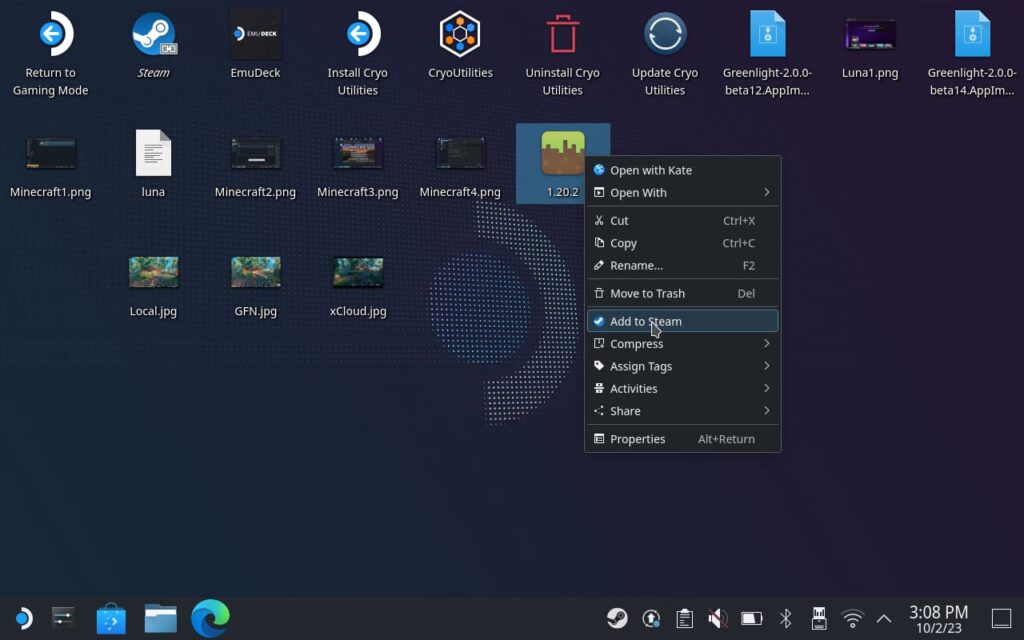
Unfortunately, this just gets added to Steam as whatever version that you installed, which in our case is "1.20.2". So go into Steam and rename the game as "Minecraft" in the game properties.
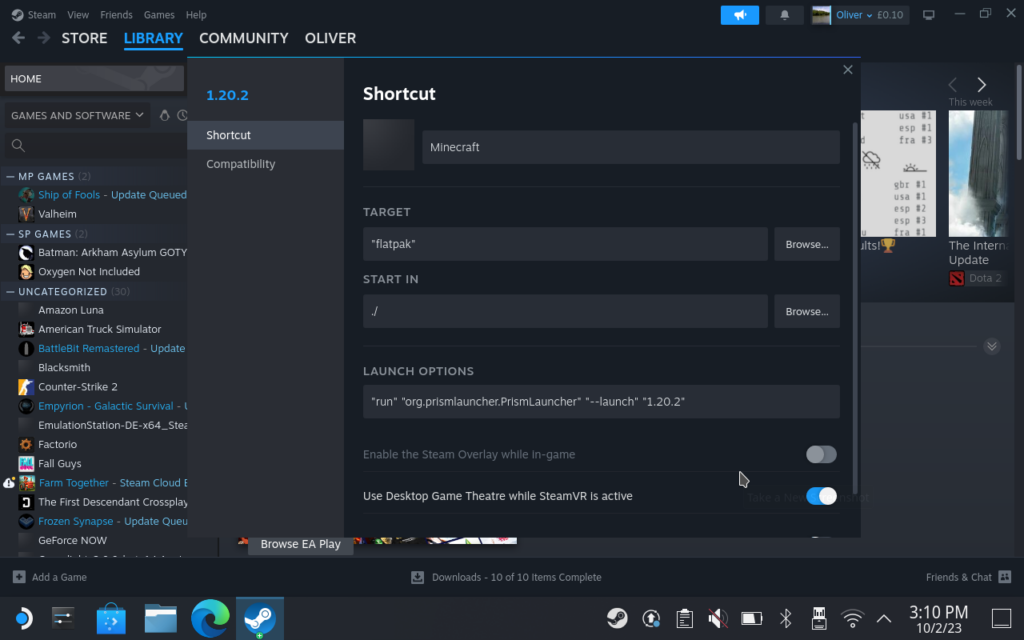
We're done in Desktop mode and almost ready to start playing, so return your Steam Deck back to Gaming Mode to finish the setup.
Controller Setup:
Now we're in Gaming Mode, navigate over to your "Non-Steam" tab in your library and click on the Minecraft shortcut you made. Click on the controller icon to open Steam Input, click on your layout to open up the layout finder, then go to the "Community Layouts" tab and find "Minecraft (SDHQ Recommended)", this is a controller layout we've made to aid Steam Deck users. Download and apply it.
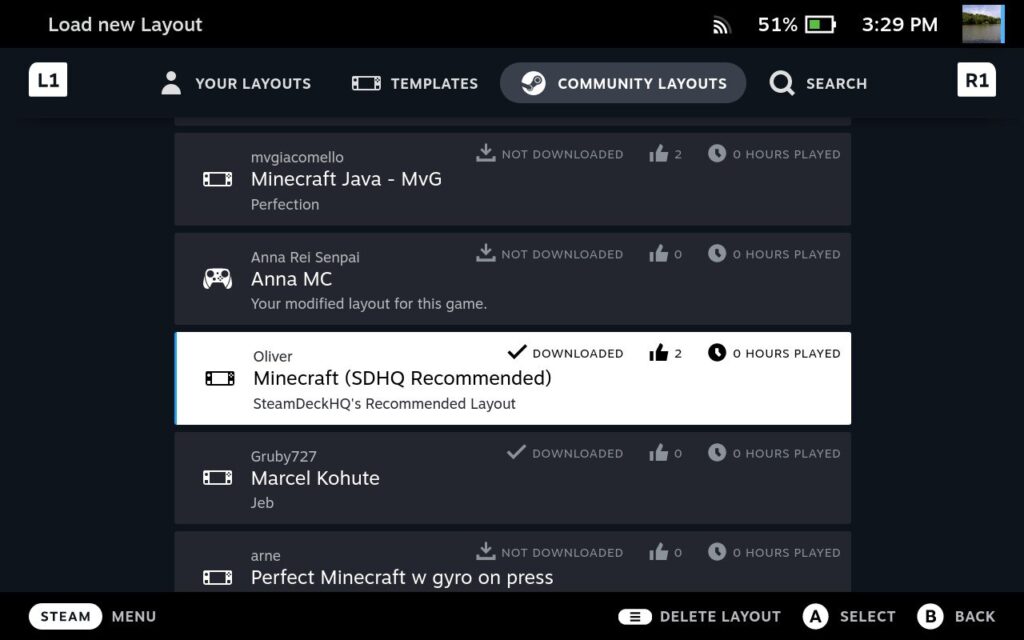
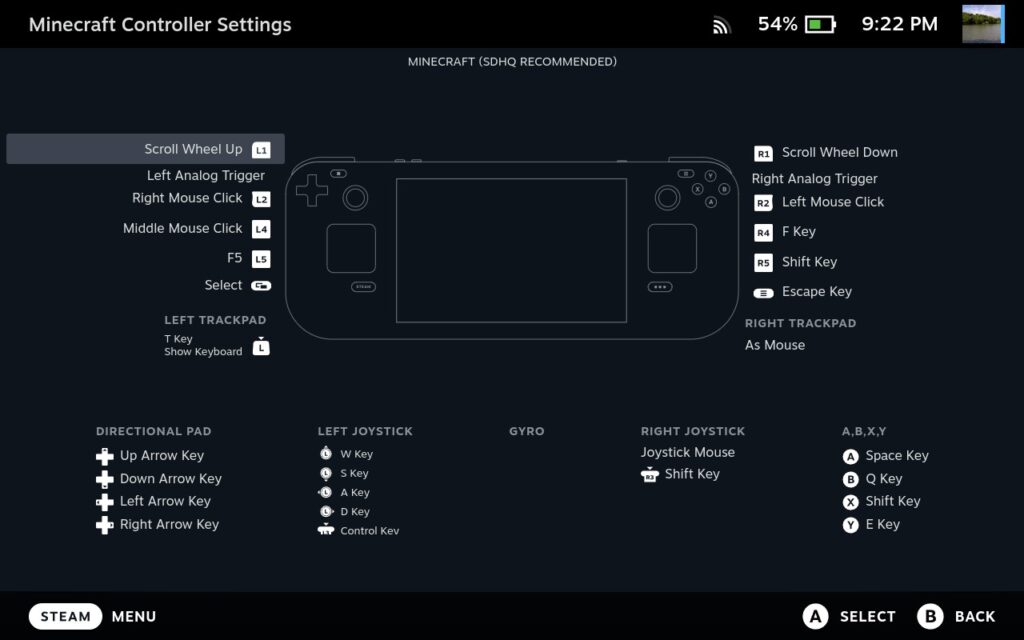
In case the layout isn't visible (which seems to often be the case for Non-Steam games), here's an image of the layout, so you can copy it yourself if you wish, or you could try another community layout depending on which appear for you:
Playing Minecraft:
Now you've done all that, head back to your library and boot the game via the shortcut, it should boot you up into the main menu and your Steam Deck controls should now work just fine to navigate the menus and play the game! You can press the left touchpad to open up chat and the on-screen keyboard. We've tried to keep the controls somewhat similar to the Xbox console control layout so it's familiar to people. Overall I found the experience very playable!
Conclusion:
We're always looking for ways to improve things for handheld users, so if we find better ways of doing this or a better control scheme, we'll let you know! For now, though, we had great success using this method and we can confirm that you can connect to multiplayer vanilla servers just fine. We didn't try modded servers, but we imagine with some tweaks in the Prism Launcher, you could play on those too.
We hope you found this guide helpful, if you're stuck at any part or think that this guide could be improved, feel free to leave a comment and we'll try and help you out!
If you enjoyed this article, check out the rest of the content on SteamDeckHQ! We have a wide variety of game reviews and news that are sure to help your gaming experience. Whether you're looking for news, tips and tutorials, game settings and reviews, or just want to stay up-to-date on the latest trends, we've got your




Great guide, thanks a lot. Had to do the controller layout from your image as it didn't appear in search as you said it might. I didn't realize at first either that I needed to add an extra command for the left trackpad ('T' key and 'Show Keyboard' system command). But anyway appreciate the guide!
Nevermind I probably did not have "All Applications" selected on the left when I searched. Double fml
CARRY ON FOLKS
Huh, I'm trying this at the end of December 2024 (about a year after article written) and I'm not seeing anything come up for Prism Launcher in the store. fml
Hey. Thanks for the amazing guide. I followed it 1 to 1 and had an easy time understanding every step. Which i think is always hard in written guides. Hat off to that.
The only problem is just that i couldnt find your controller layout and no matter what layout i use, the game doesnt detect the steam layout. When i start the game from Big Picture mode. BP minimizes and opens the game, but i cant control MC because all the inputs still control BP-Mode in the background. (i have to keep pressing the steam button so it even registers my mouse input.
When i start it from Desktop mode, it doesnt pick up my layout and i end up with weird controls that dont line up with the activated layout in Steam. I also cant move here and my button presses keep activating things that are bound to desktop mode, like opening the start menu when i press a certain button.
And in both cases the game starts in windowed mode, even though i have checked the option in the settings.
All in all it really doesnt seem to work for me.
Hi, glad you enjoyed the guide.
The controller layout on non-Steam games is a bit dodgy and for the most part doesn't work, sadly.
As for the game not recognizing the controller, do you mean you are playing in SteamOS mode on your Steam Deck when you say Big Picture? I'm slightly confused by what you mean that it's playing in a window, as that's usually not discernible in the Game Mode.
With Big Picture mode i mean the Gaming mode. Where you change the layout.
I have tried starting the game in both modes but have issues either way.
When i lauch the game from desktop mode it atleast lets me use my trackpad/mouse. But both modes dont recognise the steam controller layout sadly.
Maybe you have some tips.
I'm unsure of what's wrong. I just reinstalled Prism and a new copy of Minecraft following the guide and it still works fine for me.
Given that the Steam Deck is controlling Steam whilst Minecraft is booted, it sounds more like a software/SteamOS issue. You could try rebooting your Steam Deck and seeing if you get any joy with that.
I found the issue.
I wasnt very used to the desktop mode (or using the Steam Deck in general). When pressing the Steam button, the game booted me into Big Picture mode, which i just assumed to be the gaming mode. But inside Big Picture I had the problems I stated before.
The solution was to not launch Big Picture mode but rather to "return to gaming mode" which i just overlooked on the desktop.
From there the game launched perfectly.
Thanks for the good guide. I guess my comment serves as some extra information for the next guy that runs into this problem.
Awww, I'm glad you got it sorted! I hope you enjoy playing Minecraft!
Heyo, thanks for the guide. I was curious if there's a way to specifically install Minecraft to the MicroSD card instead of internal storage on the Deck? Or if it's really as simple as moving the install folder to the SD card?
Hmmm, I haven't tried it on an SD card, but it might work.
You can adjust your "Instances" folder in the Settings Menu for Prism Launcher, you might be able to select your SD card in there, although there's a warning about Flatpak's only getting temporary access to directories like that, and it tells you to do something with Flatseal, which I'm not familiar with.
You might want to look into that to see if it works.
THANK U SO MUCH BRO
Sup, Oliver.
I tried this, but your controller layout couldn't be found. I used another, and though I can look around in minecraft, i can't walk at all.
How did you get this to work without a mod?
Hi Plus,
Unfortunately controller layouts on Steam seem to be very temperamental when it comes to non-Steam games.
All I had to do to be able to walk around was map the WASD keys to my left analog stick. W for Up, D for Right, etc.
I've edited the guide with an image of the controller layout I use, if worst comes to worst, you could manually copy it from the image.
Another option to play with controller (since Java version doesn't have support) is to, instead of playing vanilla, add Curse Forge and use a mode like Midnight Controller. That way, you'll have an unquestionably better experience (unless you are playing a heavily modded version that requires random hotkeys).
Hadn't heard of that mod before, but it looks good.
The only mods I was able to find were all from 4-5 years ago and were long broken.
I use mcpelauncher (Minecraft Bedrock Launcher).
This app run android version.
Not heard of that before, but it's an interesting project.
Yes. Amazing project.
Easy way to use Minecraft on Linux and very cheap.