Hey everyone, today we’re putting the Steam Deck through extensive thermal testing, from the stock configuration all the way through new thermal materials, backplates and external fans!
For backplates we have the stock backplate, the new JSAUX backplate with a fan vent, and the old JSAUX backplate with a metal panel. For thermal interface materials I’ll be testing the stock thermal paste, the Noctua NT-H1 paste, and a Honeywell PTM7950 thermal pad. As for additional accessories, I’ll be testing both the JSAUX clip-on fan and the JSAUX magnetic cooling fan.
As a full disclosure, the JSAUX products were all sent to me free of charge, but no money changed hands and they don’t even know that this review is being made. Those who’ve been around for a while know that I don’t pull any punches when reviewing products, and you’ll see some of that in this article too, so make sure to read on!
The thermal pad and paste were purchased by me out of my own pocket.
Testing Methodology
All tests were performed with a Q1 2023 Steam Deck, originally a 256GB model and upgraded to a 1TB SSD, in an ambient temperature of 18C. If you have any concerns about the performance implications of the SSD over the base model, check out my previous video to see exactly why I chose to stick with this one!
The Deck ran SteamOS 3.4.8, and the games tested were Horizon Zero Dawn, Cyberpunk 2077 and Returnal. For each game, I would start the game, run the in-game benchmark, return to the menu and then run another benchmark, logging the results for the second one to give the worst case thermally.
In addition to these 3 games, I also did 30 minute burn-in testing using Unigine Superposition for each and every configuration. I ran the native Linux version of Superposition, and while it performed poorly, it was able to utilize both the CPU and GPU well enough to simulate an extended gaming session. In the interest of brevity, we will be focusing on the Returnal and Superposition results, and I’ll present the Cyberpunk and Horizon results for the winners at the end of the article.
All results were spot-checked by using GtkStressTest before moving on to the next batch, and the fan was left on the updated curve as I figure that more people use that on a daily basis.
Aside from the obvious performance and internal temperatures, I also tested noise levels and external temperatures.
Acoustic Testing
Noise levels were tested by placing my decibel meter roughly 1 foot, or 30cm, from the Deck in a dock, and running the Returnal benchmark. Recordings were taken of each test run, and each video was then used to grab 10 readings, one every 12 seconds of benchmark time, since the Returnal benchmark is exactly 2 minutes long. The noise readings were then averaged, and those are what you’ll see in this video.
As a note, these noise levels can vary in perception quite a bit, depending on the fan installed in your Deck.
My Deck has a Delta fan, which is known to be the fan with a much more abrasive frequency, and I can confirm as my other Deck has a Huaying fan, which sounds much more pleasant at the same volume. If you want to see which you have, go to Settings, System, then Hardware and look at the fan manufacturer in the page.
External Temperature Testing
External temperatures were measured using an IR thermometer. The same process was used as for the noise levels, but with the thermometer in view of the camera instead, pointing at 1 of 3 locations.
The first location, the rear vent, is meant to measure the heat of the intake grill, and should give us a good idea of the airflow into the Deck.
The second location, the back of the device, was taken from directly above the APU and should give a good idea of how much heat is being transferred off of the chip, as well as how uncomfortable the Deck will be to touch off the grips.
The third and final location, the top vent, will tell us how much heat is actually leaving the Deck.
With all 3 of these locations and the internal temperatures taken from the chip itself, we should be able to pinpoint where heat is getting held and whether we have adequate thermal transfer.
Clock Speeds
Lastly, for each hardware configuration, I tested both stock clocks and an overclock.
The overclock was with the CPU set to 4Ghz, the GPU set to 2Ghz and the wattage set to 20 watts. If you’re interested how I did this, then definitely check out the video below to see all my testing and directions on it!
OKAY, and with all of that said, let’s get into the actual testing, starting with a baseline using stock thermal paste and the stock backplate!
Stock Paste & Stock Backplate
Unigine Superposition

First up, I tested with Superposition’s 30 minute stress test. As you can see, CPU temperatures are exactly as you’d expect with a high overclock of 4Ghz.

GPU temperatures are also exactly as you’d expect over an extended period, touching 85C once and very often hitting 84C.

As a point of reference, here are the actual test results. Superposition runs very slowly, never breaking out of the single digits here, but it act as a phenomenal test for thermal saturation.
Next, let’s look at Returnal.
Returnal

Returnal gains a bit across the board from the overclock, making it much smoother, although still not hitting a solid 30.

CPU temperatures are HIGH, touching 92C right at the end of the test and 91 elsewhere on the OC.

The GPU is much the same, although it only hits 88C a few times throughout the testing.
Chassis Temperatures

Last for the baseline temperatures, here we can see that the temperatures are largely the same on both stock and overclock, except for the top vent. The stock numbers aren’t particularly worrying, with the temperatures above the SoC on the back being warm to the touch. This makes sense as the top vent is the Deck’s exhaust and it needs to remove much more heat.
That leads me to the next part of this story, noise levels.
Acoustics

Looking at the noise it generates gives us a fuller picture of what’s going on here.
To my understanding, this delta of 2.7 will result in a noise that is 2.7 times louder as perceived by the human ear, and it certainly sounded this way during testing. This means that the overclock is outputting much hotter air and also much more noise.
Speaking to the stock result, 39.6 dbA is definitely noticeable, according to the site decibelpro.app, it clocks in around a quiet library but nearly 10 times louder than a whisper.
Next, let’s move on to the next configuration!
Stock Paste + New JSAUX Backplate
The next round of tests were done with the newer style of JSAUX backplate installed. This backplate has additional thermal mass, a vent above the fan itself, and even interchangeable back paddles!
Installation was very easy, just 8 screws and a shim to open it up, then peel the protective plastic off of the thermal pad and close it.
Unigine Superposition
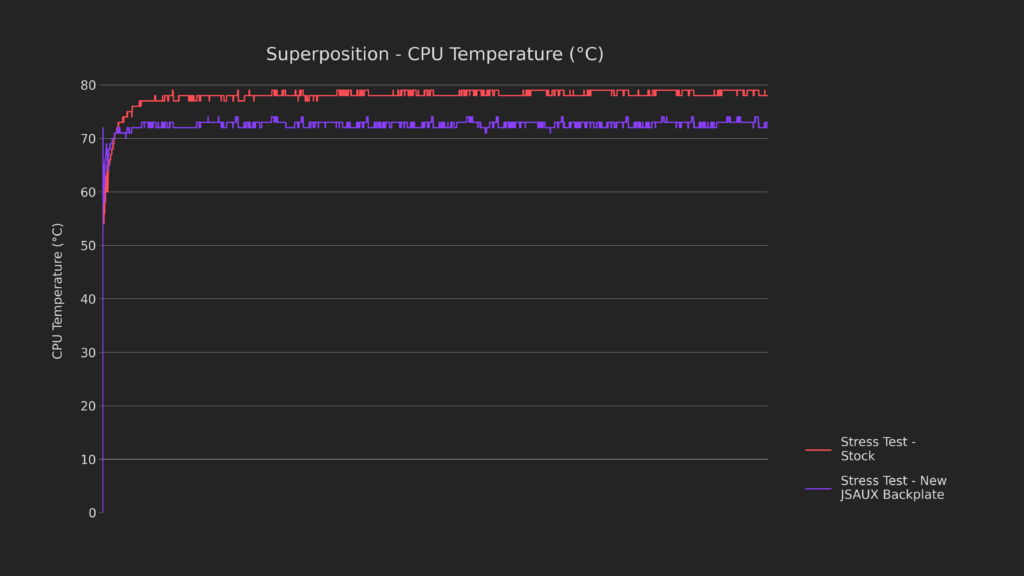
Looking at the thermal results for the CPU, the new JSAUX backplate averages about 5 degrees cooler at stock clocks, which is a HUGE jump.
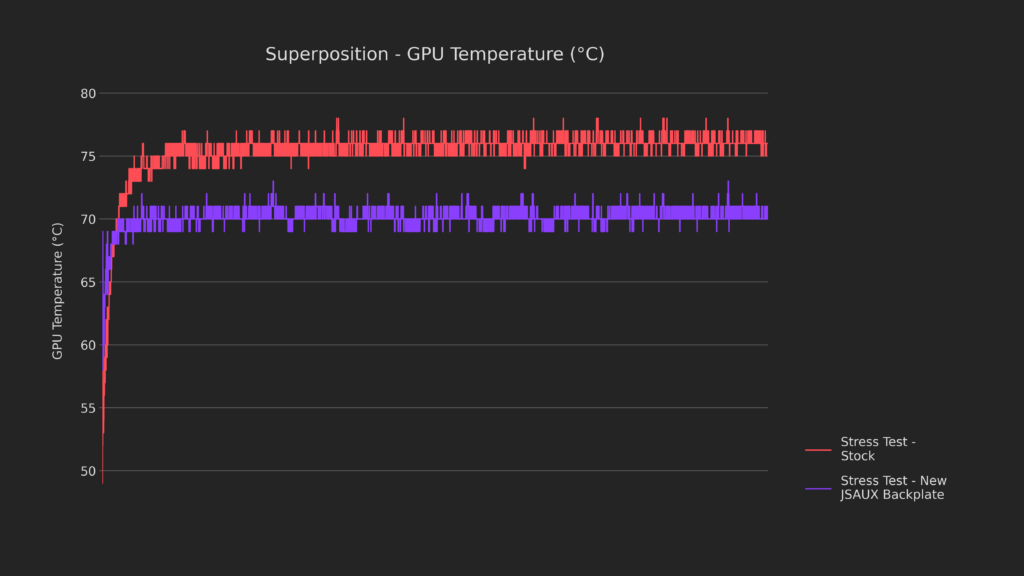
The GPU also lost 5-6C average with the new backplate, which again, is huge.
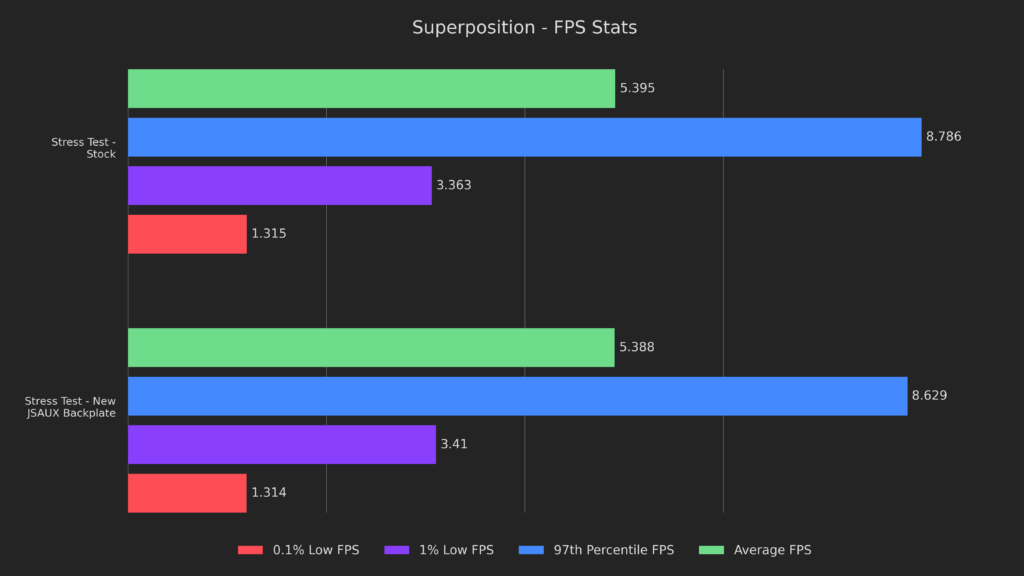
The difference in temperatures didn’t lead to any different results, but let’s see how it fares when overclocked.
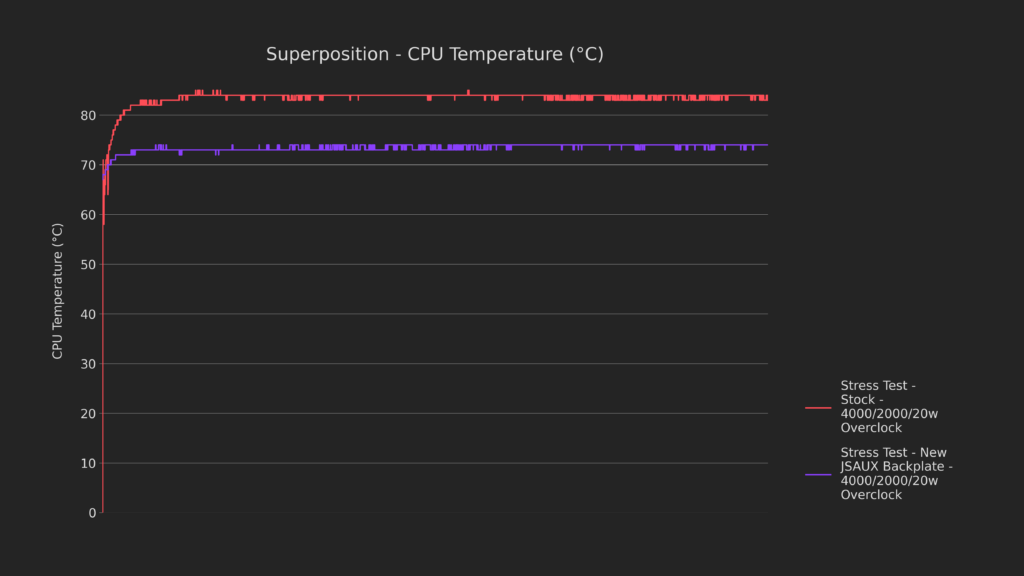
Surprisingly, the JSAUX backplate dropped temperatures from 84C average down to 73C, which is 11 entire degrees, it’s night and day!
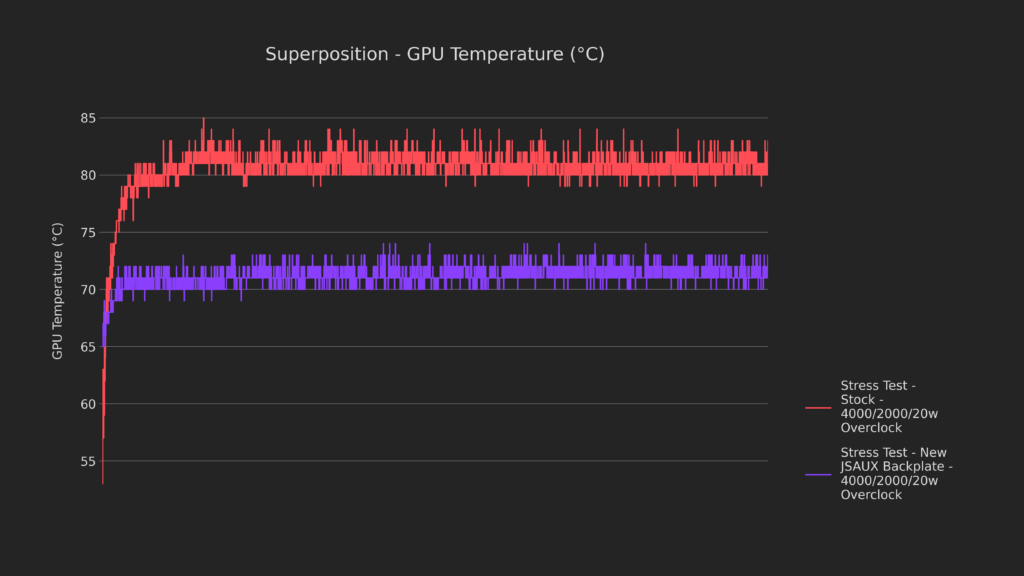
Again, I’m astounded by how much the temperatures dropped here. We went from 82C on the normal backplate all the way down to 72C with the new one, all while overclocked!
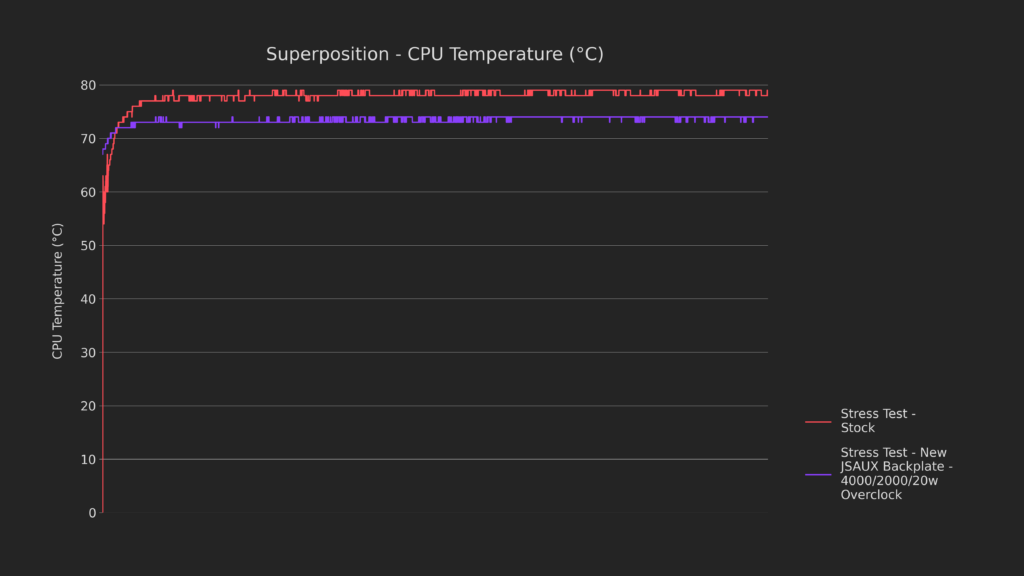
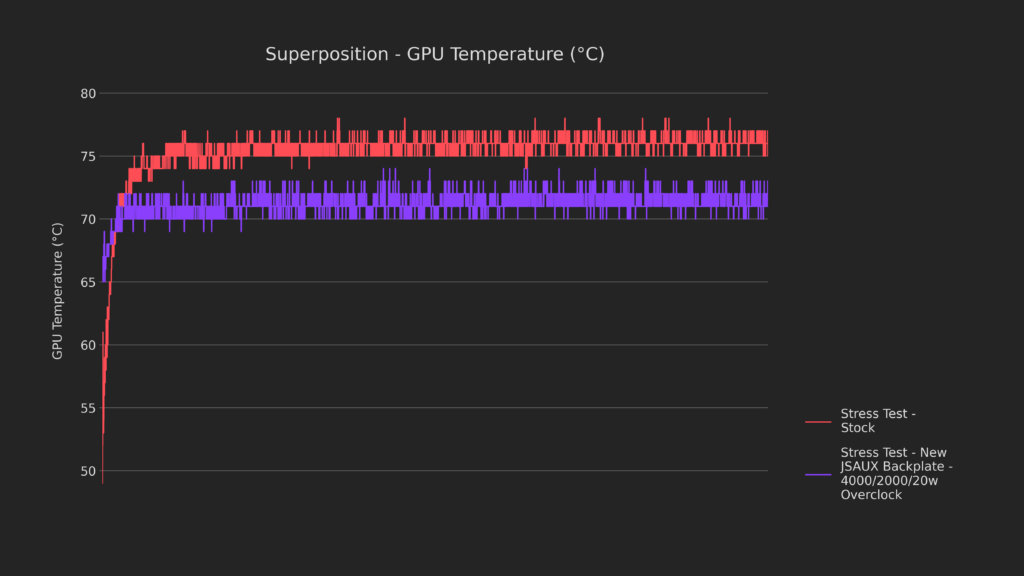
As if that wasn’t enough, the CPU AND GPU temperatures are both cooler while overclocked using the JSAUX backplate than at standard clocks when using the stock backplate!
Yes, 5 watts more into the APU is resulting in LOWER temperatures using the new backplate!
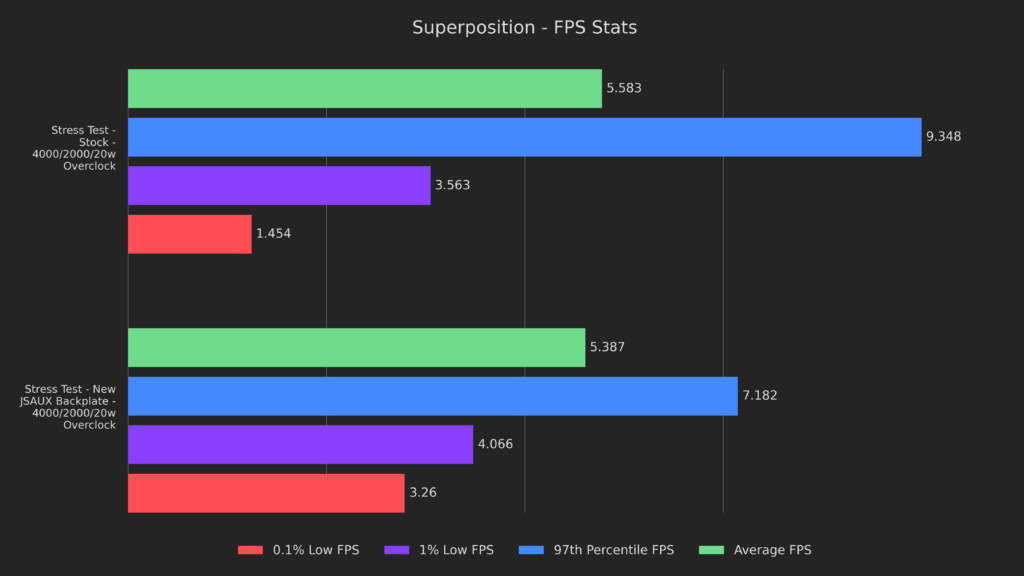
Lastly for Superposition, here we can see that while the 97th percentile decreased quite a bit, the 0.1% lows actually increased by 124%, over doubling the results with the stock backplate.
Returnal
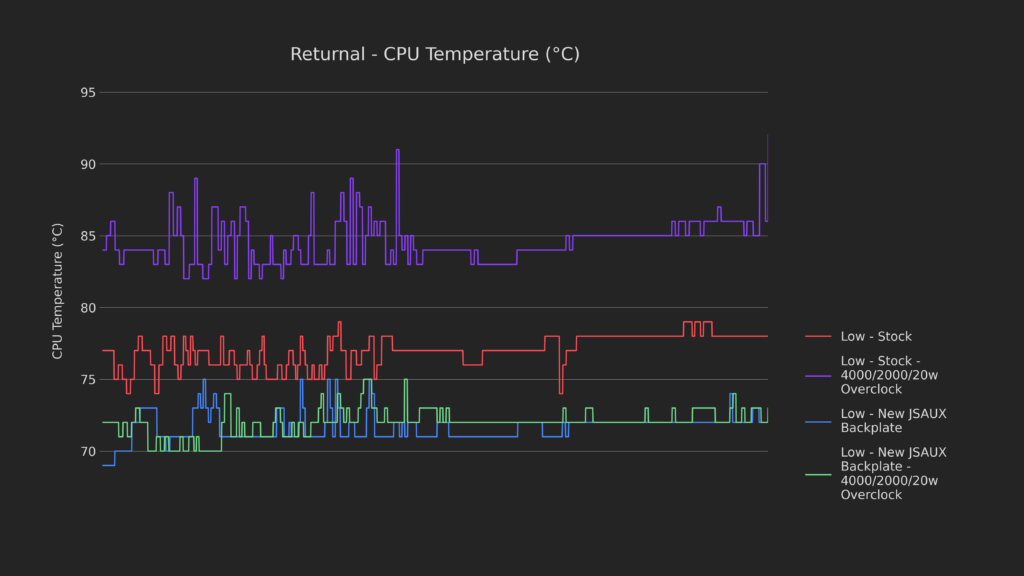
We can see that CPU temperatures are MUCH lower using the backplate, even being nearly identical despite a hefty overclock.
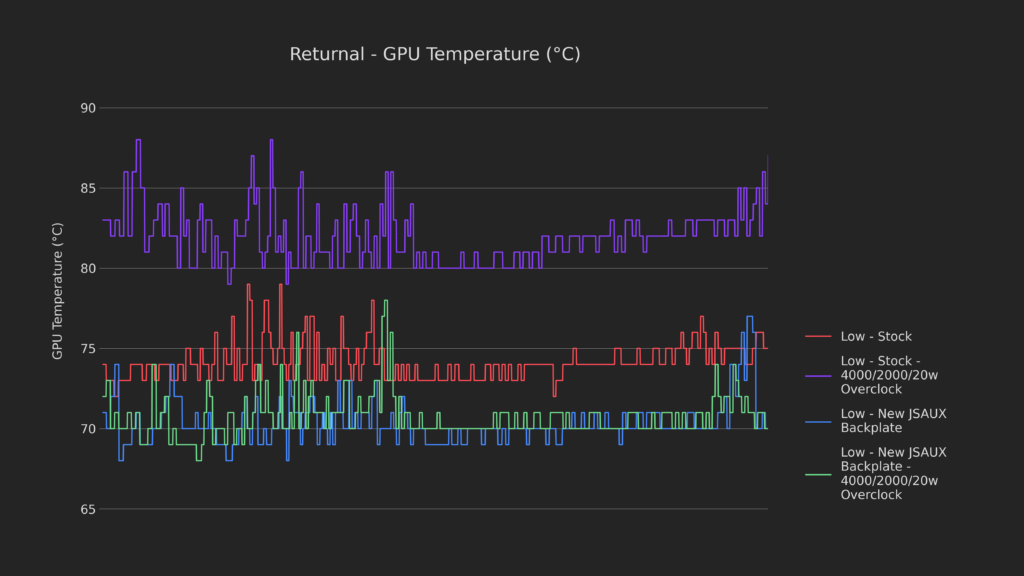
The GPU temperatures aren’t nearly as different, but the JSAUX backplate still keeps a healthy lead over the stock in all tests.
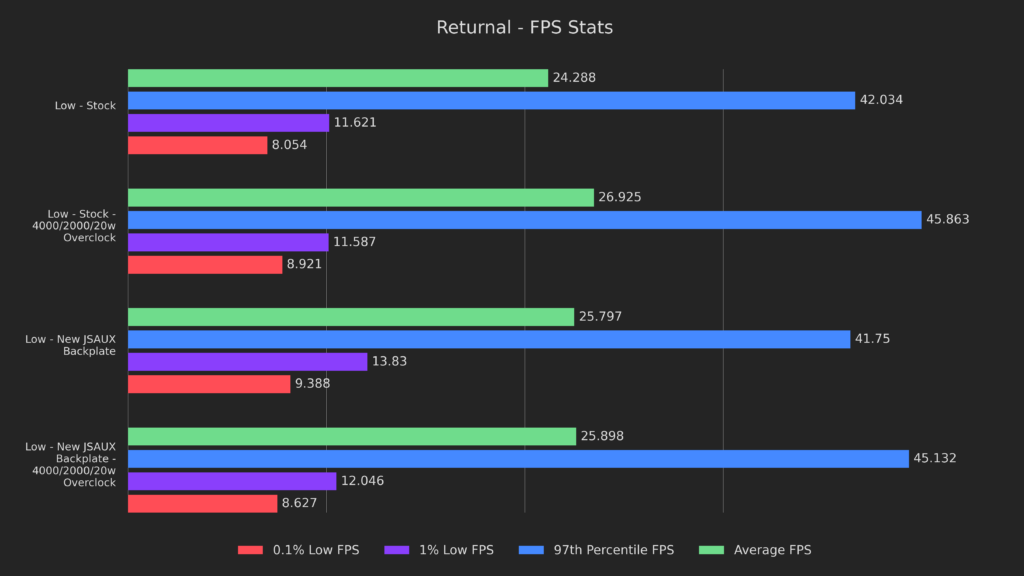
Looking at how performance is affected, we see something interesting.
Despite operating at the same stock clock speeds, the results with the new JSAUX backplate are 6% higher on averages, and the lows are 19 and 17% higher. The overclocking results are much closer, trading blows across the board, but at the expense of the stock backplate heating up much more as we saw before.
Chassis Temperatures
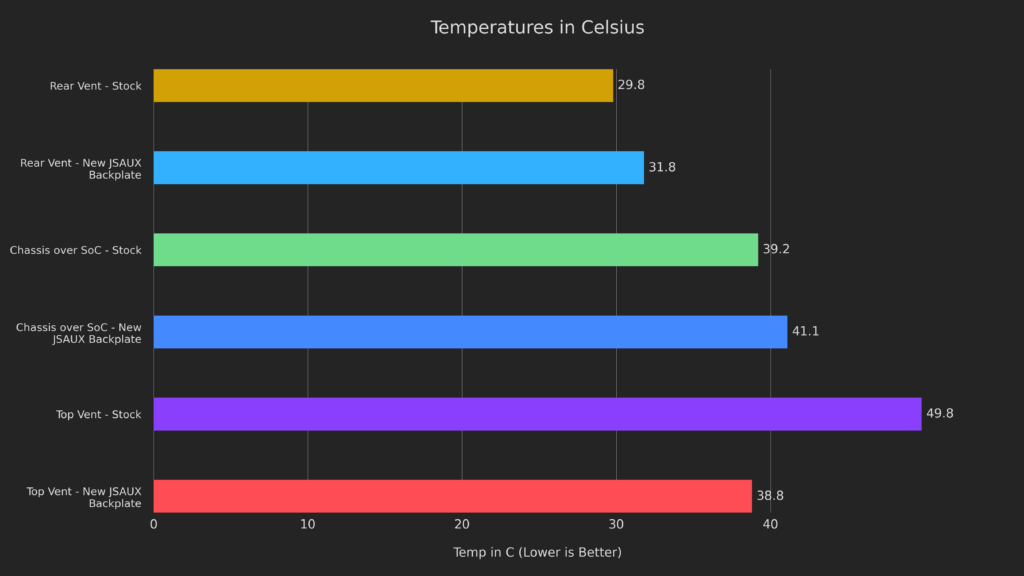
Moving on to the chassis temperatures, we can see that the JSAUX backplate runs a little hotter at both the rear vent and over the SoC. This is easily explained by the new vent over the fan, as it doesn’t force nearly as much air over that area of the internals and will build up a bit more heat prior to moving it away. The top vent, however, is a massive improvement on the JSAUX backplate, with a 22%, or 10 degree difference.
This is for 2 reasons. First, the fan getting so much cool air will make the exhaust that much cooler. Second, the fan is much closer to the exhaust, meaning that the air won’t need to travel over a ton of hot components to exhaust. This is both negative and positive, and I’ll definitely be going over some concerns with it at the end of this article.
For now, let’s move on to noise.
Acoustics
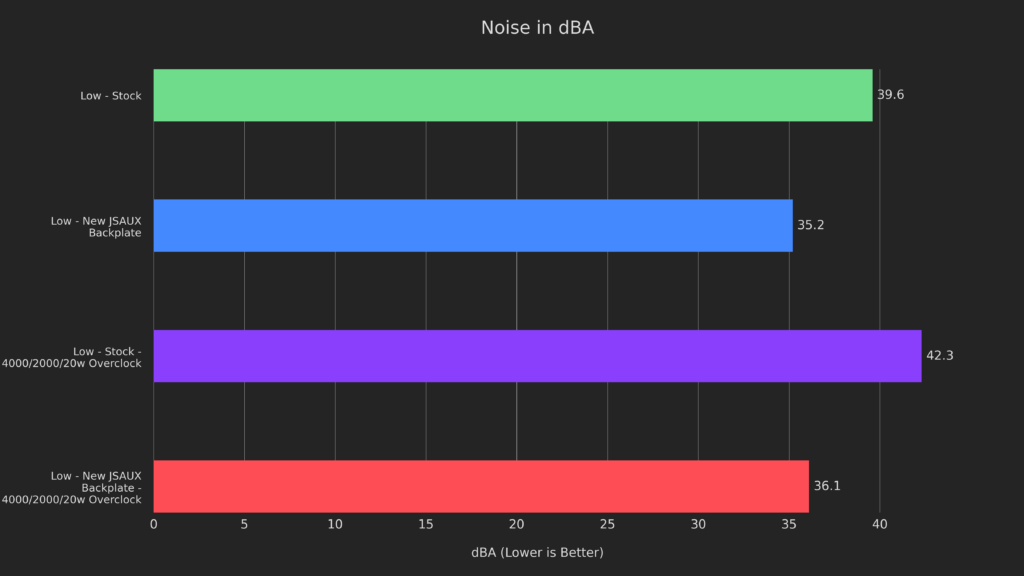
The noise generated with the new backplate was a LOT lower, 6.2 times quieter with the overclock present!
To be noted, though, is that while the fan noise might be quieter, the model of fan you have starts to matter much more. Without the fan being covered, the more grating frequency of the Delta fan becomes much more apparent, so this is definitely a balancing act that depends on your specific Deck’s fan model.
New Paste + Stock Backplate
Next up is replacing the thermal paste, in these tests I used my personal favorite, Noctua NT-H1.
The actual process was what I’d describe as intermediate, removing the backplate and heat spreader was simple, but it would be easy to accidentally cause damage to the board itself if you aren’t careful. Regardless, the entire process took roughly 20 minutes, including cleaning the stock paste off.
Keep in mind that these results will be with the new paste and the stock backplate, we’ll check them out with the JSAUX backplate next!
Unigine Superposition
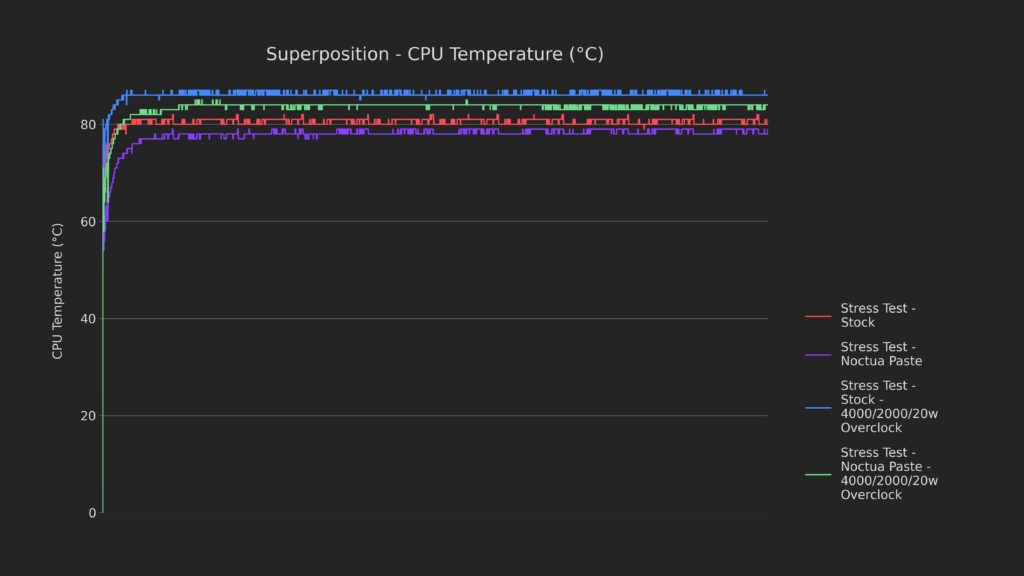
The first test is CPU temperature as usual, with the Noctua paste coming in around 2-3C cooler on both stock clocks and overclock.
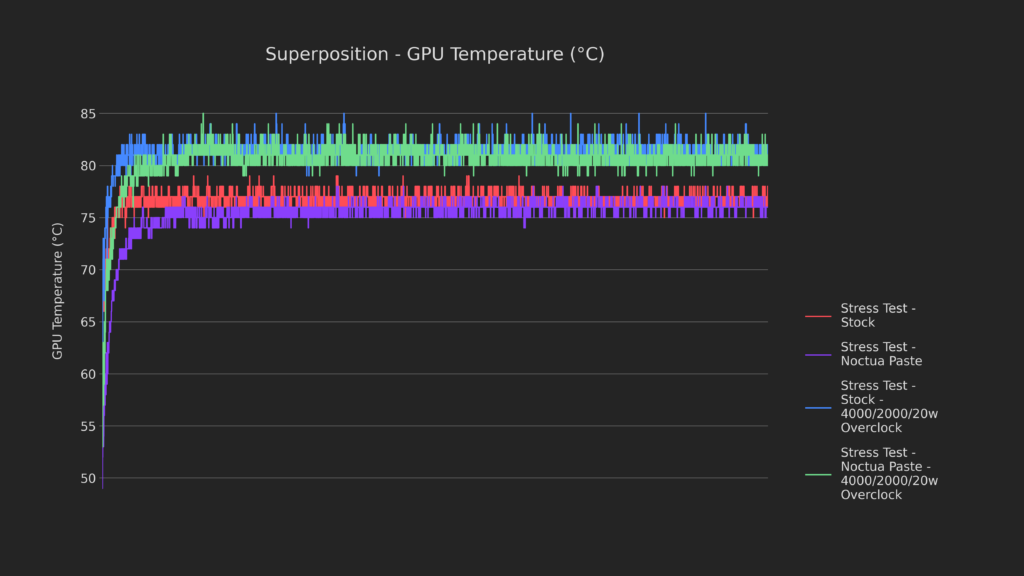
The GPU temps are similar, with the results being only 1-2 degrees apart. As you can see, it actually takes a little longer for the Noctua paste to allow for heat saturation, indicating that it’s more effective at carrying heat away from the chip.
Performance was identical with both pastes in Superposition, so let’s move on to Returnal.
Returnal
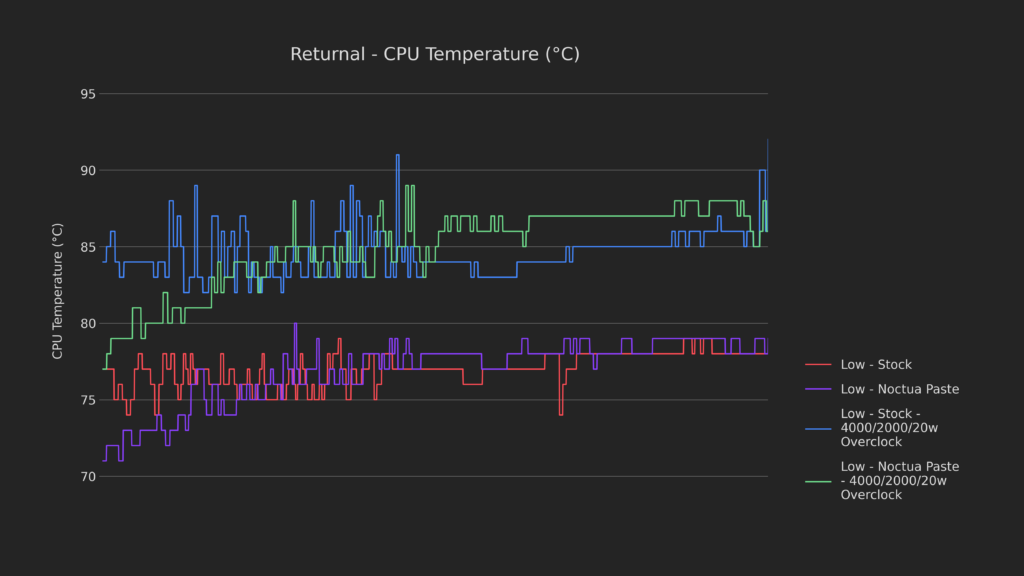
Returnal is a bit different here, with the Noctua paste actually being a little hotter post-heat-saturation on the CPU, at least when overclocking.
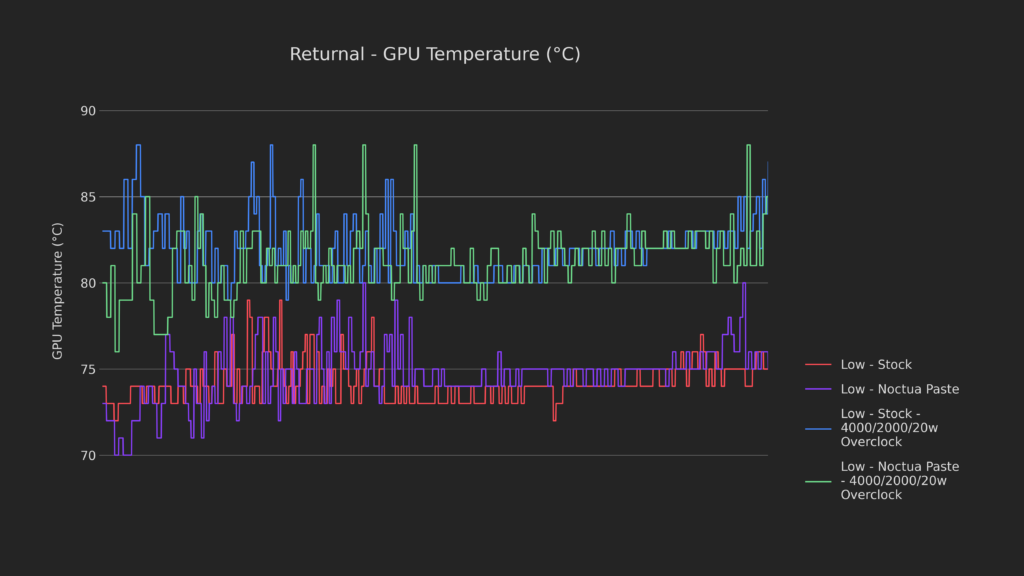
The GPU, however, has very similar results even when overclocked. Usually, when the results are asymmetric like this, it means that either a bottleneck was lifted and the chip was able to work a little harder, or the workload is heavily asymmetrical.
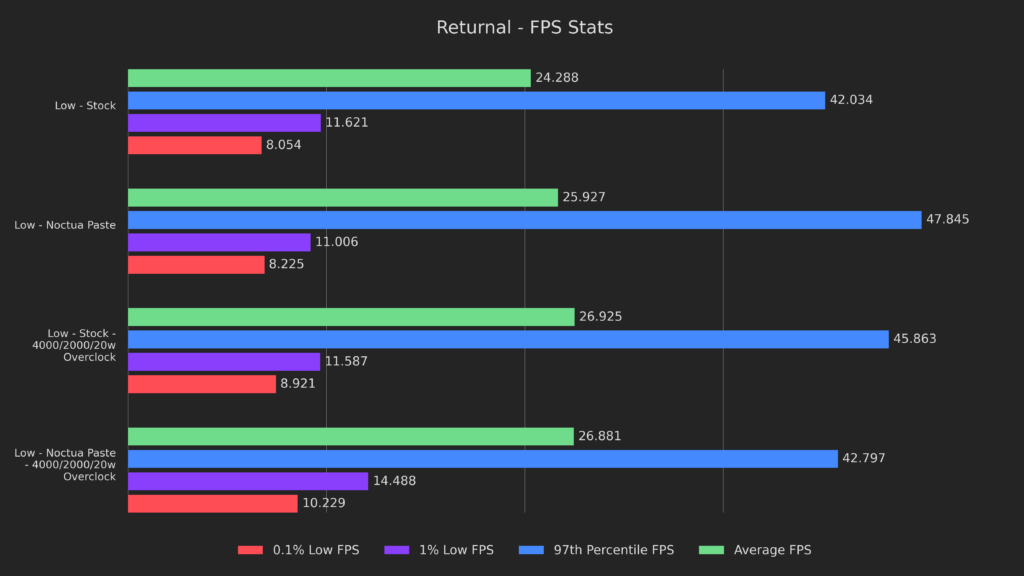
And these results confirm that to be the case, the averages and 97th percentile were noticeably higher on stock clocks, while the lows were much higher when overclocked with the Noctua paste as well.
Chassis Temperatures
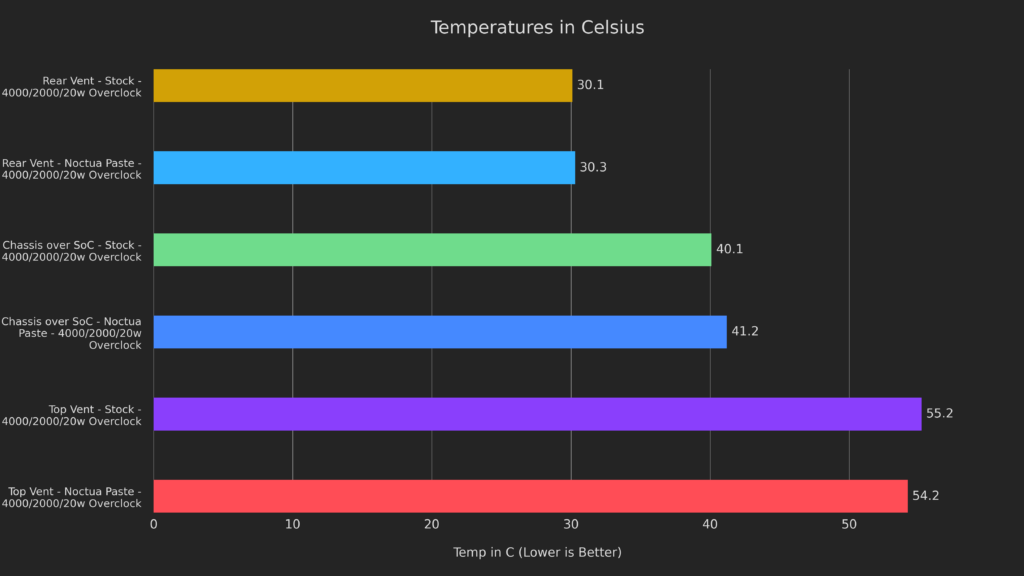
Quickly looking into the chassis temps, the results are all within margin of error. This definitely makes sense, as we haven’t changed the airflow in any meaningful way.
Acoustics
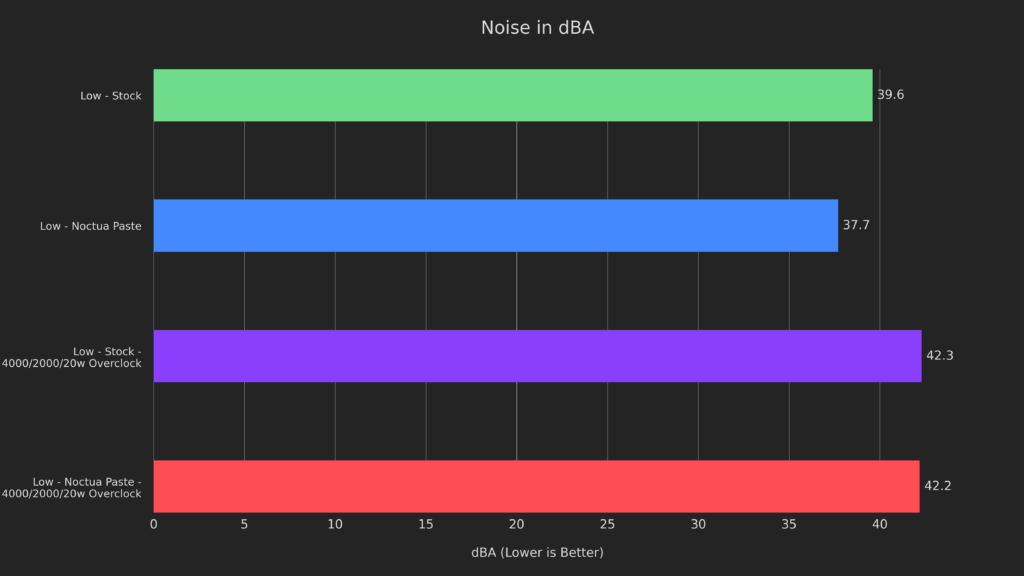
Last up for this section, the noise levels for each. The overclocked noise was virtually identical, but the stock clocks came in at 1.9 dBA lower with the Noctua paste, which makes sense given the small temperature difference at those speeds.
Next up, let’s look at the Noctua paste with the New JSAUX backplate!
New Paste + New JSAUX Backplate
For these tests, I’ll be comparing with the JSAUX backplate itself, using Stock paste. Since the difference was so massive with the backplate before, it’s only fair to see if the paste makes any difference in isolation here, too!
Unigine Superposition
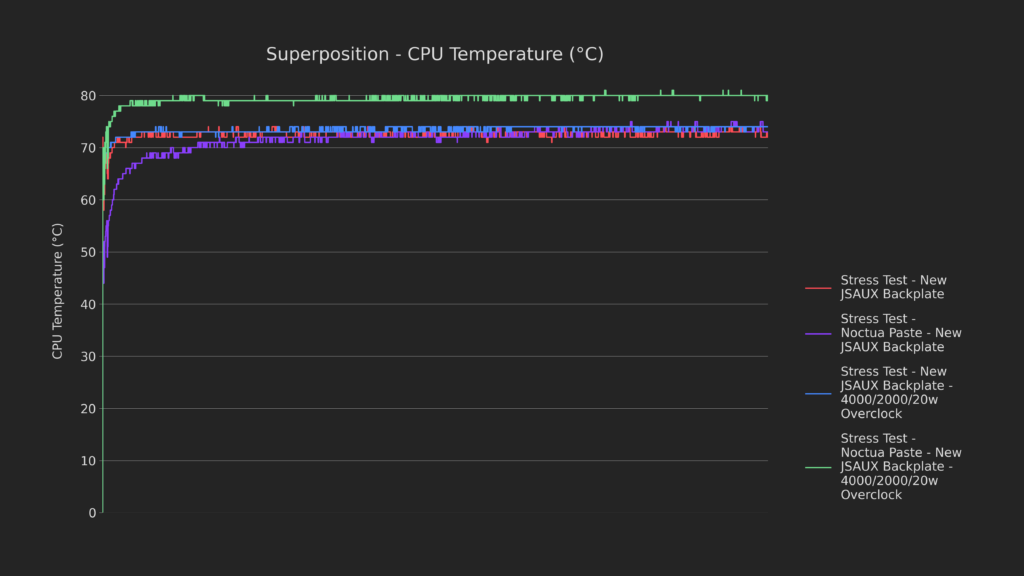
Starting with CPU temperatures on Superposition, we see something very different than before, the CPU is running MUCH hotter with both the new paste and the new backplate!
This was very odd, so next I needed to look into GPU temperatures.
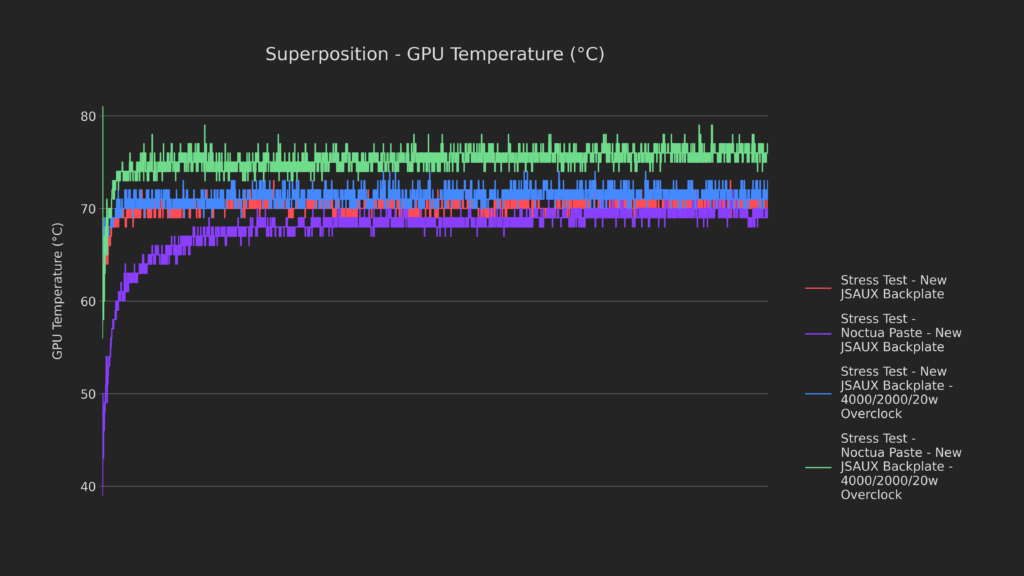
Much to my surprise, the GPU temperatures were higher as well!
The only explanation for this, aside from bad paste application that wouldn’t align with our previous results, is that the Deck was able to work much harder with the new paste for some reason, so I needed to confirm!
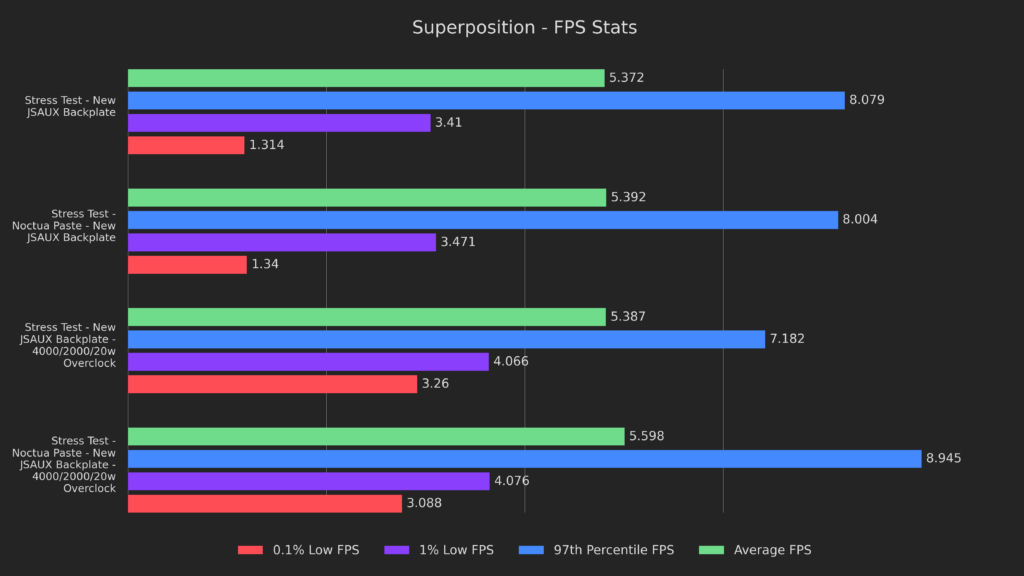
This was definitely evidence of exactly that. While lows remained largely the same, the averages had their first deviation of 4% on superposition and the 97th percentile results were a massive 25% higher with both the new paste and backplate!
I needed to confirm this on the Returnal, so let’s go see how that went!
Returnal
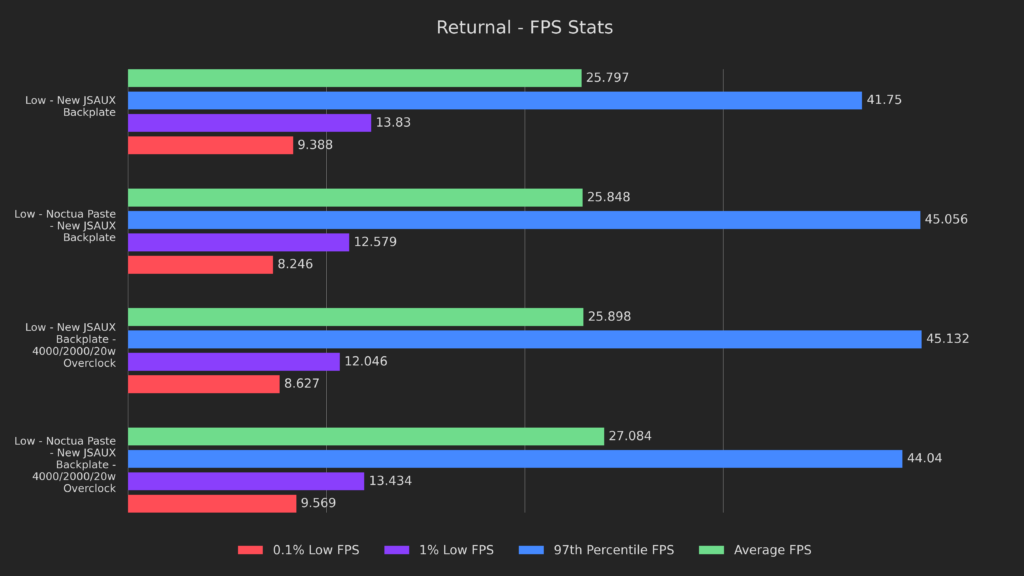
I wanted to look at these results from the other direction and see if we could guess the thermal implications of the results here.
The new paste and backplate together had better results in averages AND lows while overclocked, by a few percent each. The stock clock results were interesting, having similar averages, but more extreme highs and lows. It seems to me like the paste allowed for higher burst speeds!
Based on this chart alone, I’d guessed that the CPU and GPU would both be running hotter on the overclock, but cooler on average on the stock clocks, let’s see if I was right!
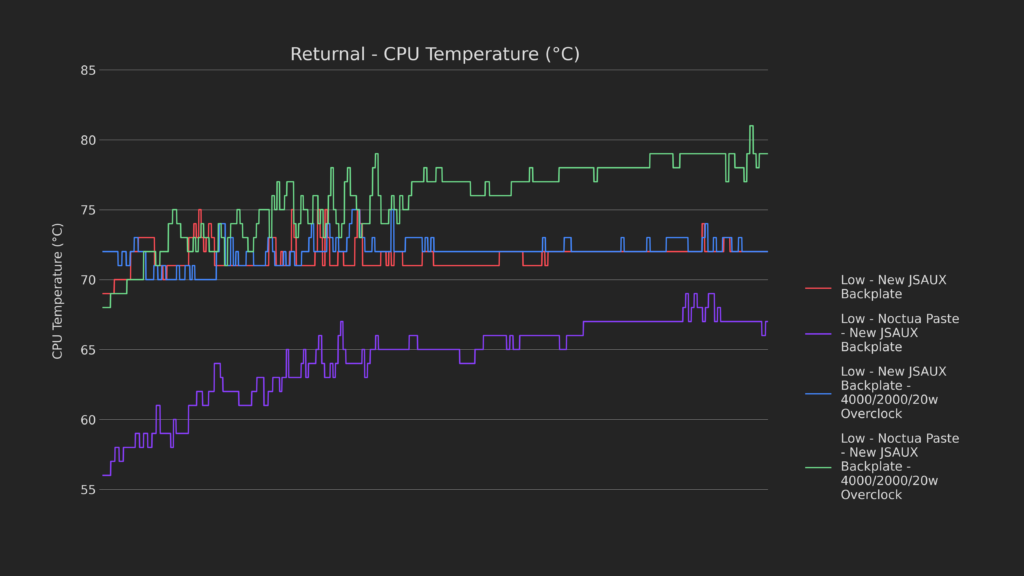
The CPU results are both exactly as I’d guessed, with the overclock running almost 7 degrees hotter by the end of the test, on the new paste. What’s more impressive to me are the results on stock clocks with the new paste, coming in at 5-6 degrees cooler than the backplate alone!
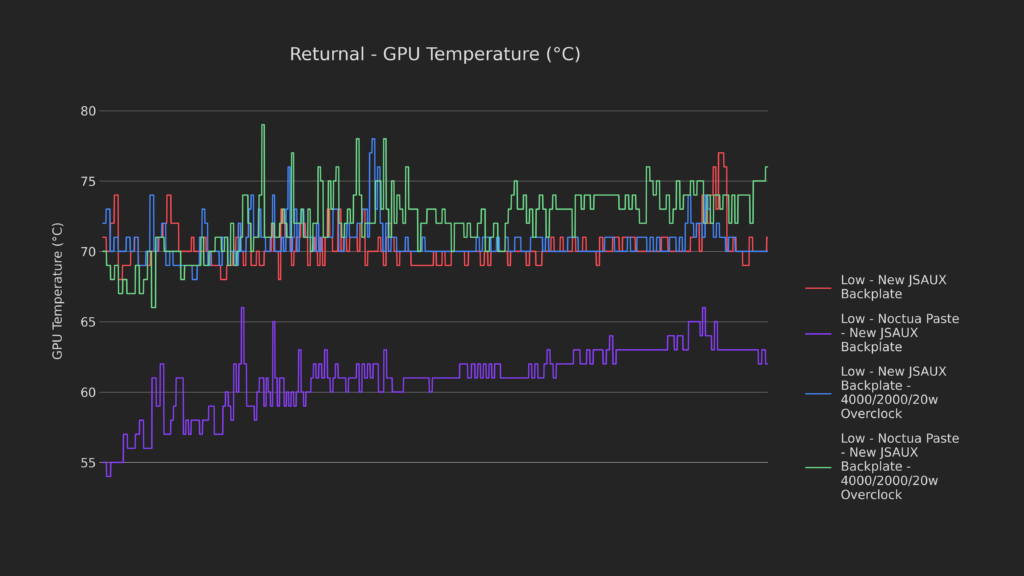
We see similar results for the GPU, again coming in far under standard temperatures with the combo of new paste and backplate!
Chassis Temperatures
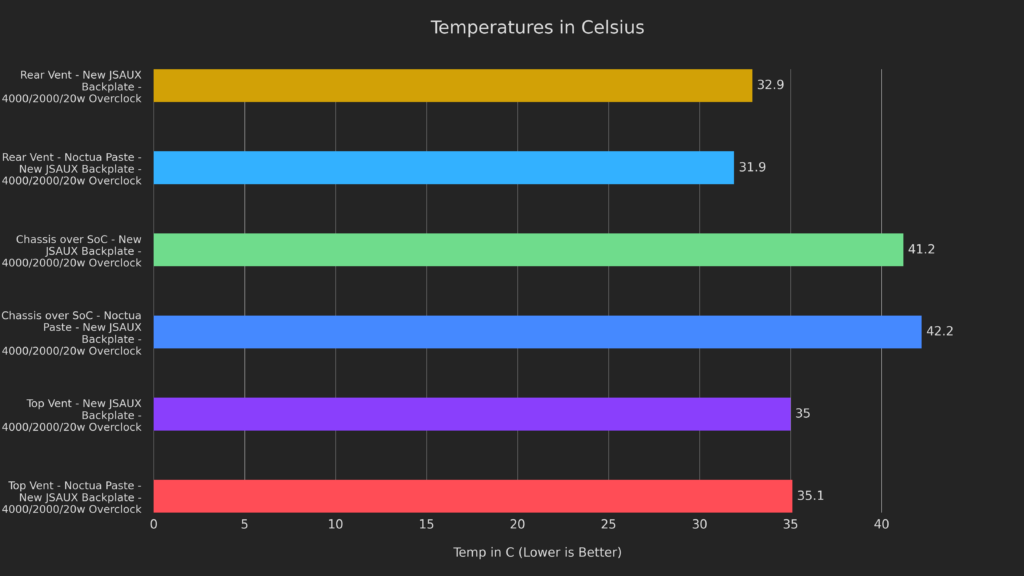
Taking a look at the chassis temperatures, we can see that even while overclocked, the maximum deviation is a single degree over the SoC.
This is a really impressive showing, and reinforces that the paste isn’t indicative of chassis temp.
Acoustics
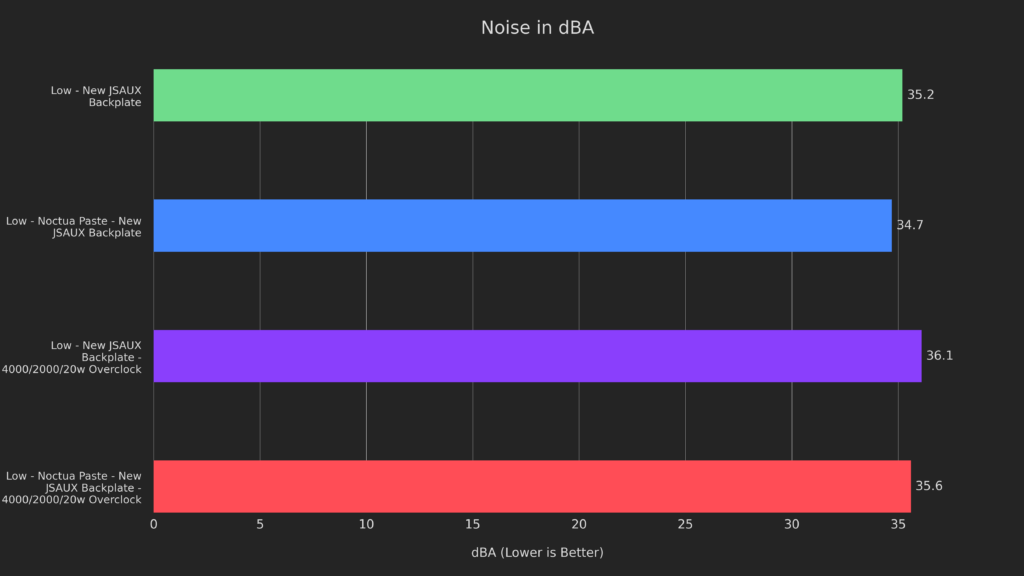
Last up for this round is acoustics, and I’m still very impressed with the paste and JSAUX backplate combo. Both of these results deviate by only half a decibel, which is awesome news for the performance we gained, despite generating more heat.
Alright, let’s move on to the next round of testing!
PTM Pad + Stock Backplate
Next up I’ll be testing the Honeywell PTM7950 thermal pad, which I’ve never used before! I ordered by pad from ModDIY, as I’ve heard that the pads from AliExpress have mixed results.
To install the pad, I did something that was recommended to me by vagifabdulla in my Discord server. Big thank you to him, since it was a massive help.
Installation
First, I cut a small rectangle out of the pad and put it in the freezer for about half an hour. While it was chilling, I took the Deck apart, cleaned the Noctua thermal paste off, and then covered the Deck up to prevent dust settling.
I grabbed the pad from the freezer, cut it to size and then used the included sticker strips to remove one of the protective plastic pieces. I put that side down onto the heat sink, then peeled the other side’s plastic off and pressed any bubbles out with tweezers before mounting the heat sink back on.
Also, let this be a lesson for those who might do this, have your morning coffee FIRST.
Not only did I almost break my microSD in half, but I also completely forgot to unplug the battery before doing this and I’m genuinely lucky that I didn’t break the Deck!
After the panic of realization settled, I buttoned the Deck back up and then started to burn the pad in.
Unlike other thermal paste, the pad needs a burn-in period to reach optimal efficiency, otherwise it won’t be transferring heat as well as it can. In order to burn it in, I did 2 rounds of 2 hour stress tests with GTKStressTest, then 15 on and 15 off for another 2 hours in Superposition. It’s very unlikely to need nearly that burn-in period, but I wanted to make sure it put its best foot forward before testing!
As a quick final note, these results will be compared to the Noctua thermal paste as it’s the best we’ve achieved thus far.
Unigine Superposition
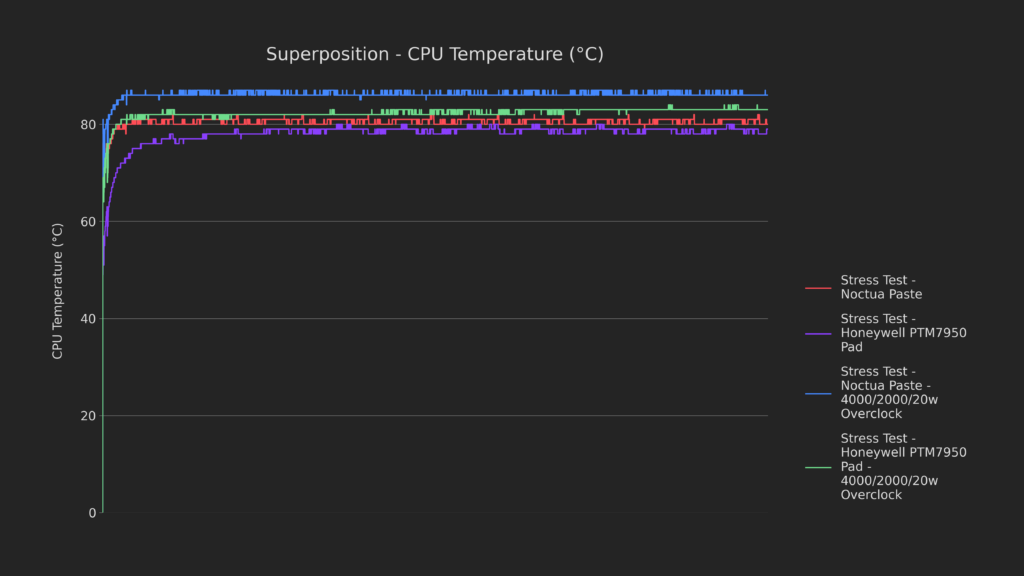
The CPU results are pretty impressive right out of the gate being 3-4 degrees cooler with an overclock and 1-2 degrees cooler at stock clock speeds.
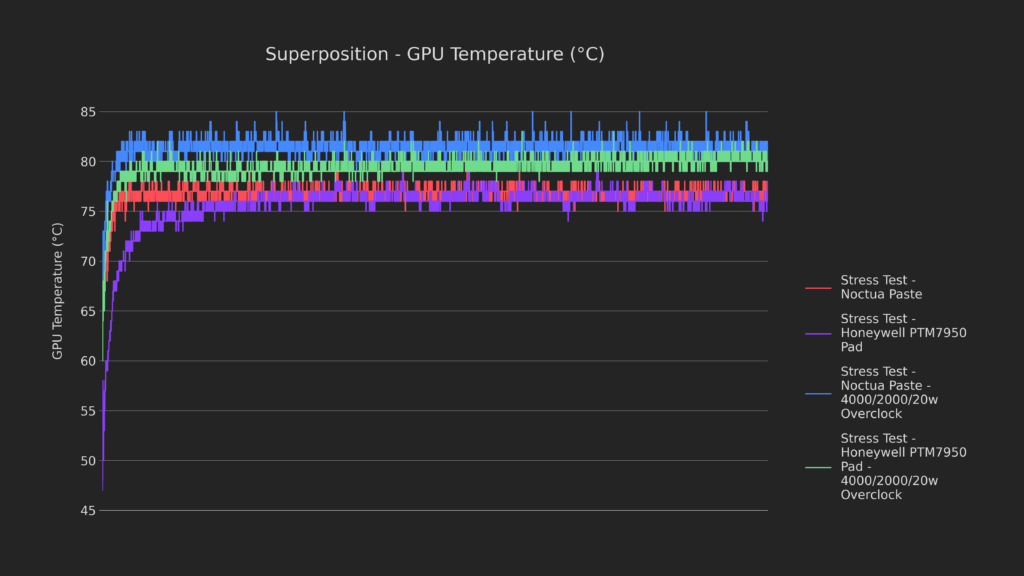
The GPU also ran between 1-3 degrees cooler with the PTM pad than the Noctua paste, showing off just how well this little thing can transfer heat.
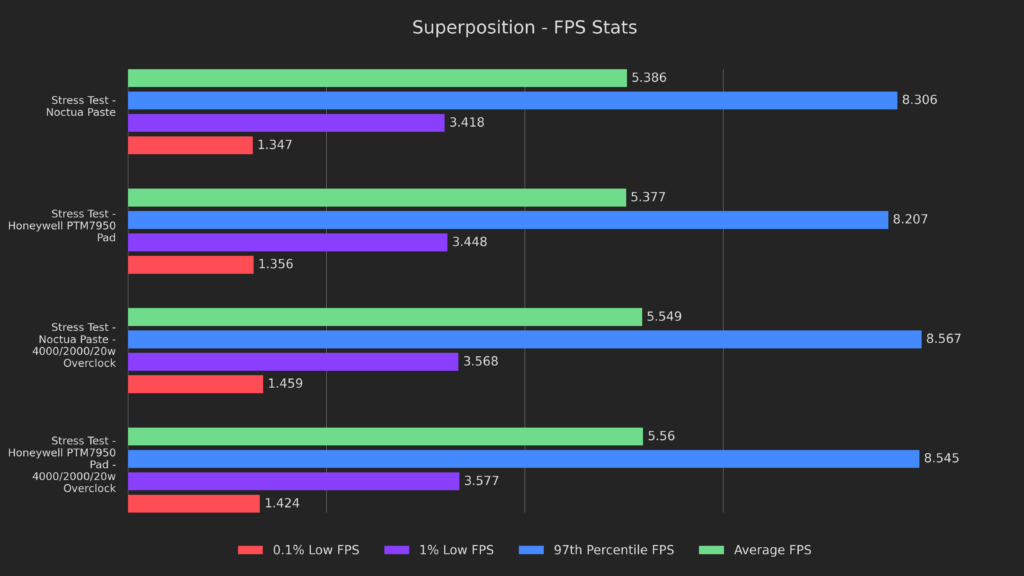
This is another situation where the actual results were within margin of error, so let’s check out Returnal!
Returnal
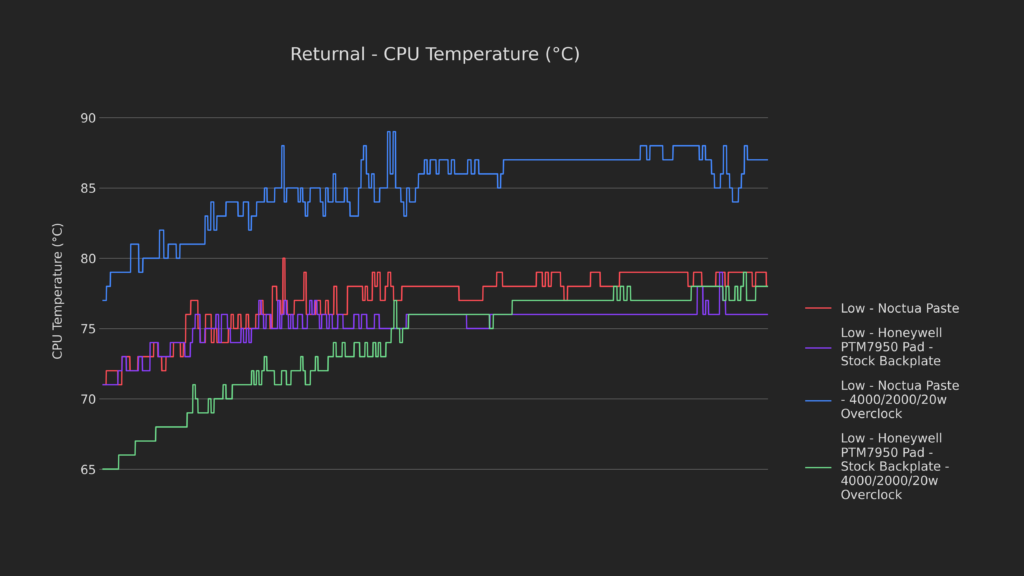
These CPU temperatures are very interesting to me. In the previous round of testing using the Noctua paste, we saw that the temperatures were much higher due to pushing more frames, will the same hold true here? Speaking to the chart itself, the overclocking temperatures are nearly 10C cooler and the stock clocks come in around 2-3 C cooler.
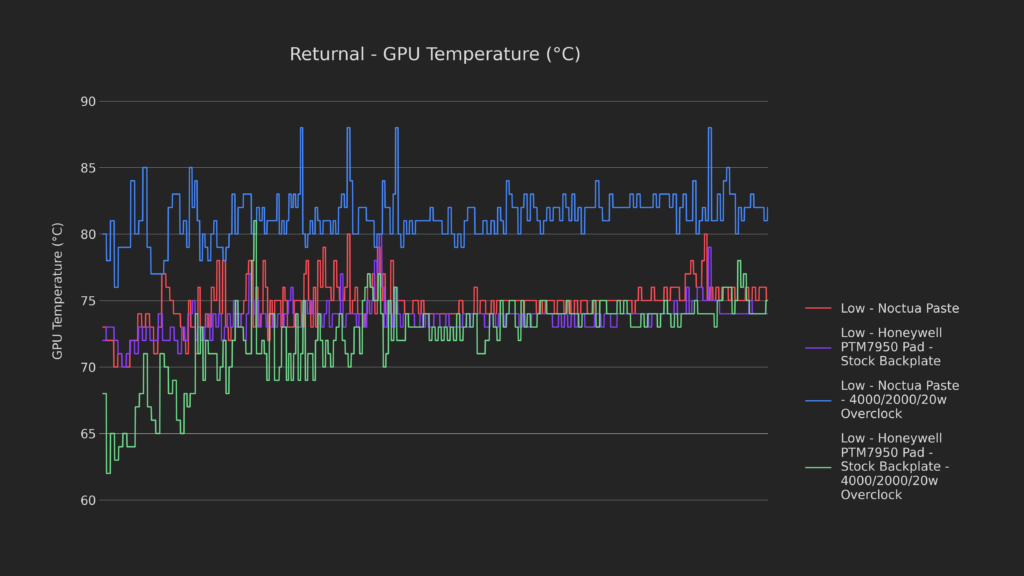
The GPU temperature here is equally mystifying, dropping about 8C when overclocked. Surely, the performance would suffer as a result of this much cooler chip?
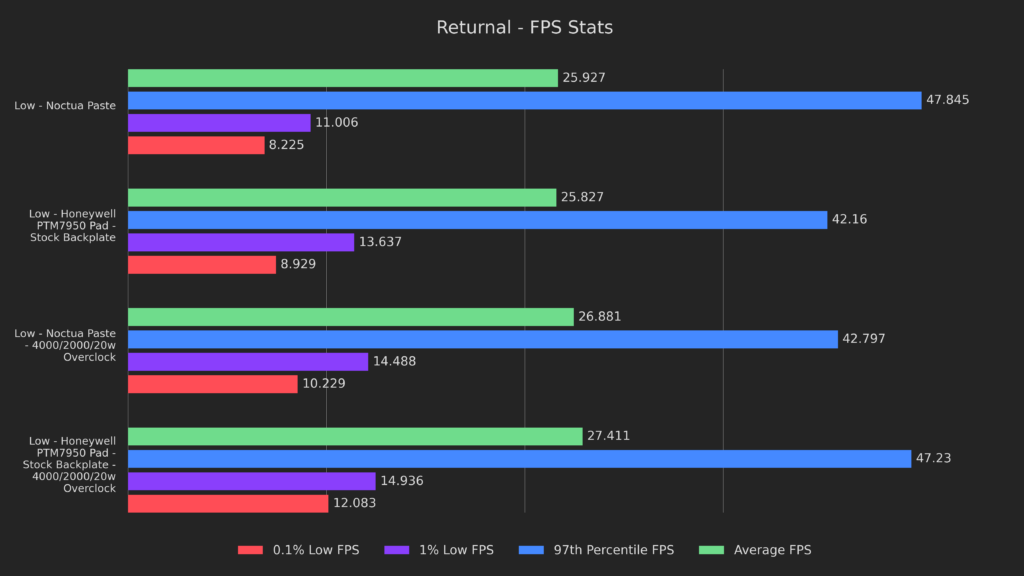
Not even close, as a matter of fact these results are the best I’ve ever seen on Returnal. Every metric is higher, but especially noticeable are the lows, with the stock and overclocked results being notably higher than the Noctua paste variant.
Chassis Temperatures
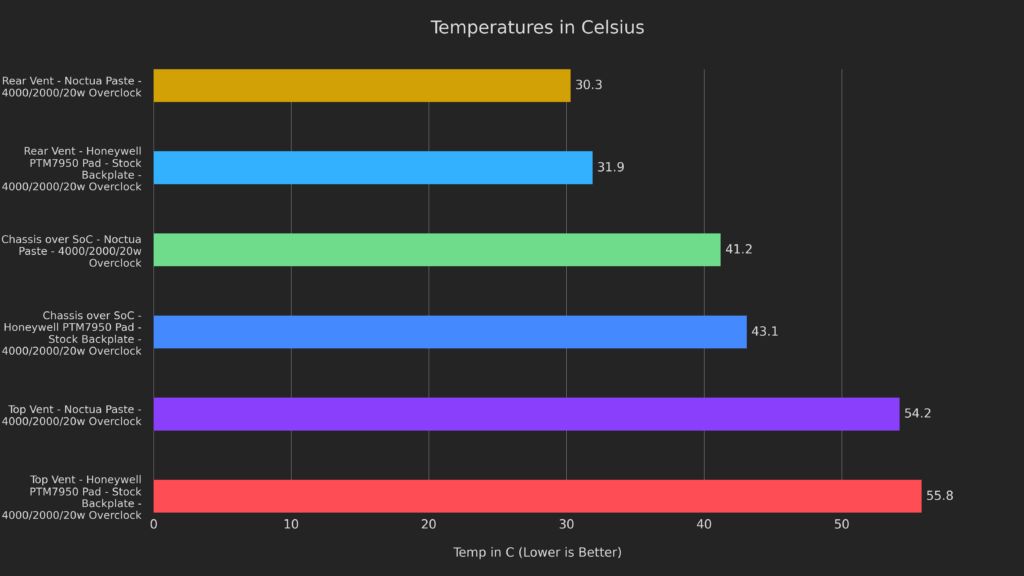
And here we can finally see the tipping point for chassis temperature. The PTM pad made every point 1-2 degrees hotter, which is a testament to how much heat it can siphon off the chip.
Let’s see if it made any acoustic differences!
Acoustics
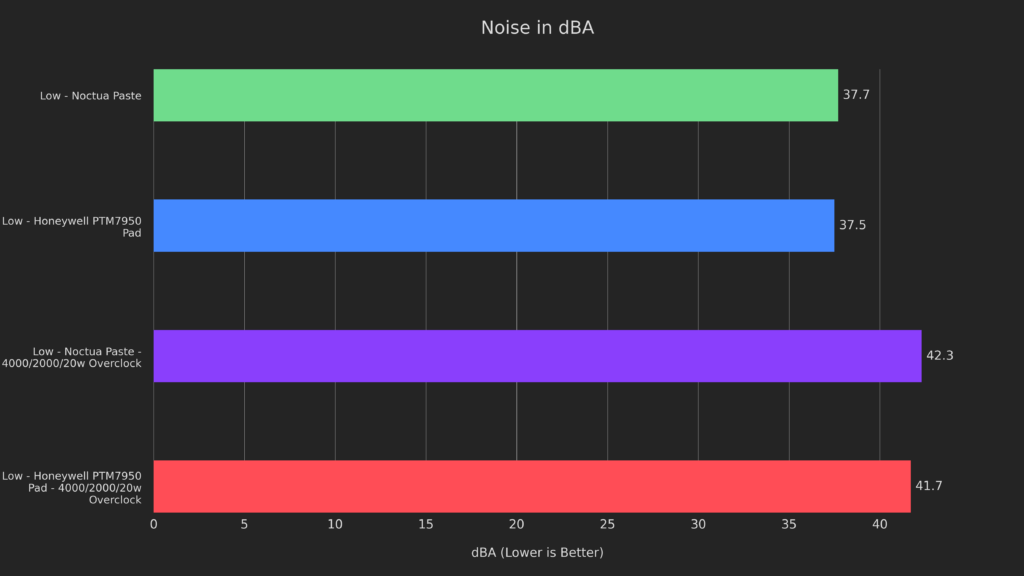
Fortunately, the cooler chip means quieter operation. At the cost of a single degree on the chassis, I think that this is a clear victory over either the stock or Noctua thermal paste. The 0.2mm thickness, coupled with insane thermal conductivity definitely makes the PTM7950 pad a contender for the best TIM I’ve used, and I look forward to testing it out on other devices in the future!
For now, let’s see how well it can do when paired with the JSAUX backplate!
PTM Pad + New JSAUX Backplate
Unigine Superposition
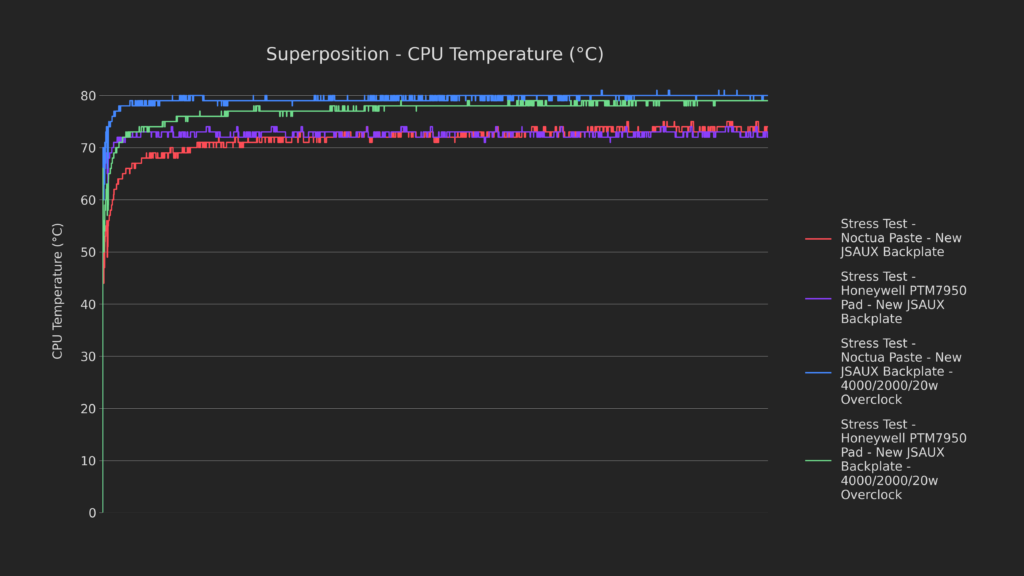
The CPU is performing as we’d expect based on previous results, with the PTM pad being 1-3 degrees cooler than the Noctua paste.
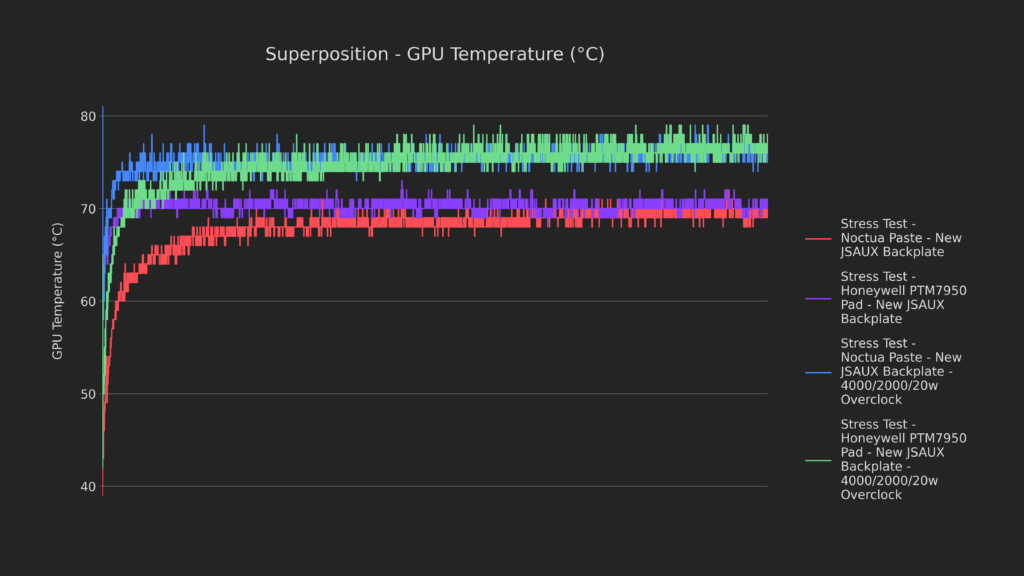
The GPU is actually a bit hotter on the PTM pad, and although I ran the tests back to back it seems like it stared off a bit hotter. This is because the Deck actually took about 20 seconds longer to start the second test for that particular result, as a result of my keyboard’s batteries dying.
I decided to see if there was any major performance impact because of this and…
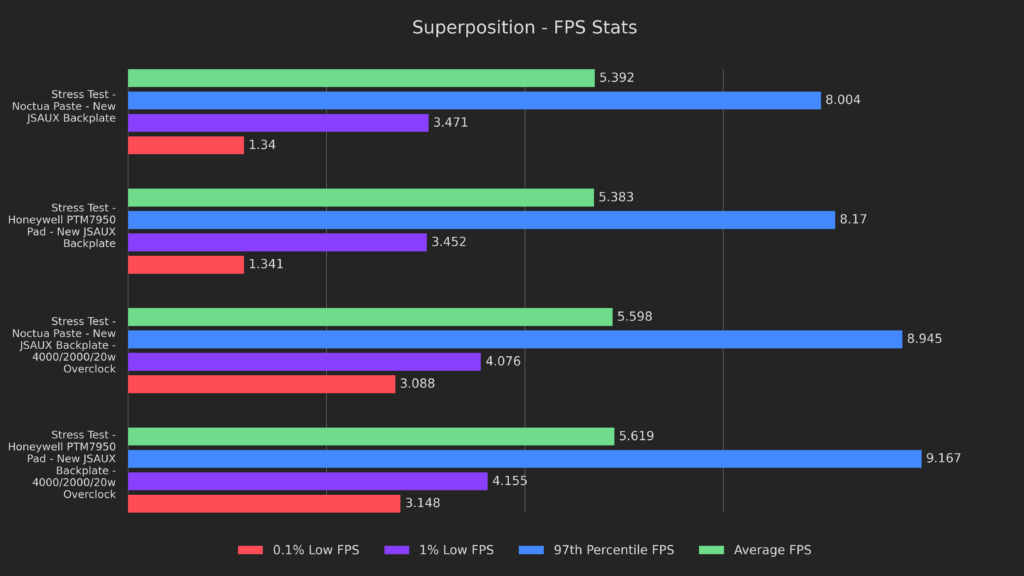
Here we can see that the results for the PTM pad are ever so slightly higher, meaning that the difference in temperature was minimal enough to not require a full re-test.
Let’s check out Returnal to see if these results hold true!
Returnal
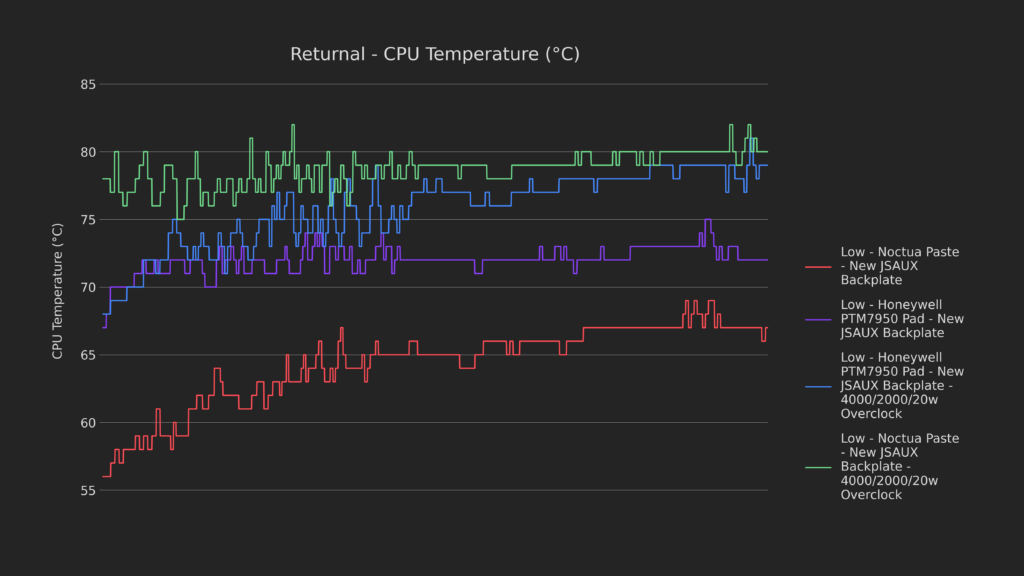
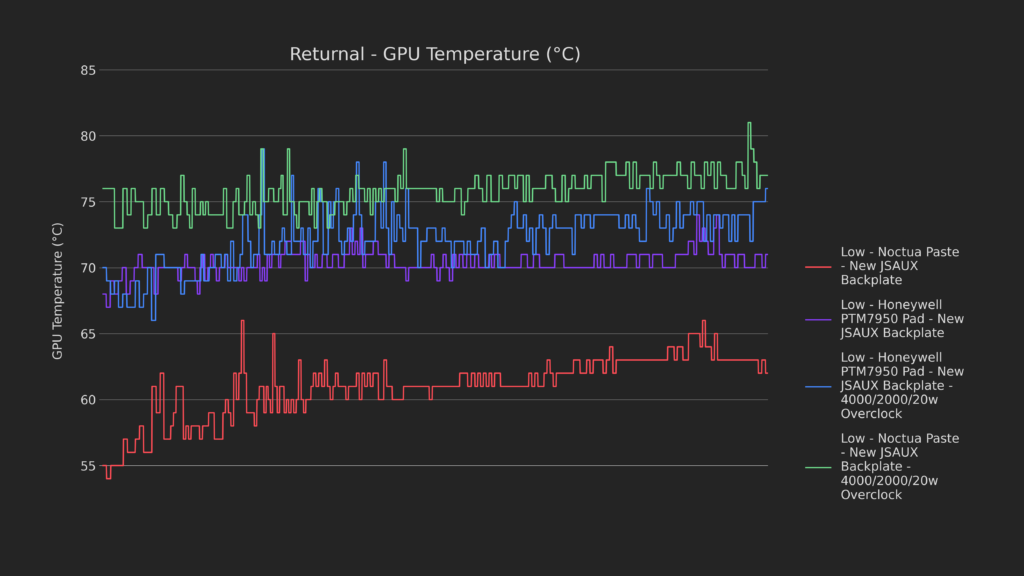
The CPU and GPU are running hotter with the PTM pad again, could we have another bottleneck being lifted?
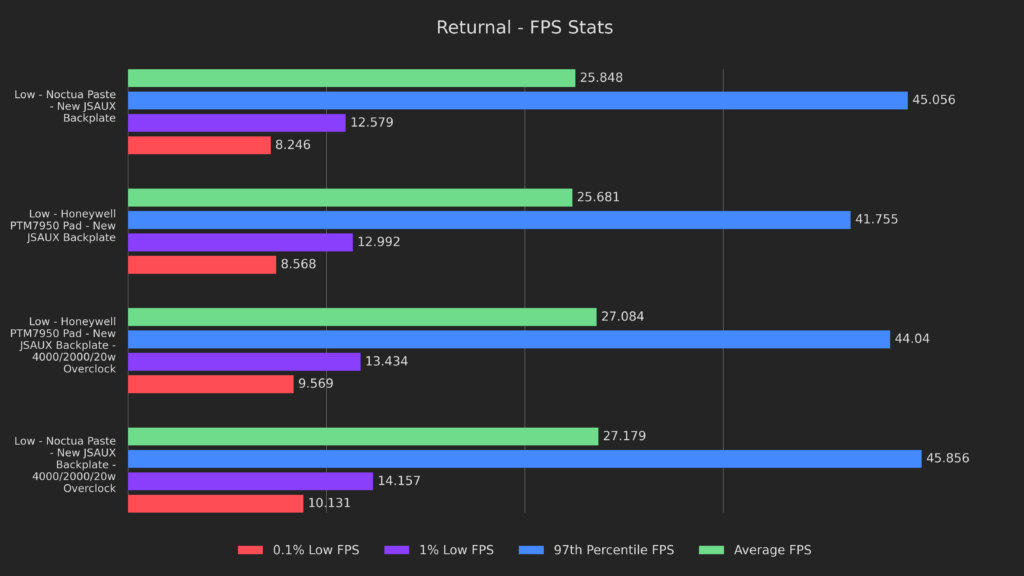
Looks like it, the overclock results are a bit higher across the board, definitely a bottleneck being lifted!
Chassis Temperatures
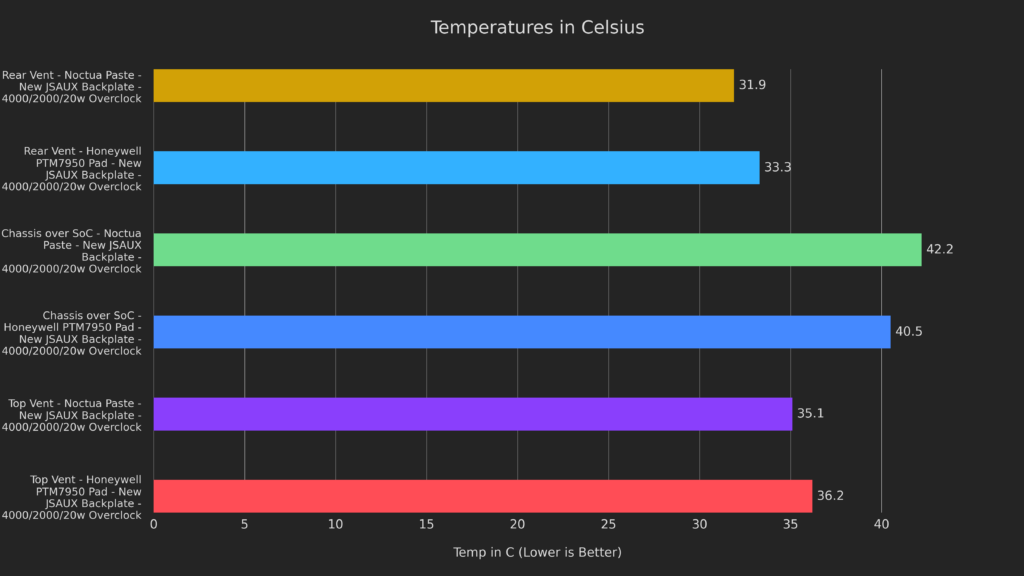
Looking at chassis temperatures, we can see that most results are relatively close. The vents are just over a degree warmer each with the PTM pad, likely attributed to the faster thermal transfer off the chip, but the chassis over the SoC is almost 2 degrees cooler.
Let’s see how those temperatures affect fan speed and noise!
Acoustics
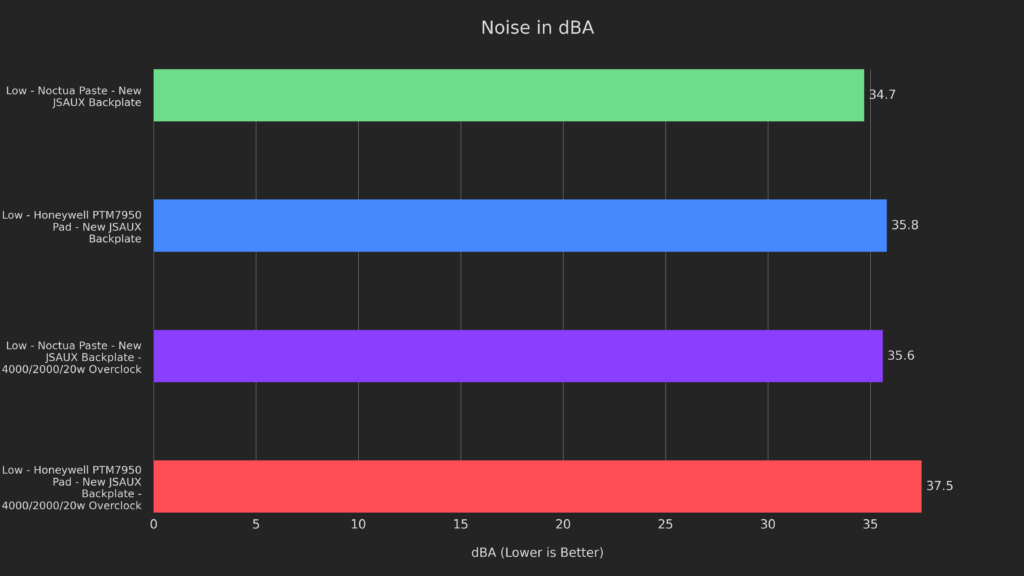
As anticipated, the higher chassis temperature was joined with higher noise. Stock clocks come in around 1.1 dBA higher and overclocked comes in around 1.9 dBA higher.
These results just go to show that the Deck will generate the same amount of heat regardless, but it has to go somewhere and it might be a little louder moving it out, depending on where the bottleneck is in the heat removal pipeline.
Alright, next let’s move on to the older JSAUX backplate with the metal plate.
Old JSAUX Backplate with Metal Plate
The backplate was a simple swap, similar to the other one. The only thing that you need to be aware of is the larger thermal pad on the metal plate, designed to increase the thermal capacity of the Deck. This testing will be comparing against their newer backplate to see which design is better, metal panel or additional vent.
Lastly, all further tests will be using the PTM pad, as it was the best we found for heat transfer.
Unigine Superposition
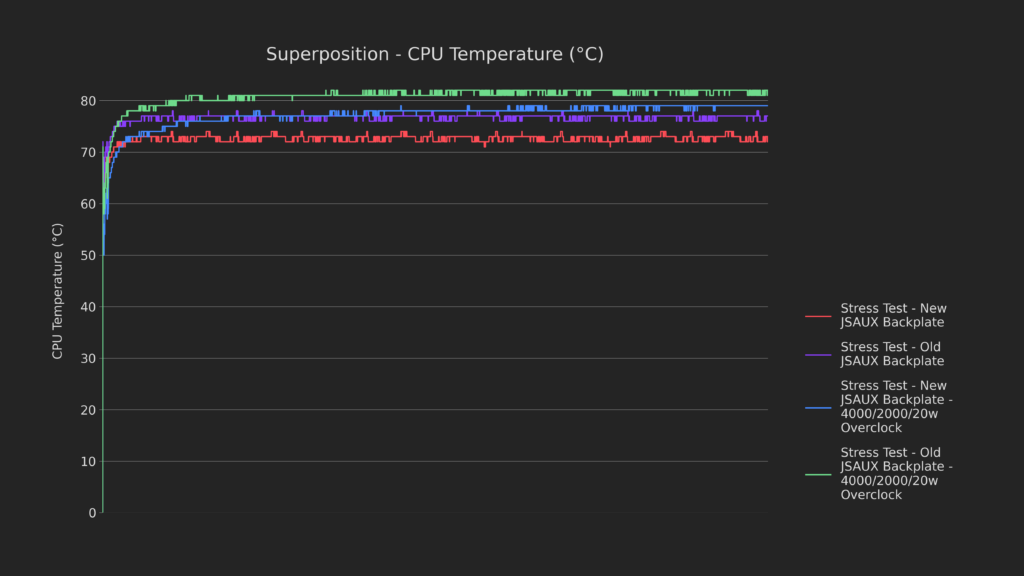
The CPU temperatures are much worse with the older backplate, about 5C average.
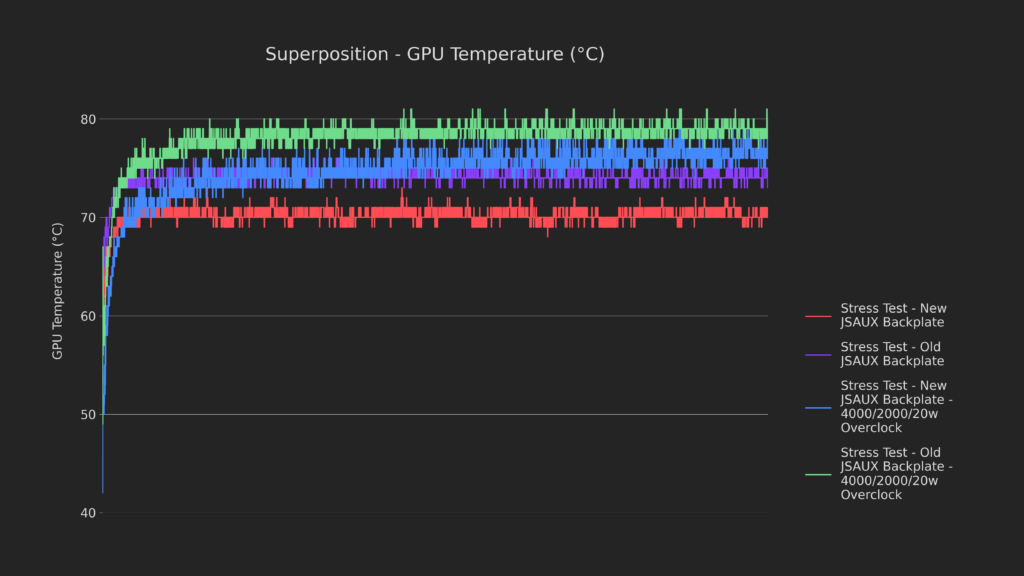
And the GPU follows suit, not really putting up much of a fight.
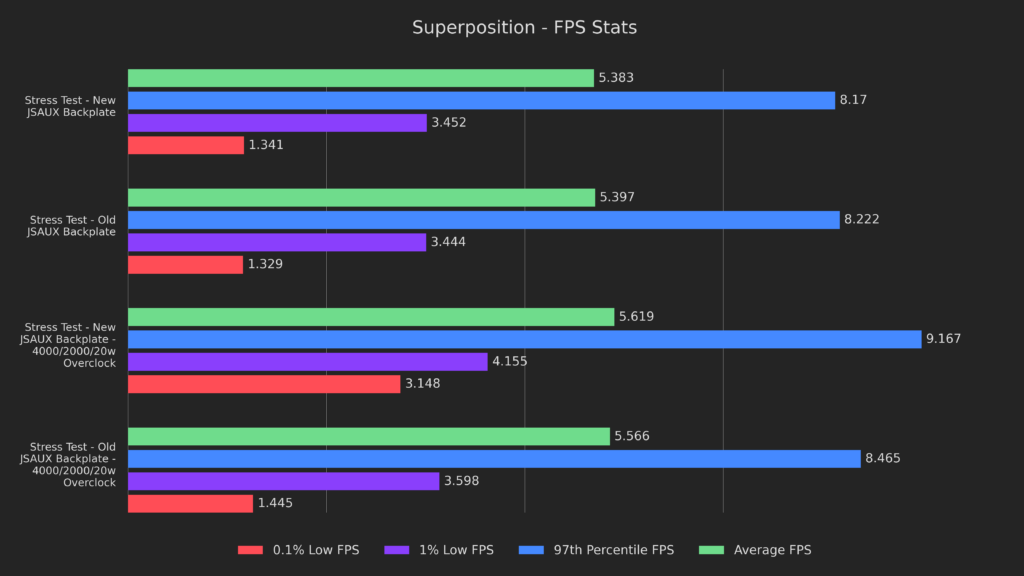
And because of that the performance suffers quite a bit, at least when overclocked! It definitely seems to me like the older backplate is worse than the newer iteration, but better than the stock backplate.
Let’s see if that’s true!
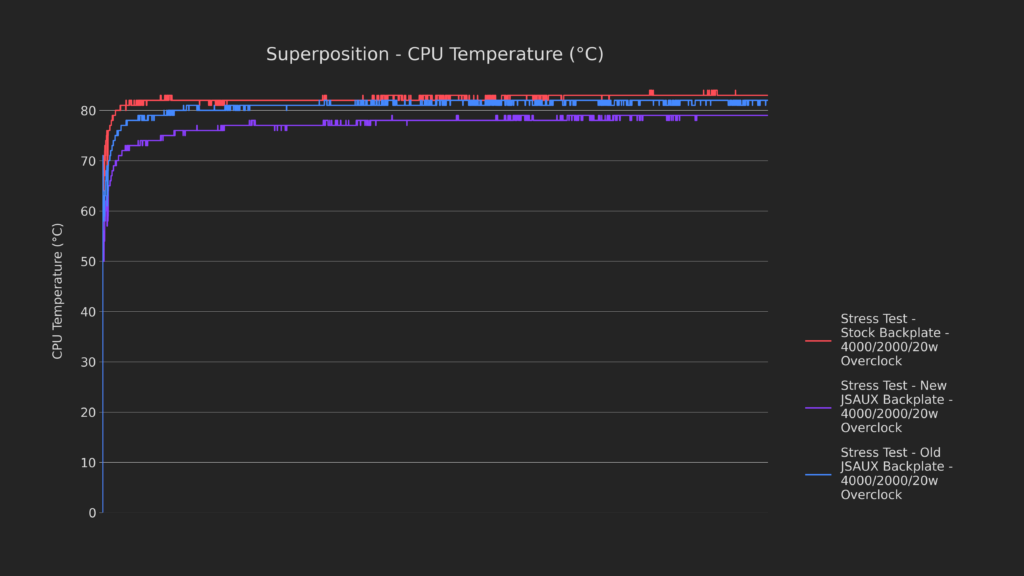
Yup, it certainly looks that way!
The newer backplate is definitely remaining cooler, but the metal plat is helping the older iteration cool the CPU quite a bit.
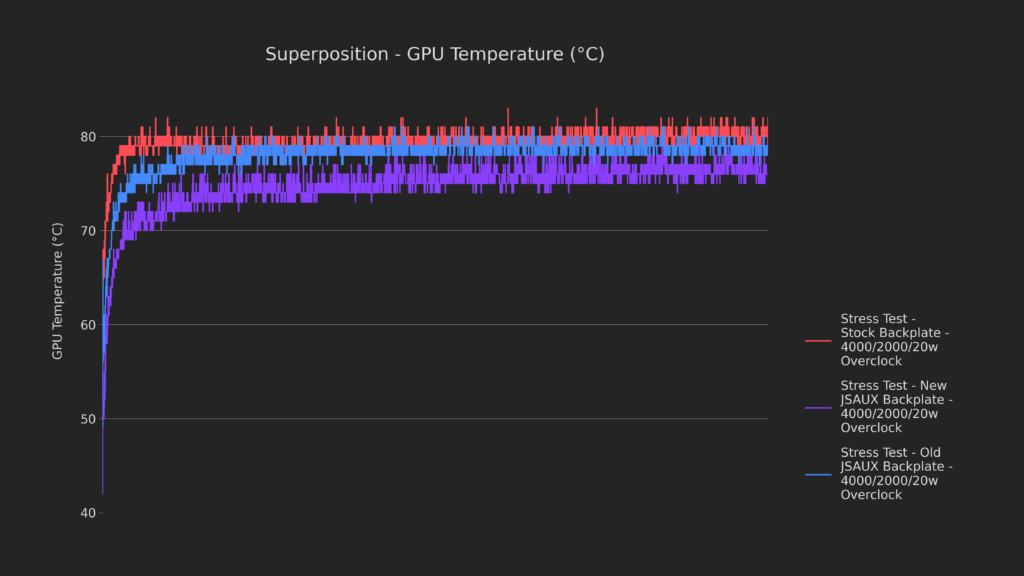
The story for the GPU is much the same.
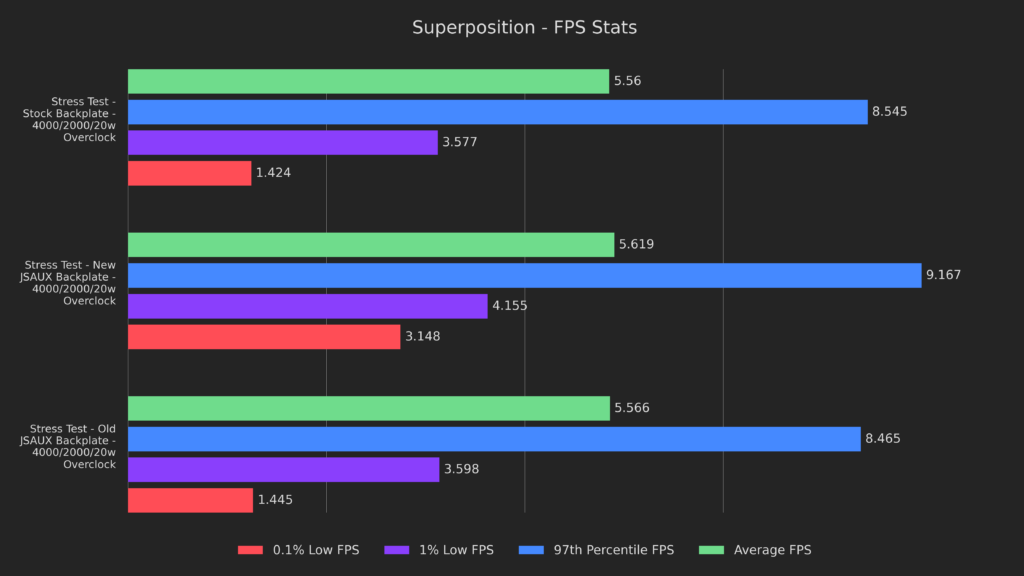
And performance is exactly as we’d expect, with the newer backplate pulling ahead by quite a bit, particularly in the lows!
Chassis Temperatures
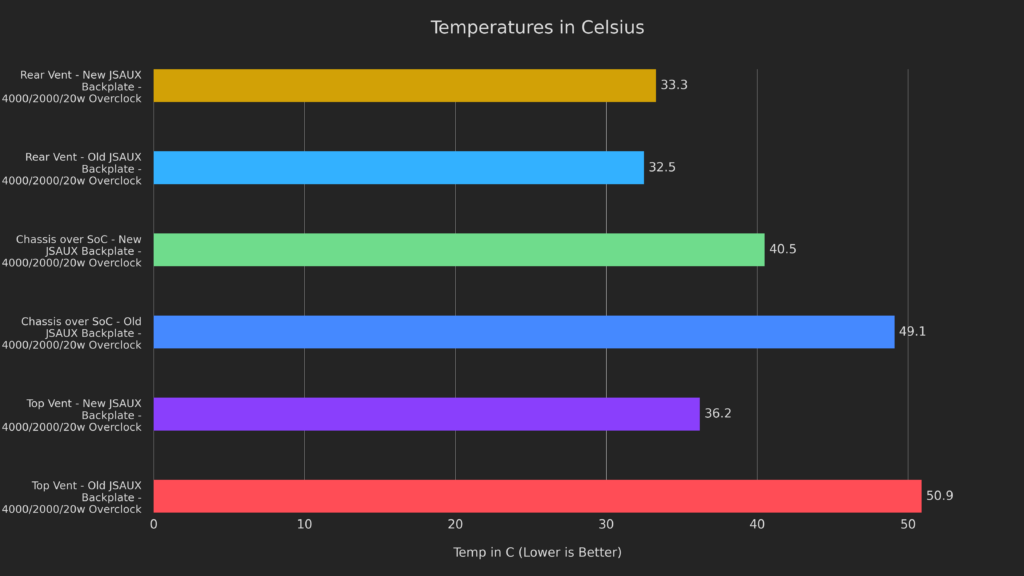
Looking at chassis temps, we can see something very unfortunate with the older backplate. Aside from the exhaust being even hotter than with the stock backplate, the metal plate gets hot to the touch on the older JSAUX backplate.
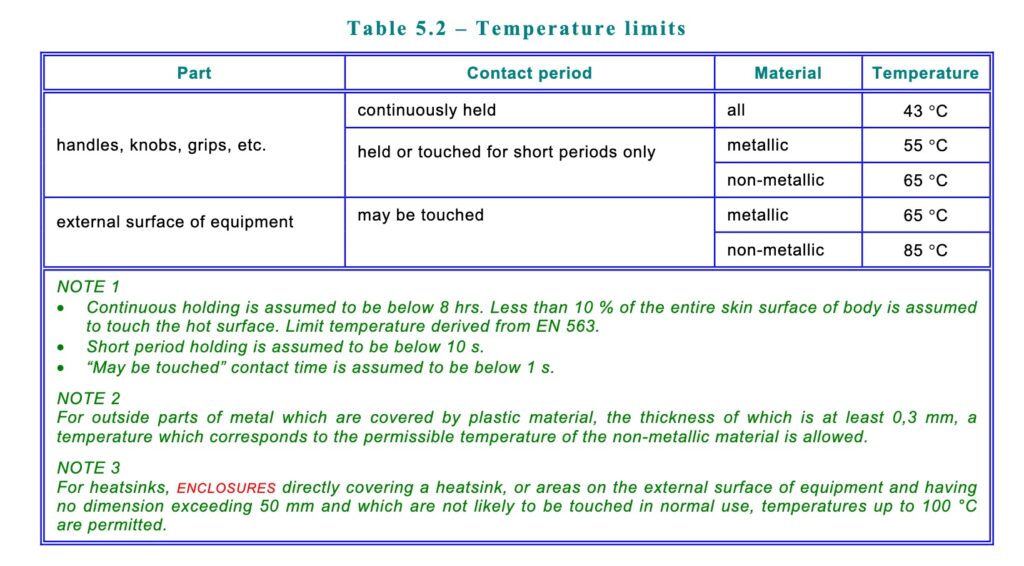
According to ECMA international, a company specializing in compliance standards for electronics, a metallic surface at 49.1 degrees Celsius could be held or touched for 10 seconds or fewer at a time. Anything more than that would be a breach of ECMA-287, and a burn hazard.
I feel obligated to reiterate that my testing conditions were an ambient temperature of 18C, if you were in a warmer area, this metal plate could get much hotter. For this reason alone, I do not recommend the older backplate when overclocking or if you have small children, or without the product we’ll be testing next.
Before we move on to that, though, let’s check out acoustics!
Acoustics
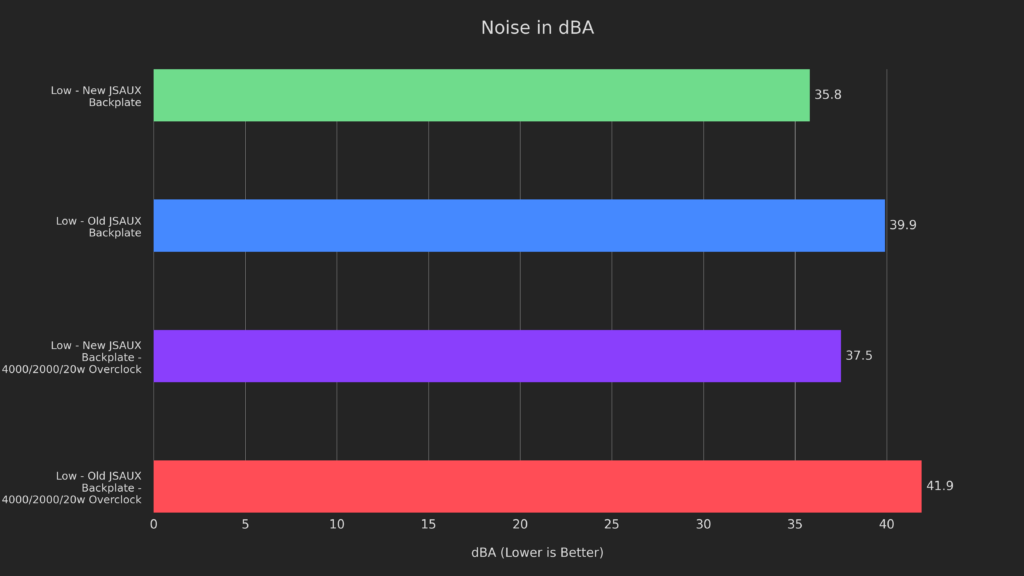
With great thermal mass, comes great heat, which necessitates great cooling. The older metal-plate backplate is much louder than the newer one, and it nearly matches the stock backplate in how loud the fans need to get to deal with the heat.
Unfortunately, this is another L for the metal backplate, but let’s see if we can fix that with the next product, the JSAUX magnetic fan!
JSAUX Magnetic Fan + Old JSAUX Backplate (Metal)
The JSAUX magnetic fan is a multi-purpose fan that’s magsafe compatible, but comes with a perfectly sized metal plate to adhere to the plate already on their old backplate. You need the additional plate to make it magnetic, as the regular one is not, but once you attach it you can just attach the fan, connect the USB cable and turn it on!
While the directions specify that the USB-C port on the fan is a “charging port”, it needs to stay plugged in for the duration of use. It has some basic RGB functionality and 2 speed settings, for this test I’ll be using a fan speed of high and centering the fan over the SoC.
Let’s see if it can cool the metal backplate off!
Unigine Superposition
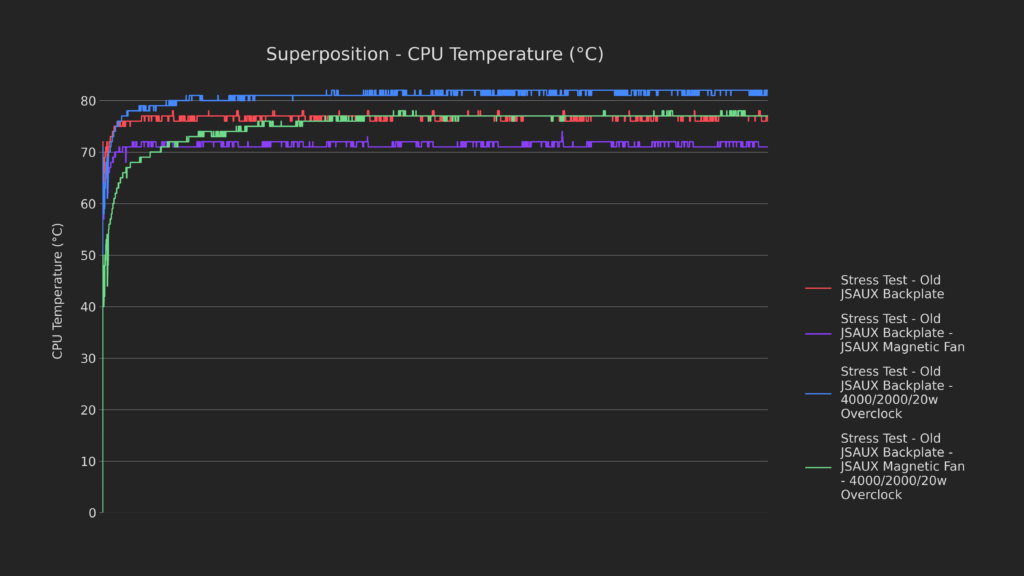
And here you can see, we’re off to a great start! The CPU is about 5 degrees cooler using the fan, and it stays that way for the duration of the test.
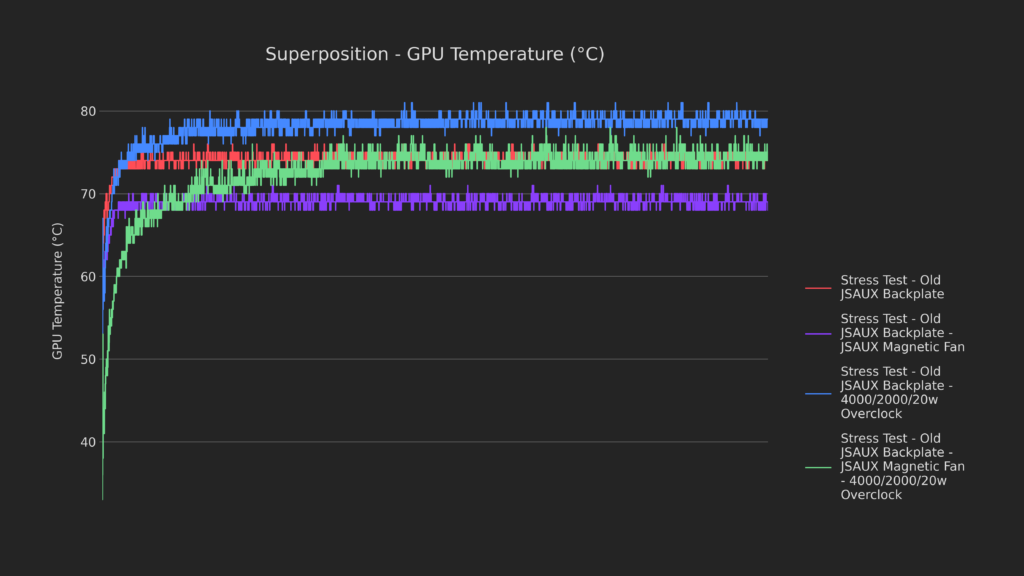
The GPU is much of the same, with a 5-6 degree drop.
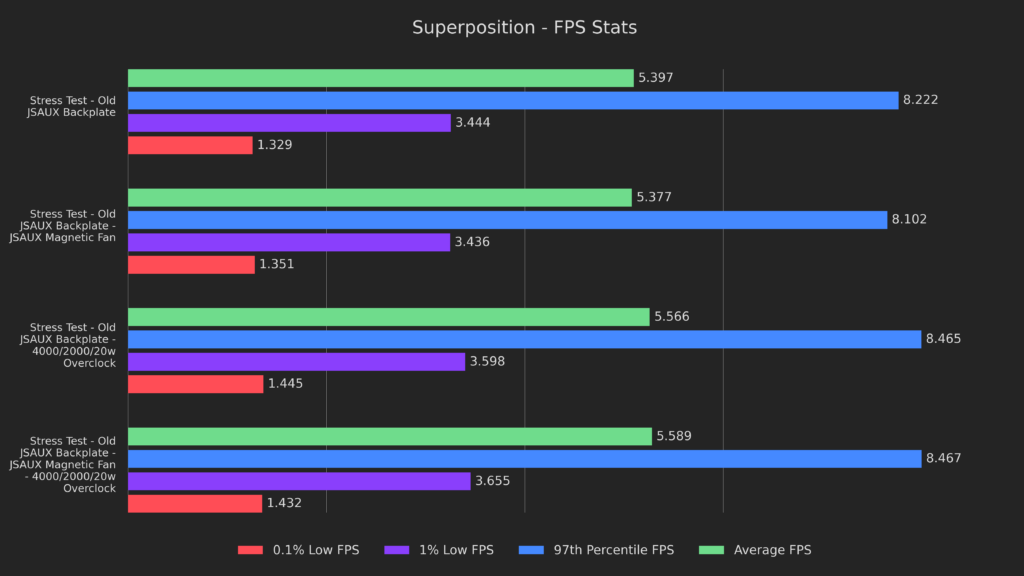
We didn’t really regain any performance with the fan, but what really matters is the chassis temperatures and acoustics, let’s start with temperatures!
Chassis Temperatures
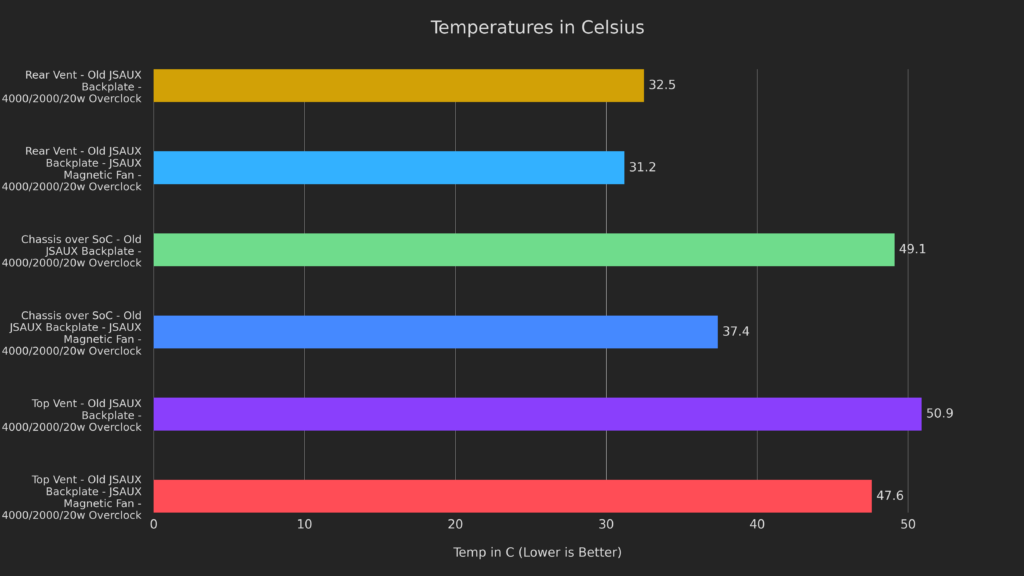
This was great to see, the temperatures of the back plate are well within safety range now, and the top vent is cooler than stock.
Let’s see how it affects acoustics!
Acoustics
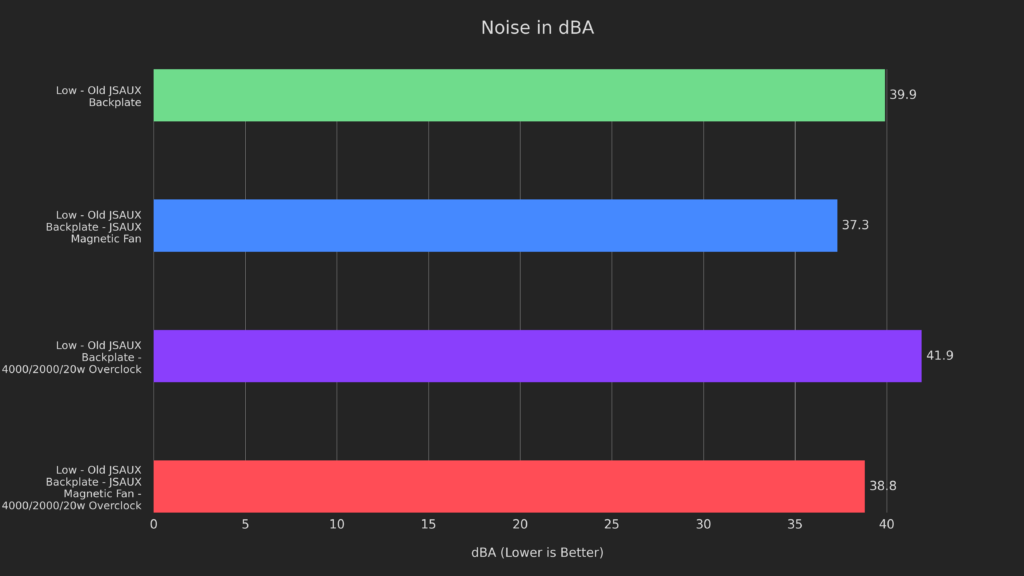
Unsurprisingly, slowing the internal fan down by using a quieter and larger fan actually quiets the Deck down by quite a bit!
These volumes are closer to what we experienced with the new backplate, and can be made quieter using the low setting on the fan, but would compromise cooling as a result. It’s unfortunate that the metal backplate requires active cooling of this degree to stay safe and quiet, but it’s great to see it can be made better.
We’ll touch more on this in the conclusion later, but for now let’s check out the final product in today’s article!
JSAUX Exhaust Fan (Clip-on) + Stock Backplate
The JSAUX clip-on exhaust fan is a battery powered backpack for your Deck.
It’s based on a clamp that you just need to pull and clip on, the top of the fan sits inside the top exhaust and will suck air out. It doesn’t have any RGB or anything, but it has a variable speed knob to dial in exactly how much you want it to cool, I tested everything on maximum speed. Keep in mind that this fan will conflict with the new backplate’s additional vent, so I’m testing it using the Stock backplate and the PTM pad.
Lastly, I want to mention that because it’s so chunky, it won’t fit in a dock. While using it you need to lean it over or find a way to lock it into place without impeding airflow, I personally just balanced it on the clip but I wouldn’t recommend doing the same.
With that said, let’s test it out!
Unigine Superposition
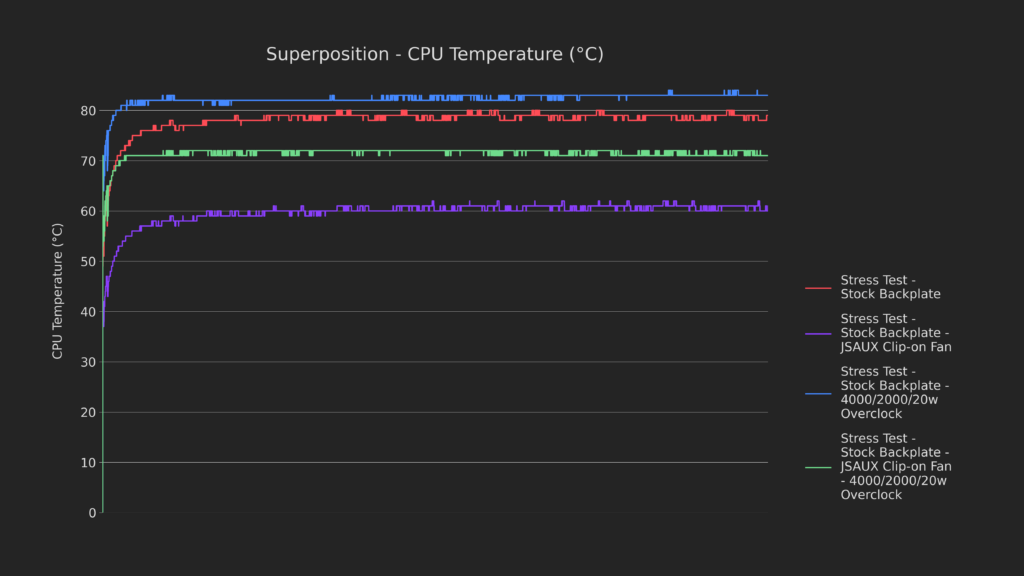
Jumping straight into the CPU temperatures, we can see that this thing doesn’t disappoint! The stock clock tests dropped by about 18 entire degrees, and the overclocking results by 10.
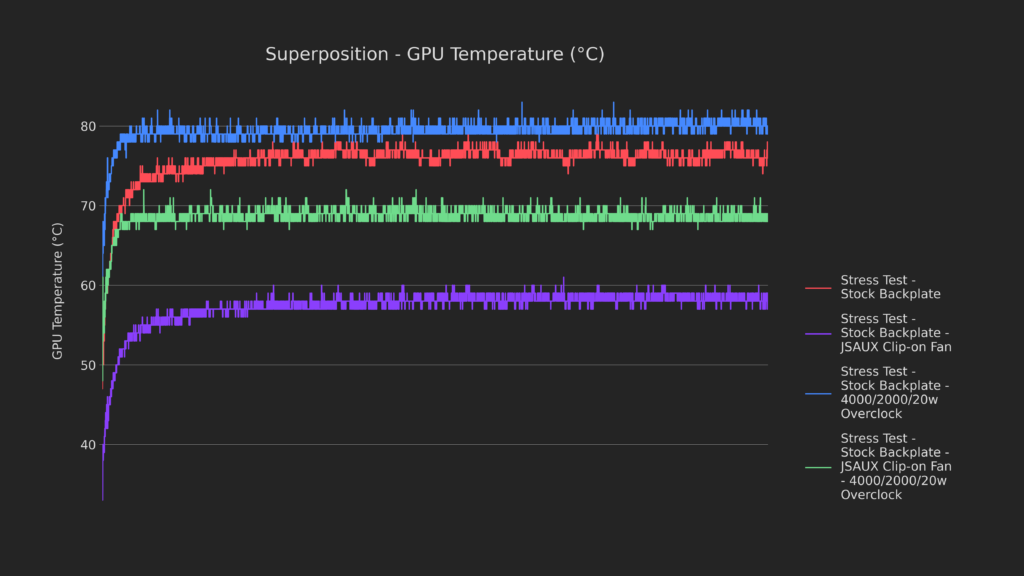
The GPU was similar, with about 20 degrees off on Stock clocks and another 10 on overclock. With internal temps like these, how are the chassis temperatures?
Chassis Temperatures
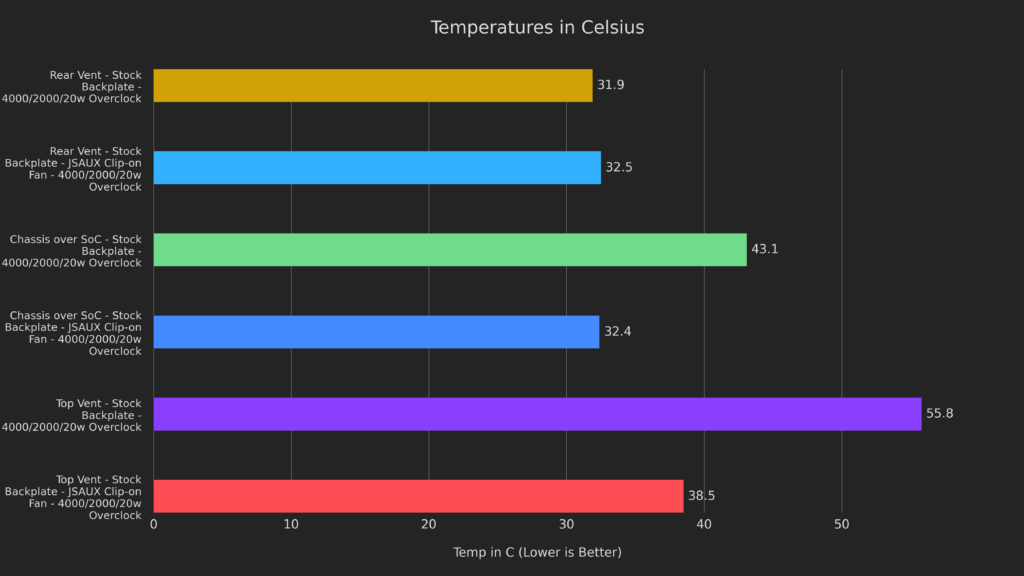
The chassis over the SoC matched the intake vent, and the top vent dropped 17.3 degrees, leaving no part of the Deck anything more than warm. The results from the clip-on fan are downright impressive when coupled with a PTM pad, but what’s the downside?
Acoustics
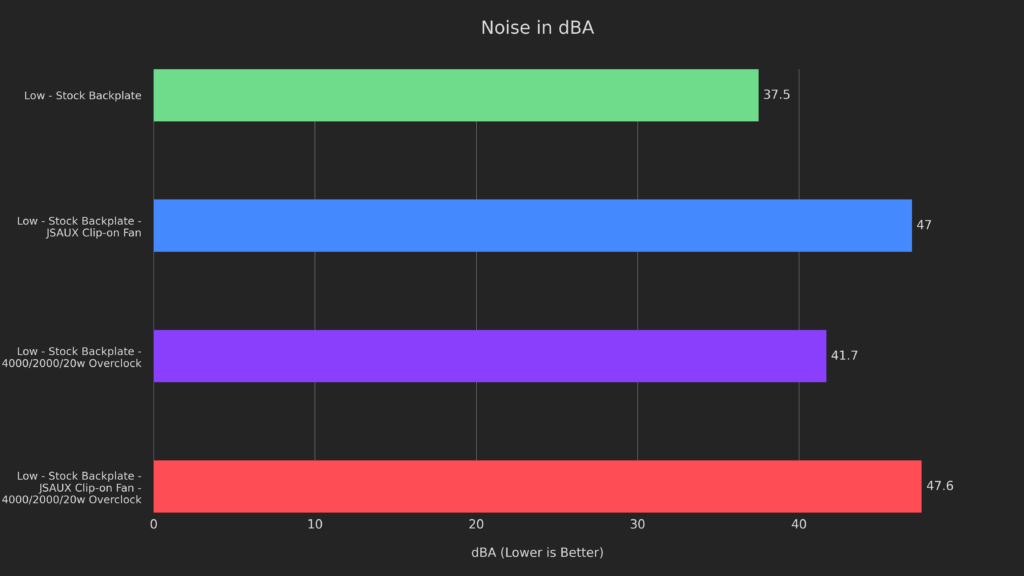
The noise generated by the fan at these speeds is HIGH, and the frequency makes it incredibly noticeable while gaming. At 47dbA, stock clocks with the clip-on fan result in 9.5 times higher volume, nearly an order of magnitude.
The same chart I referenced earlier indicated that this is almost the sound of moderate rainfall, so it’s definitely not something I can ignore. Unless you’re playing with the Deck docked, or aren’t sensitive to fan noise, this is entirely too loud while in handheld mode on maximum speed. Medium speeds are better, but then you lose out on a lot of the cooling that you get otherwise, with the Deck easily being able to keep up at the same volumes.
Review Time!
Alright, so now that we’ve tested everything, what are the key takeaways?
Old JSAUX Backplate (Metal)
Starting with the old JSAUX backplate, the one with the metal plate, I recommend avoiding it if you’re thinking of overclocking or have larger hands. The metal gets hot enough that I was able to feel it a few centimeters away, I accidentally touched it a few times and definitely feel like I’d have been burned if I kept my fingers there.
If you really want the metal backplate for either aesthetic or performance reasons, then I recommend…
JSAUX Magnetic Fan
The magnetic fan to go along with it.
Aside from not having a battery, this tamed the unruly metal backplate and made it pleasant to hold.
It’s a pain having a cable plugged in, but it wouldn’t be too hard to have this plugged into a Dock and then just slap it on the back of your Deck when you want to play on the TV.
It’s a little too glossy for me, it doesn’t feel very premium, and the RGB leaves some to be desired, but it’s good at it’s main purpose. If you don’t want to swap a backplate, but you still want to have some extra cooling for the Deck laying around…
JSAUX Clip-On Fan
Then I definitely recommend the clip-on fan. It might be noisy and a bit cumbersome, but the speed adjustment and excellent performance make this a great choice for someone who doesn’t feel comfortable opening their Deck.
Thermal Paste
If you feel comfortable opening your Deck and have some decent thermal paste laying around, you can definitely shed a few degrees just by swapping out the stock stuff. It’s not best-in-class, but plenty of techies have it on hand and that makes it easy to recommend!
The Winners
And that brings us to the winners for the day, the new JSAUX backplate with vent and the Honeywell PTM7950 thermal pad. Having 1 of these is already a boon for performance, but having both is even better, especially when comparing to Stock.
How much better? Let’s see some new comparisons!
Horizon Zero Dawn
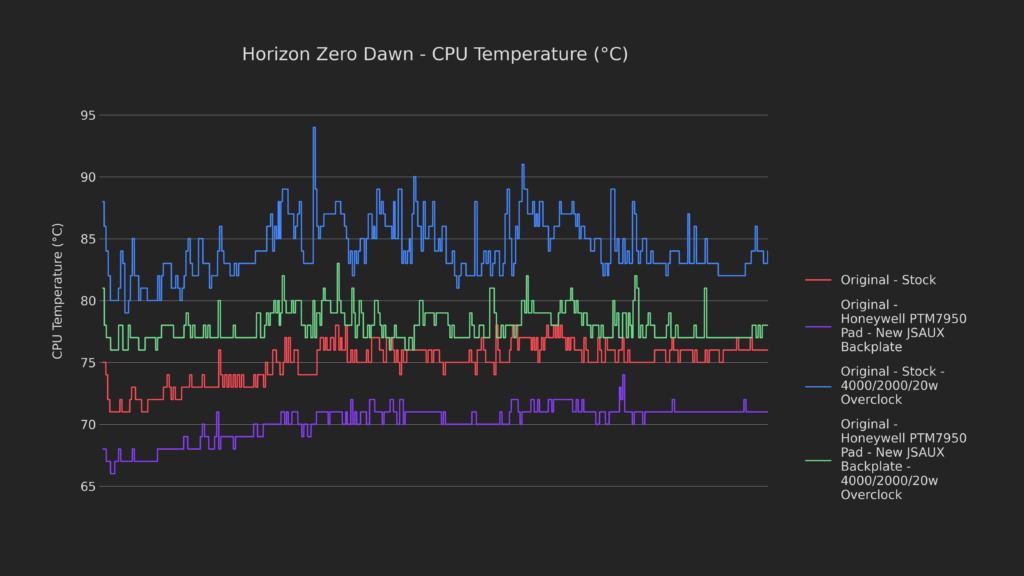
CPU temperatures on Horizon Zero Dawn were about 5 degrees cooler at stock speeds, and 7 degrees cooler while overclocked.
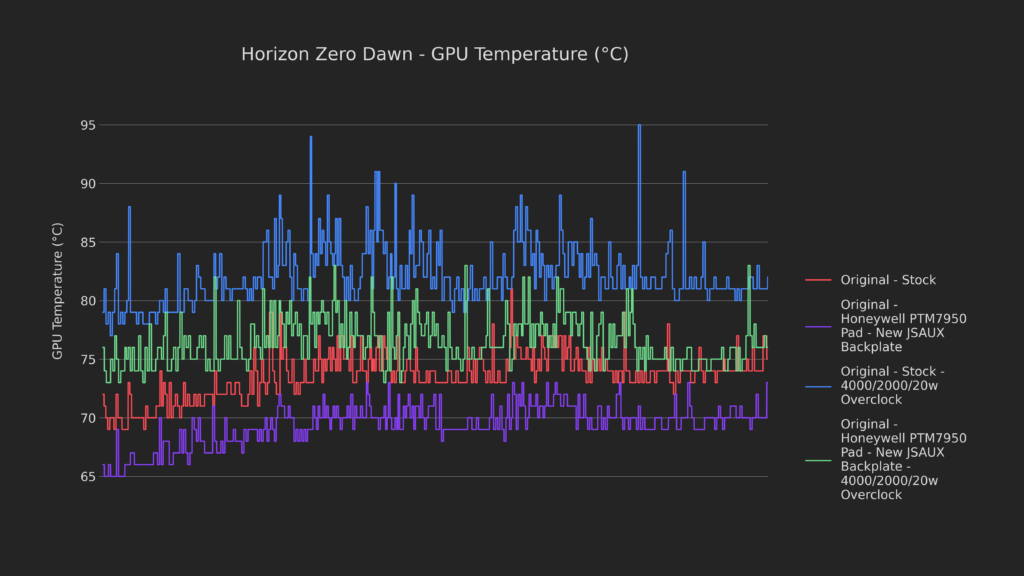
GPU temperatures were similar, losing 5 degrees average.
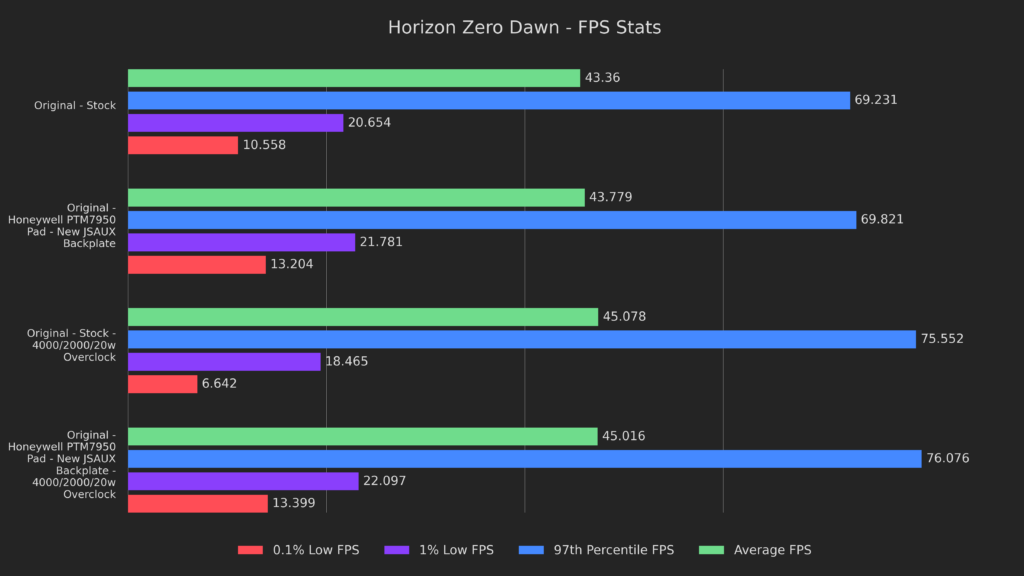
And performance was much more stable, even considering the hitching inherent in the game!
Cyberpunk 2077
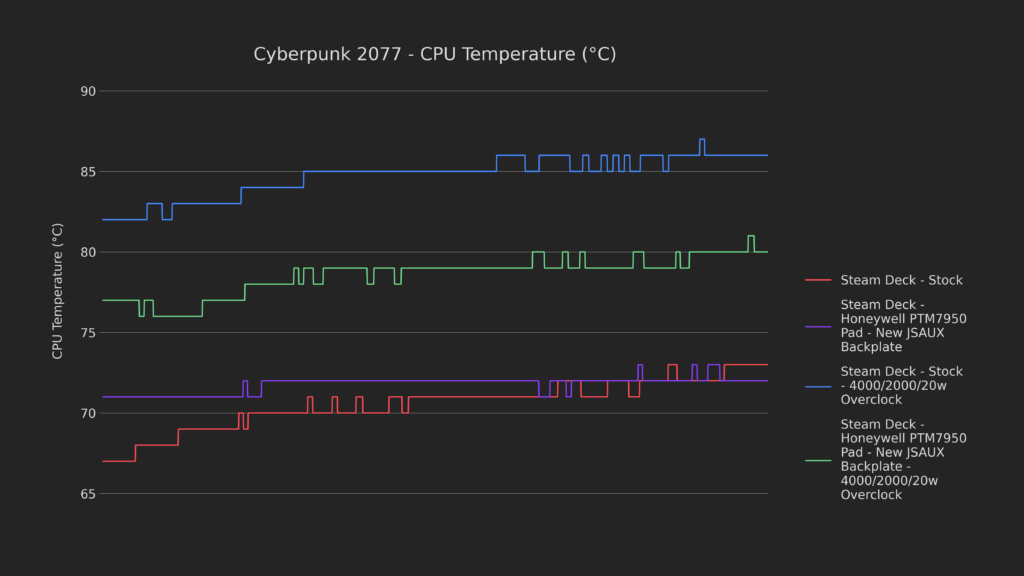
Cyberpunk 2077 ran 5-6 degrees cooler on the CPU when overclocked, but within margin of error on stock clocks.
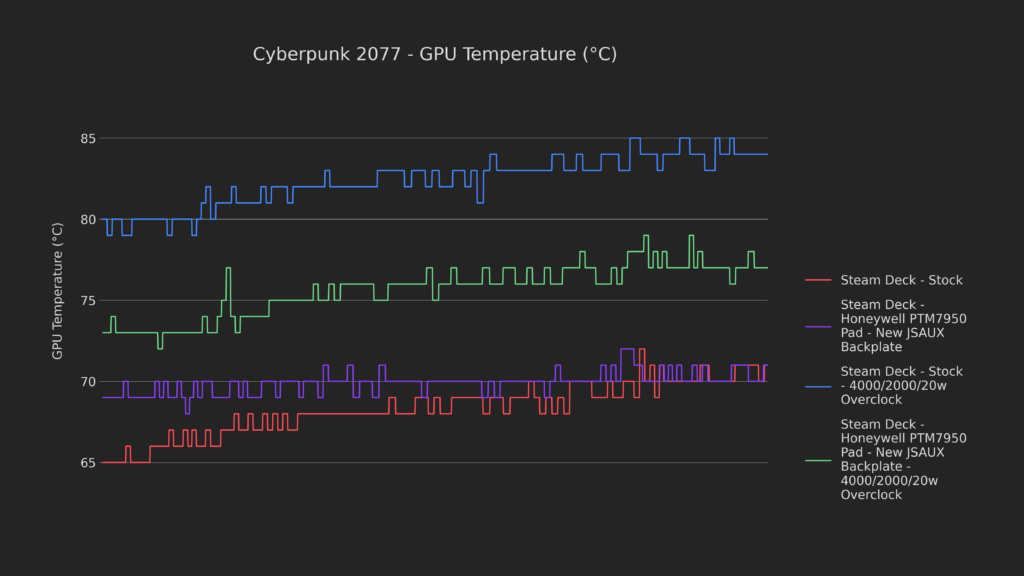
And had similar results on the GPU.
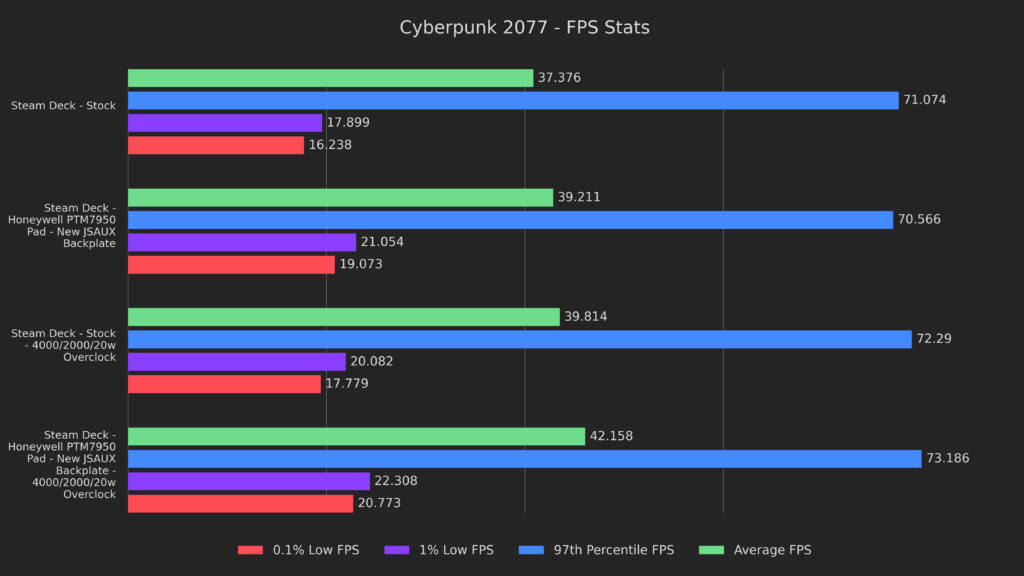
But managed to pull a few more FPS at both the stock and overclocked.
Chassis Temperatures
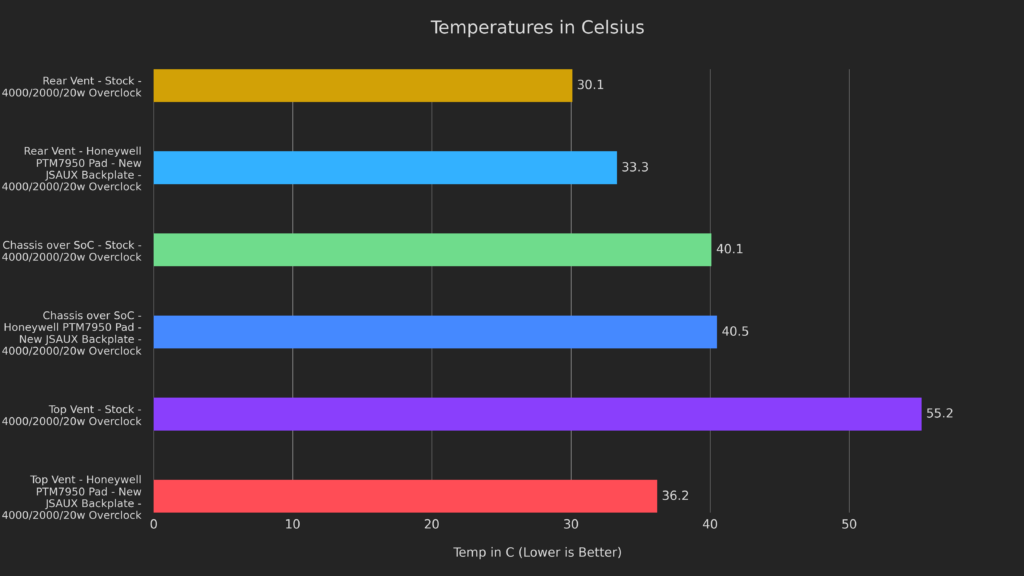
This was while it stayed MUCH cooler on the chassis.
Acoustics
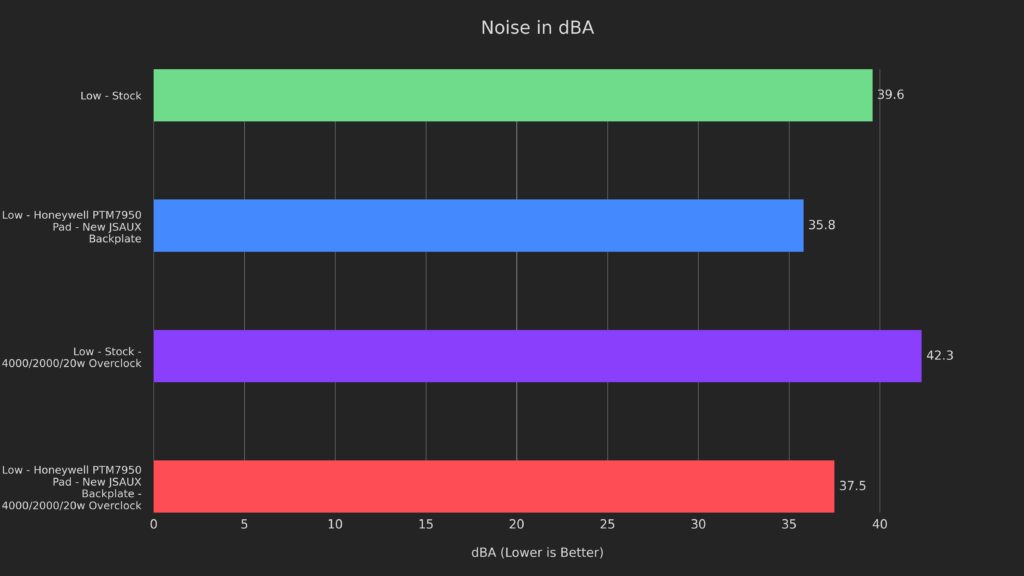
AND quieter by about 5dBA to boot.
My Concerns
I mentioned that I’d touch on this at the end of the article, but there are a few potential downsides to the new JSAUX backplate with the vent.
First, the Deck was made with a very specific airflow pattern in mind, and was made with an emphasis on negative air pressure. Having the fan on the inside and pulling air through the lower intake vent pushes a lot of air across many heat-sensitive parts of the Deck, like the VRMs, or voltage regulator modules. The JSAUX vented backplate circumvents a lot of that airflow and COULD harm those parts, although I didn’t notice any of these parts getting significantly hotter during my testing.
Second, with the fan basically being exposed, dust buildup could be far worse using the new backplate. Fortunately, you’ll be able to see much of it through the transparent shell, but it’s something to keep in mind for long-term usage.
Lastly, if you have a Delta fan you may want to steer clear, or replace the fan as well. The fans are usually quiet enough to not be too grating, but on occasion they’ll ramp up and the whine will be very noticeable.
Conclusion
I will personally be keeping the new backplate on this Deck, having both it and the PTM pad is a night and day difference for my usability and it should keep my fans quieter, which might even help battery life in the long run!
Lastly, and as always, thank you all for reading and have a great day!
The JSAUX and some Amazon links above are using an affiliate link which gives Cryobyte33 a little back from sales at no extra charge to you.
If you enjoyed this article, be sure to check out the rest of the content on SteamDeckHQ! We have a wide variety game reviews and news that are sure to help your gaming experience. Whether you're looking for news, tips and tutorials, game settings and reviews, or just want to stay up-to-date on the latest trends, we've got your back!




You should test the old metal backplate, with the magnetic fan attached, and also with the vented clip on fan.?