A lot of games are coming out on Steam that many want to be able to play on the Steam Deck. While some don't need any setting changes whatsoever, a lot of games do! Whether it be to run as optimally as possible and save battery or to have it running decently while looking the prettiest, setting changes help get games running well on a device that it seems like it shouldn't.
For a lot of our optimizations, we change a multitude of settings from SteamOS to In-game. While it is easy to just change the settings and play, it is good to understand what the settings do and how they could affect the device and the game itself. In this guide, we will go over the SteamOS (Quick Access) settings, as well as general in-game settings we tend to find in most, if not all, games. This is also an overview, not a very deep-dive, so we highly recommend looking more into these settings as there is more going on under-the-hood.
SteamOS Settings (Quick Access Menu)
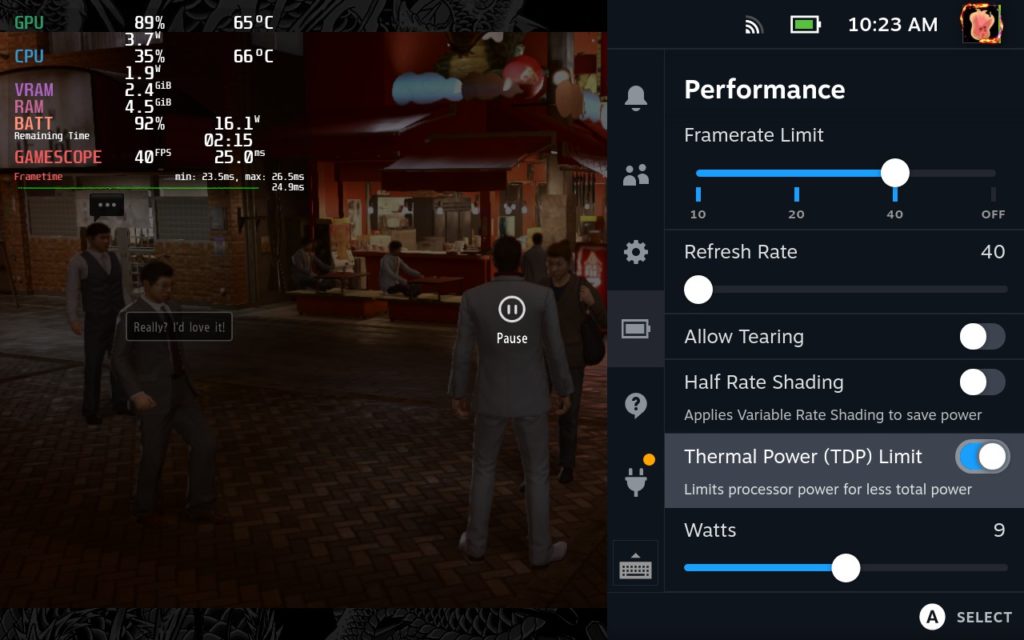
The most important settings we look at, for when it comes to saving battery and stabilizing framerate, are the ones that are baked into SteamOS. These can be easily viewed in the quick access menu and can be saved for each individual game via the profile at the top.
Now, starting from the top and going down, I will explain each setting and how we utilize it:


Framerate Limit - This is an internal limit that will stop a game's framerate from going over a specified amount. The values in the bar relate directly to the refresh rate with the rates being: 1/4 of refresh rate, 1/2 of refresh rate, same value as refresh rate, and no cap at all. Cutting down on how many frames are outputting can save battery significantly and bring down temperature.
Refresh Rate - This is the limit at which the display of your Steam Deck will refresh. On the Steam Deck, this value ranges from any number between 40-60. Changing this value will also directly affect the framerate cap, which can save battery life and bring down temperature.
Having a framerate and refresh rate that match in value will always be better than going to a 1/2 or 1/4 value as it syncs up perfectly and will feel significantly smoother. Utilizing these can also help stabilitze framerate that is erratic. For example, if you have a cap of 60 or no cap at all and the framerate hovers around 42-47 FPS, imposing a refresh rate and cap of 40 will stabilize the game's framerate, save some battery, and will feel smoother overall.
Allow Tearing - This is a relatively new option that will disable any cap or Vsync for games through SteamOS. This is only useful for when outputting to an external monitor or TV that has a different refresh rate. Enabling this will disable any Vsync that SteamOS imposes and allow less latency with some visual screen tearing.
Half-Rate Shading - This will apply a Variable Rate Shading that is designed to save on power. This option will half the shading quality while in-game. I don't personally enable this much, but it can come in hand for some when it comes to framerate stabilization if trying to push for a higher framerate.
Thermal Power (TDP) Limit - This is the limit for how much power is outputted to your APU to run games. This is a key component in our builds for when we are trying to save on battery life. There are also some games like Hades or Tactics Ogre: Reborn that will use more power than it needs to, which the TDP limit can fix. The range for how much it will limit goes from 3W - 15W. I personally try to balance it around 9W for our builds that push for higher quality. There is also a direct correlation with less power used and lower temperature internally from the CPU and GPU.
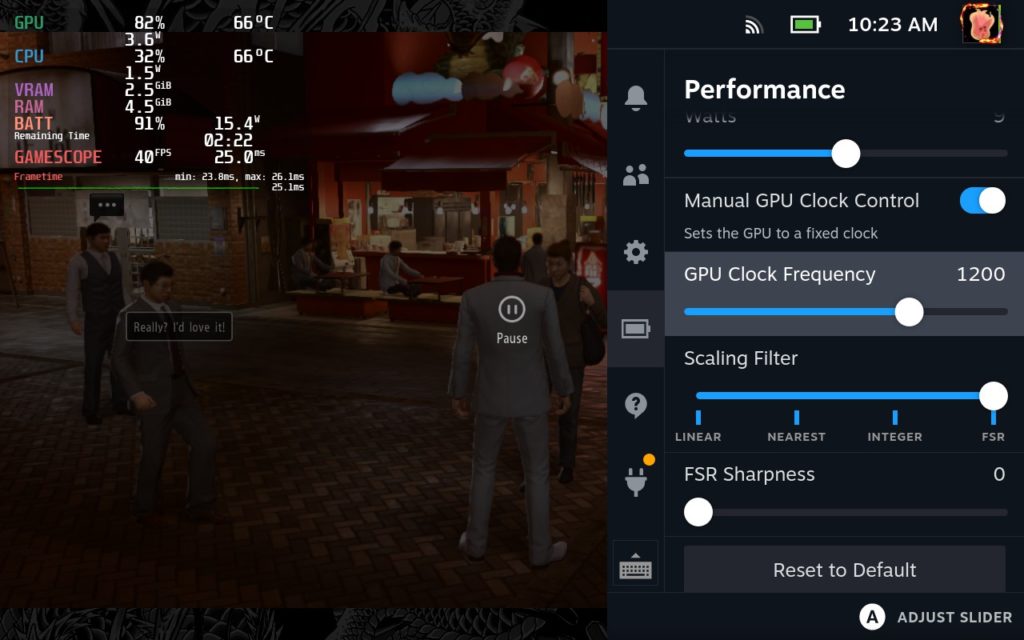
Manual GPU Clock Control - This option allows you to set a manual GPU Clock Speed Frequency. The Steam Deck does do this automatically, but there are times when setting a Clock Speed frequency, like when GPU is being under-utilized, really helps with framerate stability. While it can save on battery, this setting is used more to stabilize CPU/GPU usage and keep stuttering framerates under control.
Scaling Filter - The Scaling Filter is an option that allows you to upscale any resolutions that are 16:10 aspect ratio and underneath the native 1280x800 resolution. This includes 1152x720, 1024x648, and 960x600 resolutions respectively. There are 4 options for the scaling filter as well:
Linear: No upscaling whatsoever.
Nearest: Also known as Nearest Neighbor, this upscaling method is the simplest of the 4 methods and replaces pixels with whatever is nearest for output. This means multiple pixels of the same color will be present next to each other to try to create a higher resolution image. This can preserve some sharp details, but introduce some jaggedness in smooth images.
Integer: This upscaling method turns each pixel of a game into a square or rectangular group of same-color pixels. It is very useful on pixel-style games, but 3D games tend to have reduced sharpness.
FSR: AMD's open-source upscaling method. Based on the Lanczos algorithm, this iteration of FSR (1.0) uses an anti-aliasted lower resolution image and using spatial upscaling to make the game look like it's running at a higher resolution. This is the preferred way of upscaling 3D games, which on the Steam Deck, are the ones most in need of configuring to run better.
Through a combination of these settings, we can generally improve on how games run and optimize for the best performance and save on battery. These are features that come baked within SteamOS and aren't as easily accessible/available in other systems. But this is only half of the optimization method as some bigger games also need changes in-game, which we will go over too.
In-Game Settings
While each game is a little bit different and may not show all of these settings, or may show others that are specific for the game, we will be covering the most important and common ones that generally appear in every game.
Resolution - This is the option that will render your game at the screen size of your choice. Picking a higher resolution will push the game to render more details to properly fill the screen, but at the cost of power. Making it lower will result in a blurrier image as it renders for smaller screens and then blows up the image, but can save on battery drain and power usage. Upscaling methods can come in hand here to try making the image look better without utilizing more power.
Upscaling Mode - Some games will come with their own internal upscaling methods that can access more details within the game to result in higher quality images. These methods generally use temporal upscaling, which relies on past frame data, to produce a much better image while saving the same amount of power that SteamOS's FSR 1.0 uses. The two most common are FSR 2.0 and Intel's XeSS. Temporal upscaling needs past data to be able to work and that has to be implemented by the developers of the game, so it can't be widely used in SteamOS.
Texture Quality - This setting changes how detailed the resolution of textures are in game. Turning this setting down can help with the limited video memory we have on the Deck, but it doesn't impact as much by itself. Generally leaving this on a higher setting is okay.
Texture Filtering - This can help distant textures look smoother, but doesn't have a big impact on image quality and doesn't help performance as much.
Shadow Quality - This option changes how detailed the shadows are that appear in-game. This can range from increase shadow resolution, the amount of shadows, soft vs hard shadows, or increase the distance at which shadows are visible. This can have a very big effect on the performance of games and is one of the first settings I tend to look at.
Ambient Occlusion - While it has different types that exist, Ambient Occlusion helps simulate how light sources affect different parts of an object to provide more realistic shadows. This results in softer shadows being rendered as different parts of objects may have different kinds of shadows depending of the shape and width of the object. Like shadow quality, this can heavily effect the performance of a game.
Reflections/Ray Tracing - Like Ambient Occlusion, Reflections specifically deals with how objects reflect in surfaces through light sources and direction. There are many ways this is done, but the newest and most popular is ray tracing, which is hyper accurate and detailed. Turning these off or on low free up a large amount of processing power and is usually one of the first settings I look at apart from Shadows.
Geometry Quality - Sometimes mentioned as LOD (Level of Detail), geometry quality focuses on how detailed the 3D objects in the game are. Generally, this means that the polygons used to make up a 3D object are reduced. This can result in using less processing power and increase performance, but the objects will look less detailed in their structure.
Anti-Aliasing - Another setting I look at pretty early on. Anti-Aliasing deals with smoothening out edges of 3D objects so they aren’t sharp. Depending on the game, this can free up a good chunk of power to help a game run more optimally. Turning this off will make the game look much sharper.
Dynamic Resolution - This option usually has you set a target framerate and will automatically change the resolution the game is outputting as it attempts to stick to that target framerate.
Render Scale - This option allows you to scale your resolution down by a specific percentage to save on performance without changing the overall resolution. For example, if you have a 1280x800 resolution, you will automatically have 100% output to that resolution. But if you set to 90%, the game will output 90% of the scale
Post-Processing - This is a collection of filters and effects specifically there to enhance the visual elements of the game. This could be something small like a filter, or something much bigger like volumetric fog, but it is all their to enhance the image you see. Depending on what is included in post-processing per game, turning this down may or may not have an effect on the game’s performance.
And those are a collection of the most important settings that we look at when optimizing games. Some games do show different settings, so you might not see all of these in some games (or you might see more), but these are the most common. We may update this encyclopedia later on as SteamOS develops and new settings are added, or we find more games using a newer video option that has been added. I hope this helps understand the basic idea of each of these so changing settings on your own will be more understandable!
If you enjoyed this guide, be sure to check out the rest of the content on SteamDeckHQ! We have a wide variety game reviews and news that are sure to help your gaming experience. Whether you're looking for news, tips and tutorials, game settings and reviews, or just want to stay up-to-date on the latest trends, we've got your back.


Noah what do you recommend setting in-game vSync and frame rate caps to? Should these be disabled and instead use the Steam Deck's internal fps/refresh rate caps, or vice versa? What produces the lowest input lag and best performance?
It depends on what you're after. For the lowest input lag, set SteamOS's internal FPS Cap to "Off" and use the in-game Vsync. This is really only necessary in games that need precision and the best timing possible. Otherwise, I tend to keep intervals of 5 (40, 45, 50, 55, 60) when changing the SteamOS refresh rate. I also prefer using SteamOS's FPS cap for most games as this is generally easier to configure and doesn't affect input lag as much for the games that don't require it. You could just use Vsync and whatever the refresh rate is to hit framerates, but 9 times out of 10 it will feel and perform exactly the same.
"Having a framerate and refresh rate that match in value will always be better than going to a 1/2 or 1/4 value as it syncs up perfectly and will feel significantly smoother."
But almost all recommended game settings I checked on this site suggests 60 hz 30 fps. So it's 1/2. But this article says, that better to match hz and fps
I agree, it is better to match up Refresh Rate and Cap absolutely. Most of our recommended settings do that unless it can't hit 40. Skywalker Saga, Prodeus, Power Wash, Resident Evil 2, Cosmic Shake are some of our newest reviews and use a framerate that matches refresh rate below 60. 30 is only used if 40 can't feasibly be hit.
So, so useful honestly. Someone could maybe make a cheatsheet out of all of this would be good for Valve themselves to put when entering the Quick Access Menu, like it has the explanation pop up for Steam Input when you first use it.
This is fantastic, and immediately bookmarked!
Thank you so much for all your hard work.