Hello everyone, and welcome back to another Deck Dive!
Starfield, as I’m sure you know, is Bethesda’s latest modding framework, and as per usual, performance near release has been abysmal. Despite this, I’ve played every second of my save file on the Steam Deck, and today I’m going to share my findings so you can enjoy your playthrough as well! If you like this article. and want to support me directly, go ahead over to my YouTube channel and hit that subscribe button!
Testing Methodology
Before getting into the benchmarks, let’s go over the testing methodology.
The Decks
All testing was done on 2 Steam Decks running the SteamOS beta, 3.5.1. Version 3.5 was chosen, rather than the Stable channel’s 3.4, because of the much better CPU performance. The first Deck, used for most of the testing, was running on BIOS version 118. The second Deck, used for overclock testing, was running BIOS version 116.
Both Decks used the following versions of software:
- Proton experimental 8.0-2023101
- Mesa 23.3.0-devel (git-85a01d8f)
- VKD3D 2.10.0
My overclocked Steam Deck is at 4Ghz on the CPU, 2Ghz on the GPU, and running at 20 watts. It is also fitted with a PTM 7950 pad, and the JSAUX vented backplate, so keep that in mind when comparing to my overclocking results.
A Note on Overclocking
A quick note about overclocking on SteamOS 3.5 and the new BIOS revisions. I know that my overclocking process no longer works, and I’m currently testing a new way to do so. This article has results using the new process, which I’m not ready to share yet, but I’d expect a video about it relatively soon.
The Run
The primary testing location is the New Atlantis Spaceport district since it has a little bit of everything, but I’ve also checked the following locations thoroughly:
- Introduction/Tutorial mission on Krete
- Cydonia
- Dogfight in L.I.S.T. 4 Families mission
- Forest planet
The New Atlantis spaceport has elements of each of these locations, namely large sight lines, some vegetation and complex geometry, particle effects during ship takeoff, and large amounts of AI to hit the CPU hard.
The exact route was loading in next to my ship, then walking through the UC checkpoint, up the stairs, walking by the bar, and then ending by the tram, which takes approximately 60 seconds.
So, without further ado, let’s get into the baseline!
The Baseline
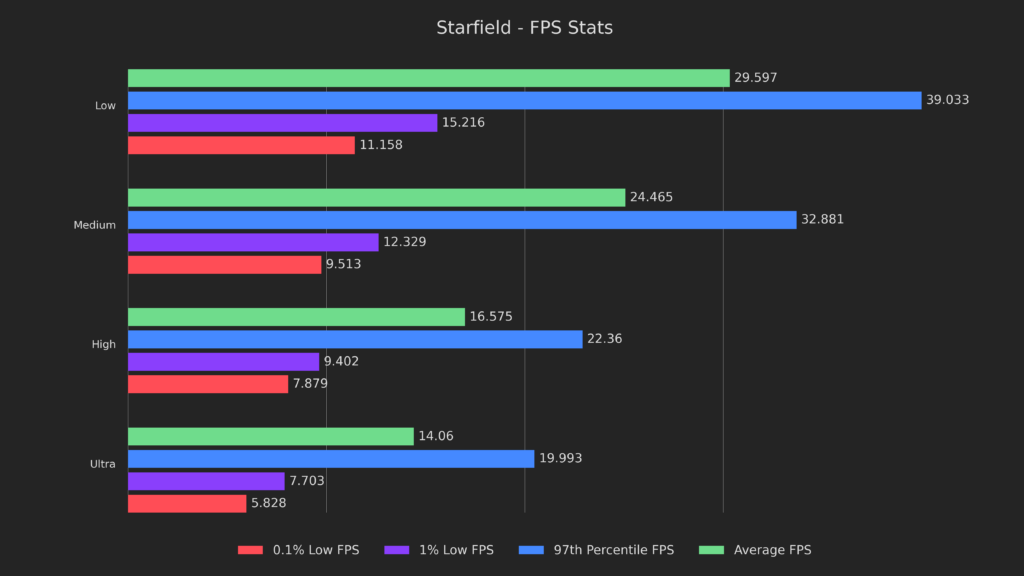
Right off the bat, we have what I’ll call… sub-optimal numbers. Even on low, we can’t hit an average of 30 FPS, and Ultra can barely even manage 14. On top of that, stuttering is pretty severe, with low being the only preset to manage a double-digit 0.1 percent low.
We have our work cut out for us, so let’s find the bottlenecks!
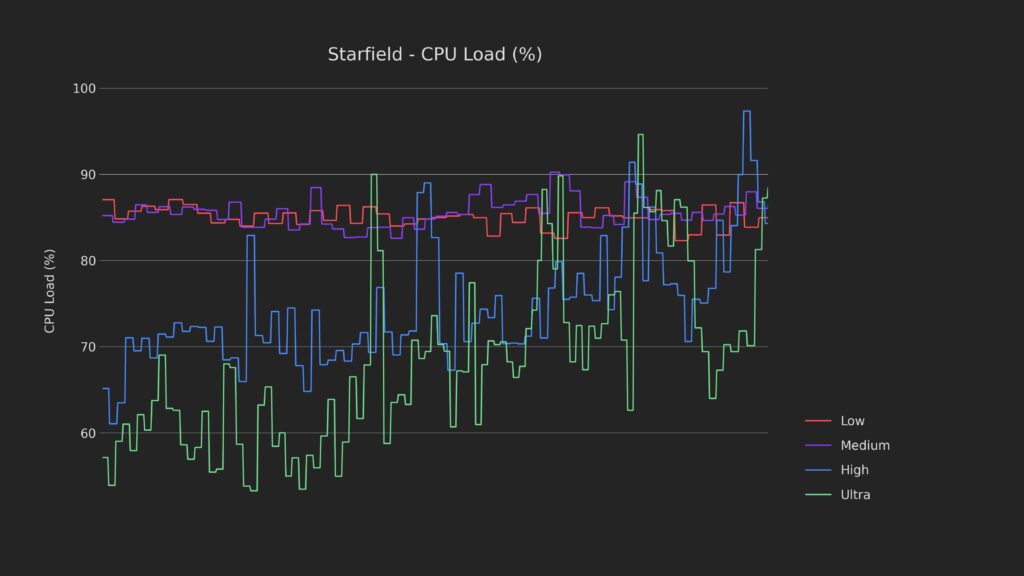
First up is CPU load, which is high.
The low and medium presets have an average load of about 85%, whereas high and ultra have a much lower load, which suggests that the CPU is the bottleneck on lower settings, and the GPU is the bottleneck on higher ones.
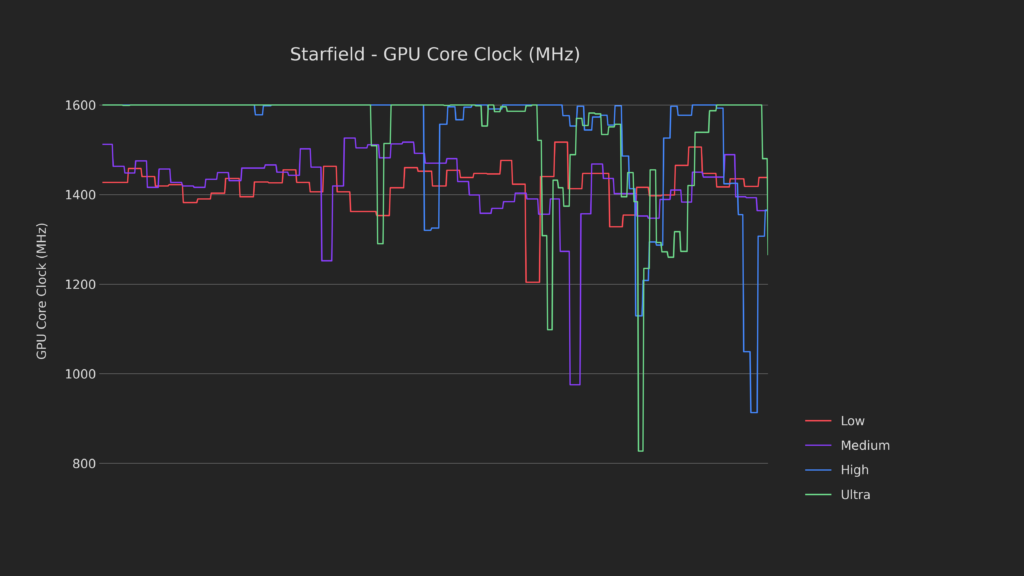
Speaking of the GPU, we can see that I was right with my guess. While low and medium hover around the 85-90% utilization mark, the higher presets max it out during most of the test.
2 things are interesting to note here, though:
First, the downward spikes in the test's last half seem universal. Looking at the footage, we can see that the first of these occurs during a really bad stutter when approaching the tram from the bar area, which happens every single time. The second of the stutters occurs when stopping next to the tram, where you can see the performance absolutely tank while the game tries to swap old assets out before boarding.
The second thing to note is that neither the CPU nor GPU are being fully utilized during the duration of the test on low or medium settings, despite the horrible performance. This made me think there must be a memory bottleneck on the lower settings, so let’s check it out.
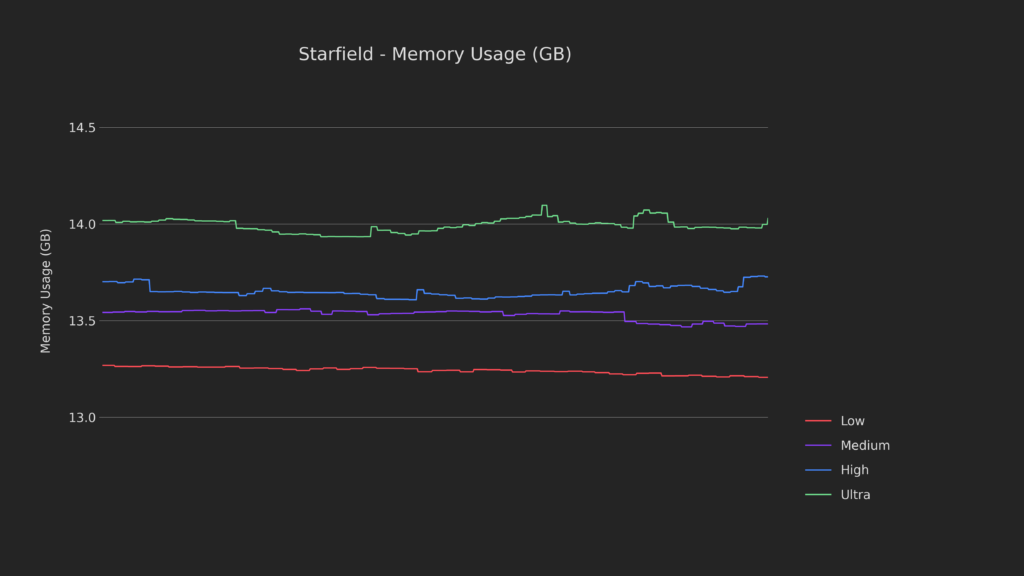
Looking at the memory usage, we can see that the Deck is throwing everything it has at Starfield.
Between the 13 and 14GB of memory used here, it’s pretty clear that the GPU won’t have anywhere near the memory it needs, which explains the stutters. Fortunately for us, this means that either the swap resize in CryoUtilities or increasing the VRAM could be a viable candidate for improvement, so I’m excited to check those out in a bit!
As we can see, the performance here is just bad, so we will focus on the low and medium presets during the bulk of the testing and then use what we learn to maximize gains on higher settings later.
Lastly, before moving on, the next few tweaks will be adjusting the minimum VRAM, or UMA Frame Buffer, and using CryoUtilities 2.
If you don’t know what either of those is, I highly recommend checking the video out.
4GB VRAM
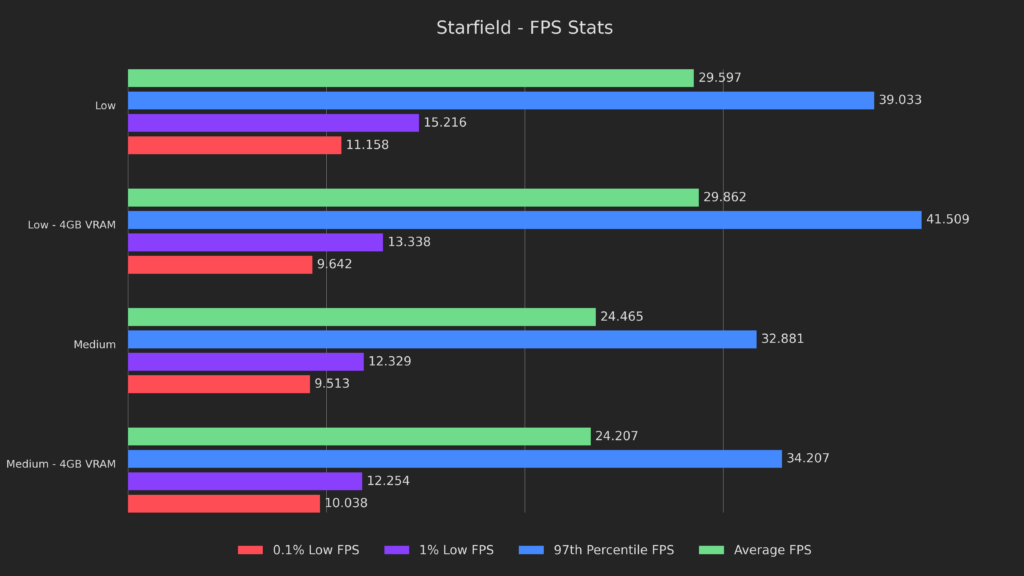
First up is 4GB of VRAM, which doesn’t do much for averages but increases the 97th percentile by 6% and 4% for low and medium, respectively. The lows on the low preset are 2 FPS lower with the 4GB of VRAM and within a single frame on medium.
Overall, 4GB of VRAM is a bit of a wash, but we’ll see why we covered it in a bit.
CU2 + 4GB of VRAM
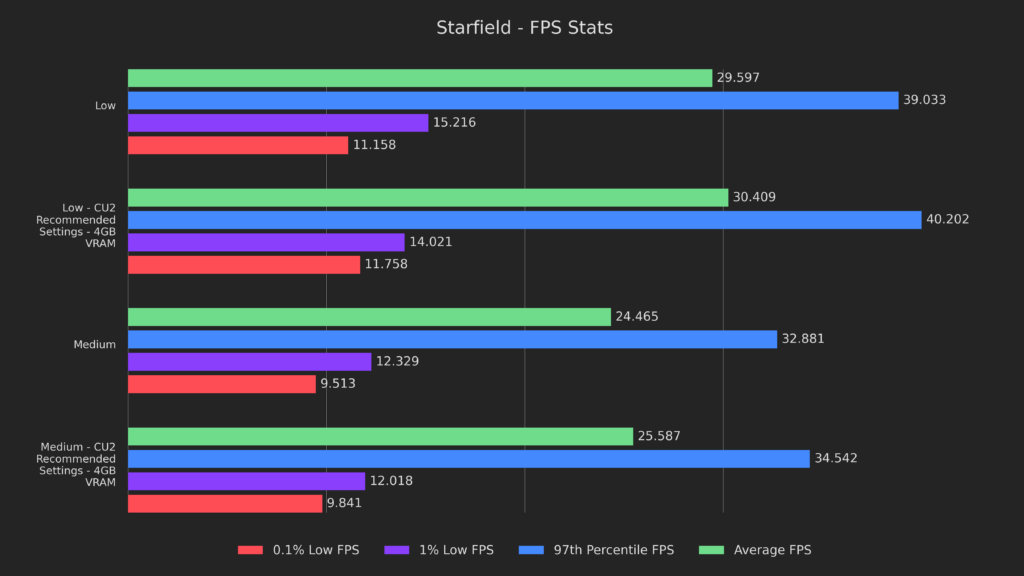
Next up is adding CryoUtilities 2’s Recommended settings into the mix, which we can see brings us our first gains.
Paired with 4GB of minimum VRAM, we see a 3% and 5% boost to both averages and 97th percentile results and a minor boost to 0.1% lows on both presets. It’s not a huge difference, but just these 2 small changes would let us lock to 30FPS more consistently in busy scenes, so it’s a welcome difference.
As these are our best results, we’ll use them as a baseline going forward!
Deck Performance Mod
The next thing I wanted to try is the Steam Deck Essentials mod, which does everything from compress the textures to fit into the Steam Deck’s VRAM to change the framerate of the in-game animations for a more fluid experience.
Installation
Installation is pretty simple and can be done completely on the Deck!
All you need to do is go to the Nexus page and then download all 3 files on the files page.
From there, start with the textures file and follow the instructions inside the readme.
At the time of writing, I simply had to move the files in the “Starfield Directory” folder to the Starfield installation folder and the files in the “Documents” folder to the location on screen now (/home/deck/.local/share/Steam/steamapps/compatdata/1716740/pfx/drive_c/users/steamuser/Documents/My Games/Starfield).
Note that all the relevant locations are listed in the readme, so don’t hesitate to read and copy/paste the relevant paths.
Next, do the same for the “INI Tweaks” file you downloaded. In these upcoming tests, I used the “Ultra Performance” option.
Then, lastly, do the same for the animations file.
After all 3 are installed, you just need to do 1 more thing: delete the existing shadercache for Starfield.
To do so, just go to the shadercache folder (/home/deck/.steam/steam/steamapps/shadercache/1716740) and delete everything in there.
Don’t worry; nothing is really lost here since it only contains the shaders that Valve built, your save games are safe.
And with that, you’ve installed the mod completely!
Deck Perf Mod + Perf INI
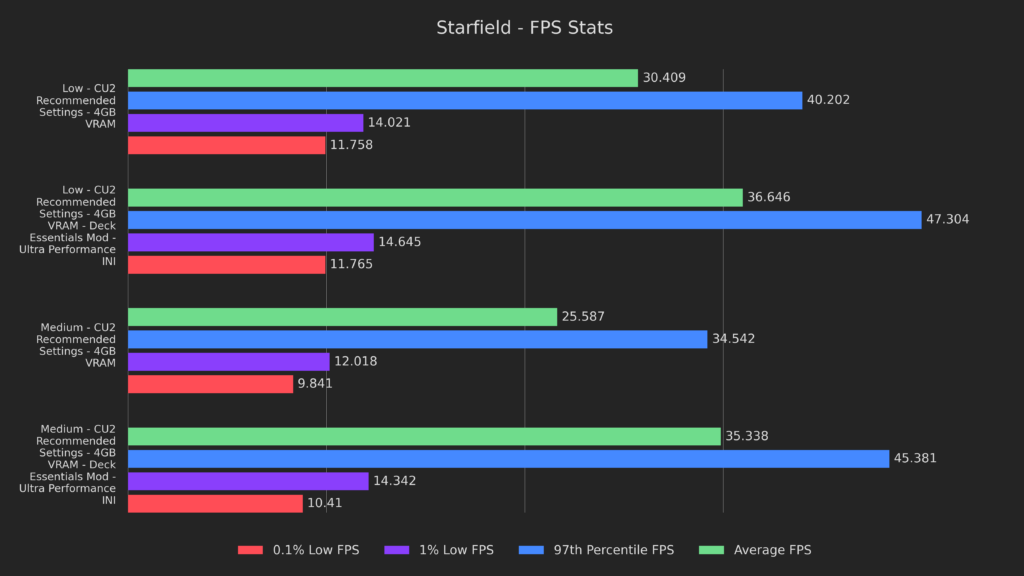
Here we can see why we went through the trouble.
While the visual quality of the game takes a hit, it performs MUCH better. The averages increased by 25 and 38%, while the 97th percentile results increased by 18 and 31% for low and medium, respectively. Despite the lows barely budged, clearly signifying that loading stutter is a major problem with Starfield, no matter the assets used.
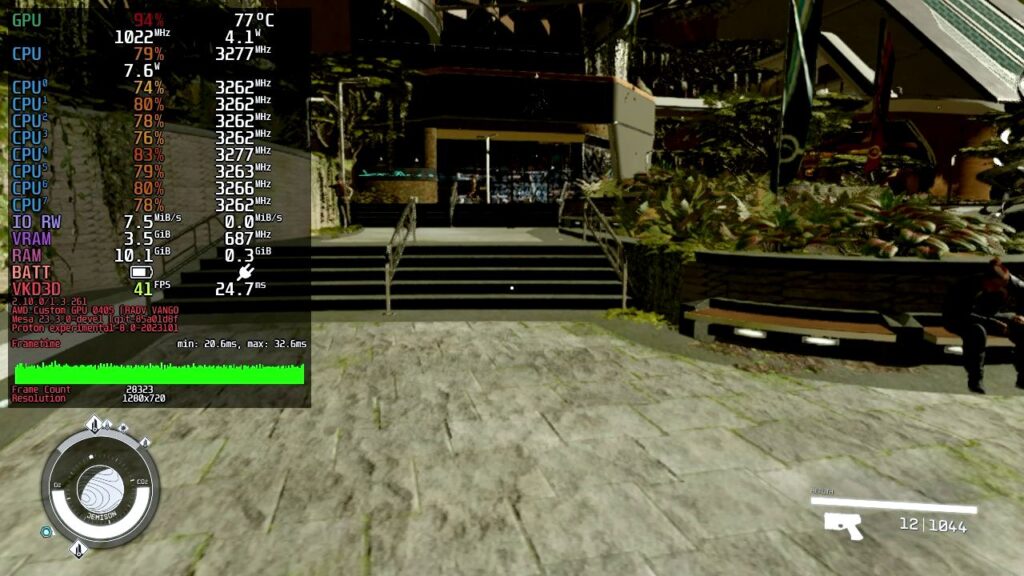
With these much better results, let’s search for some new bottlenecks!
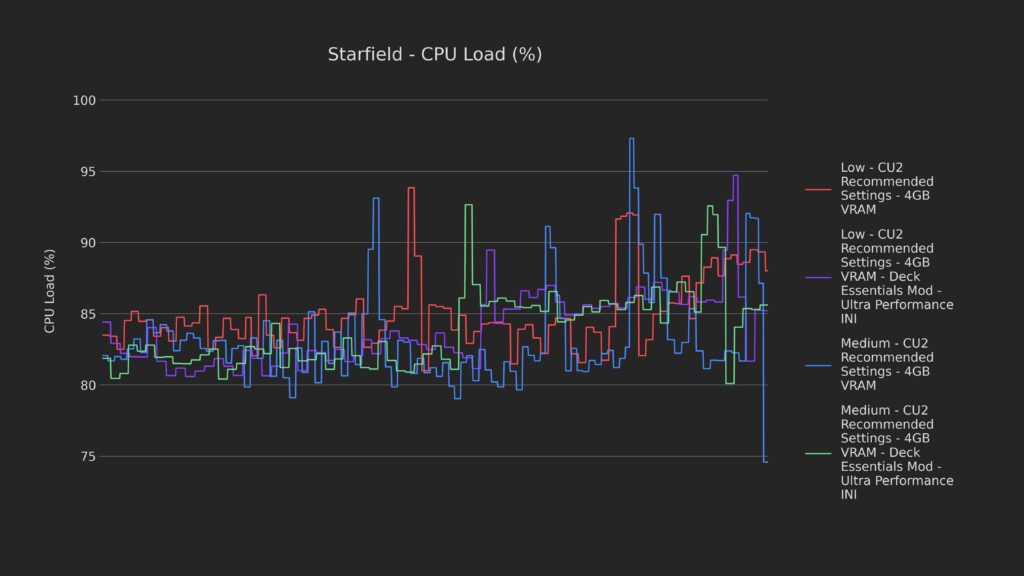
The CPU load looks identical, so nothing here.
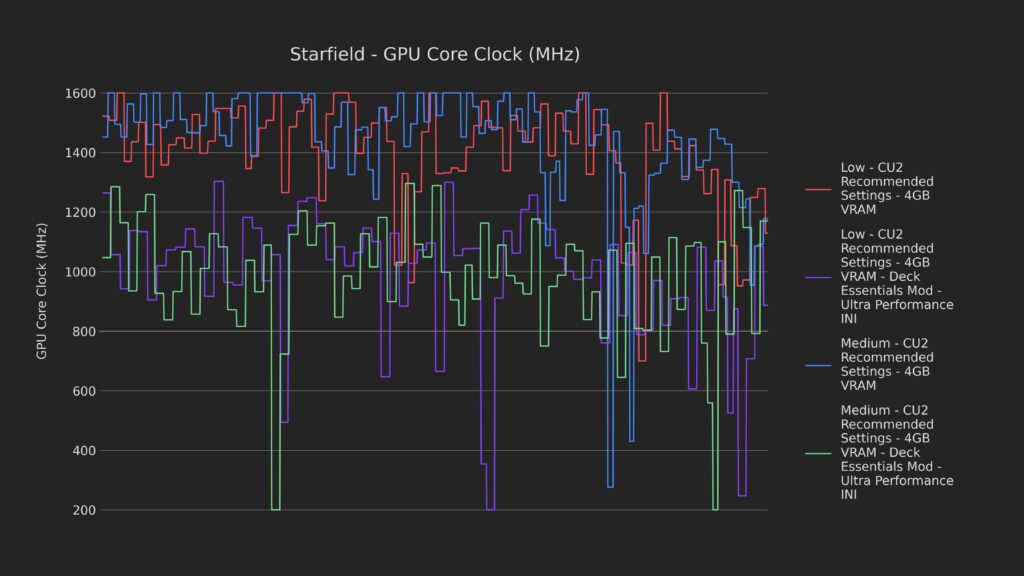
But the GPU load is MUCH lower with the mod active, clearly showing that it’s doing its job and making Starfield much easier to run.
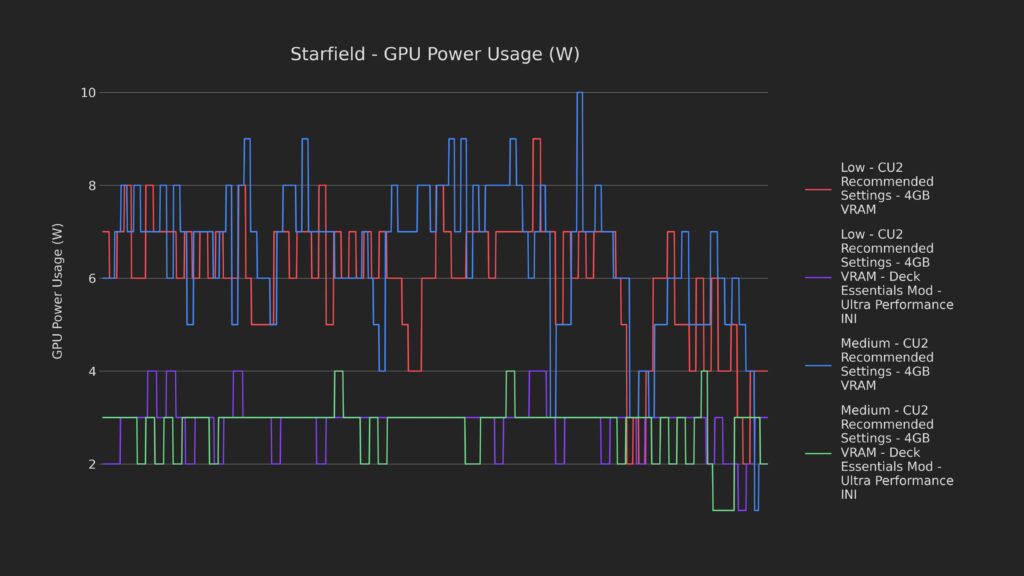
On that note, the GPU power consumption lowered drastically, sometimes more than 60%!
Quality INI
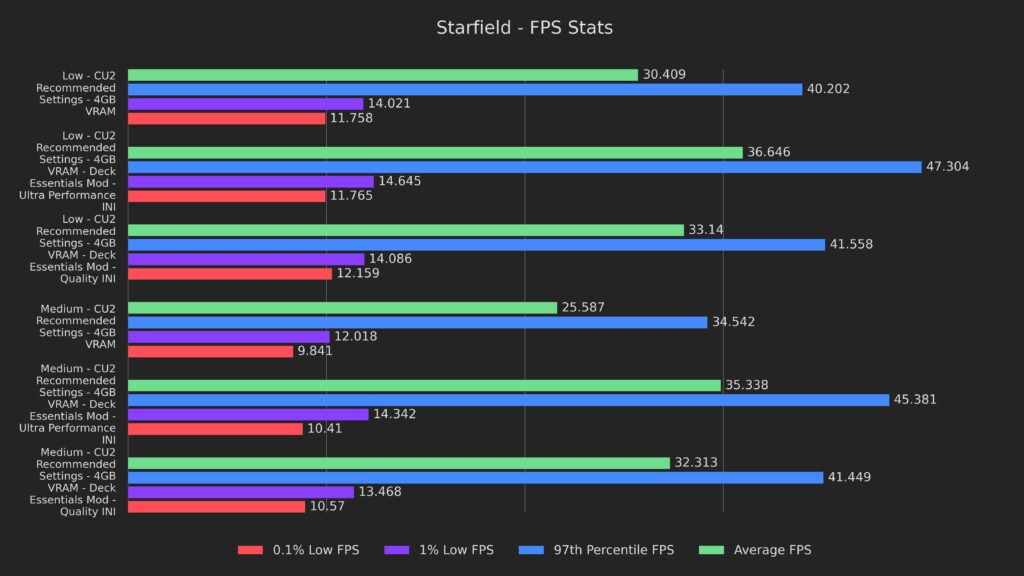
I also wanted to test the INI option marked “quality” since the visual hit was pretty severe on ultra performance. Fortunately, even using the much nicer-looking quality option, we still retained a large amount of our performance gains, so we’ll have to keep it in mind for later!
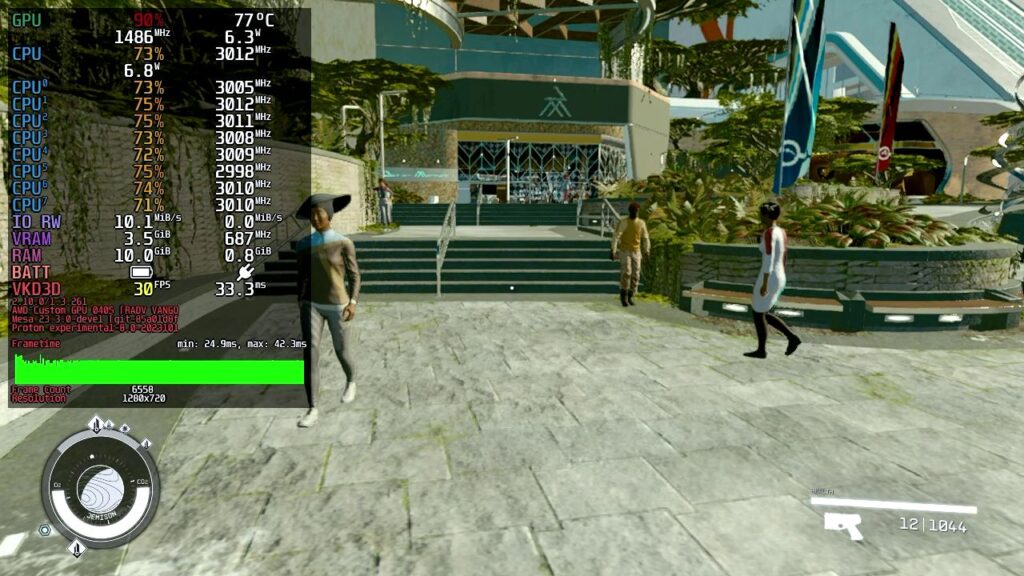
As a quick note, I’ll remove the CU2 and 4GB of VRAM labels from graphs for the remainder of the testing, but they were still used. I just want to keep the graphs readable!
Perf INI and Disable Dynamic Resolution
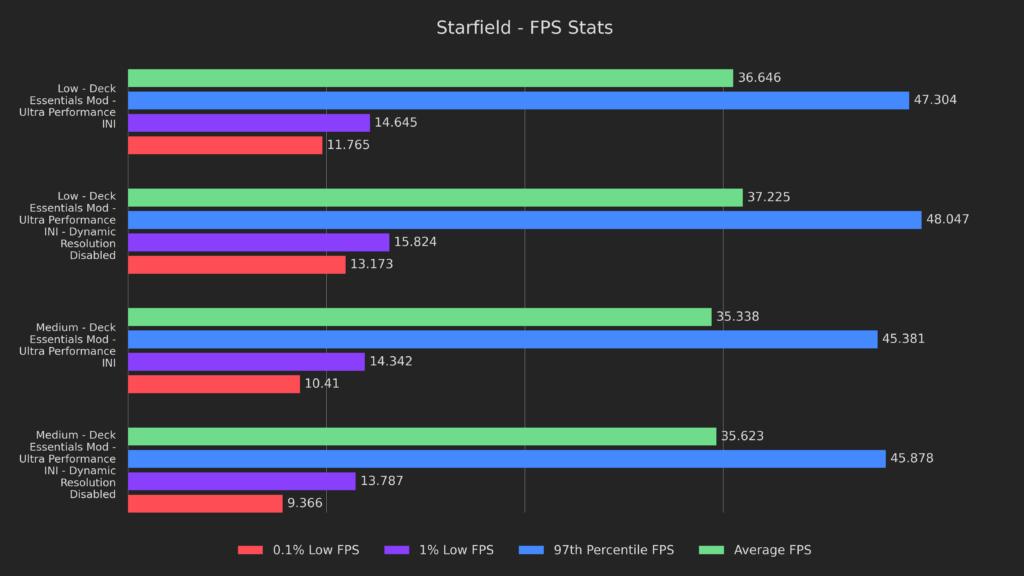
After seeing the loading lag spikes, I thought they might be caused by the dynamic resolution scaling feature, so I tried disabling it! To my surprise, not only did the averages and 97th percentile results rise, but even the lows on the low preset. I don’t have any definitive proof of this, but I believe that the scaling is a pretty costly process and doesn’t help us when using the mod, as most textures are already very small.
From here on out, these results are the new baseline!
Disable TAA
Next, I wanted to see if disabling temporal antialiasing, or TAA, would help with either framerates or the fuzziness in the image. You can disable TAA by editing your StarfieldCustom.ini in the documents folder that we extracted earlier and then adding the following text under the [Display] heading:
bTemporalAA_idTech7=0
I would like this toggle to be in-game since I don’t like how fuzzy TAA makes the image, but this will have to suffice for now.
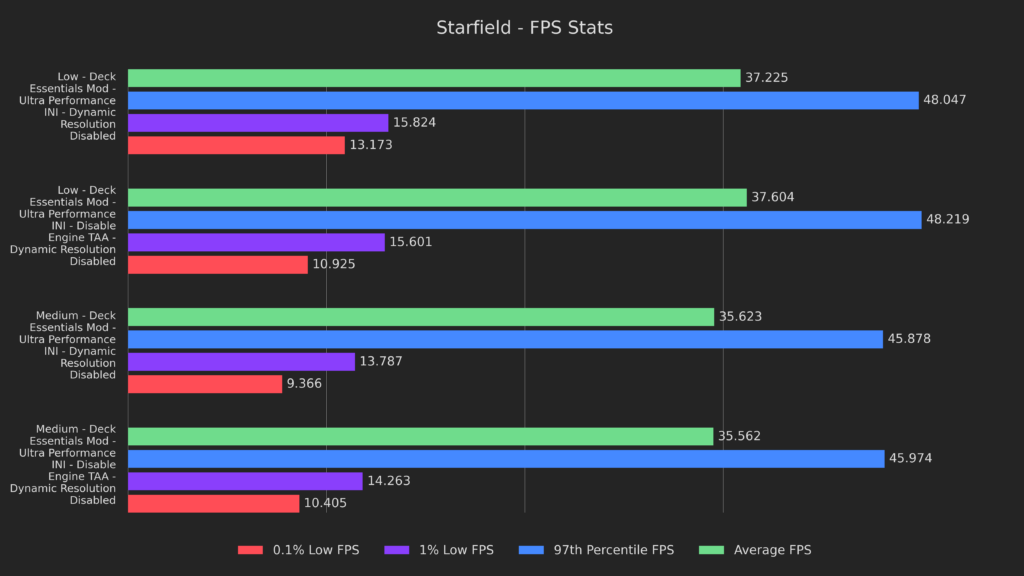
Performance was a mixed bag, with low getting worse lows and medium getting slightly better lows.
That said, if you hate the soft edges that TAA gives, then this change is amazing!
Overclocking
Next up is overclock testing and a reminder that I’m running at 4Ghz on CPU, 2Ghz on GPU, and a wattage of 20.
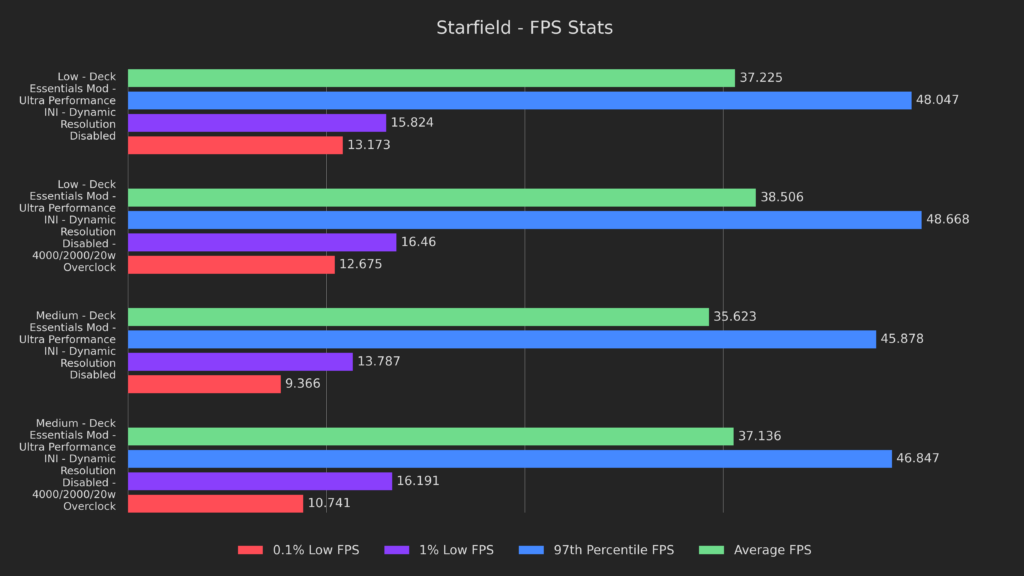
Overclocking results were definitely better than stock, but not as high as I’d hoped, which really goes to show how many computers you need to get a single frame out of Starfield. In this case, we saw averages increase by 3% and 4%, and the 97th percentile results increase by 1% and 2%.
The lows on the medium preset increased by 17% and 15%, but the lows on the low preset were nearly identical.
Testing Conclusion
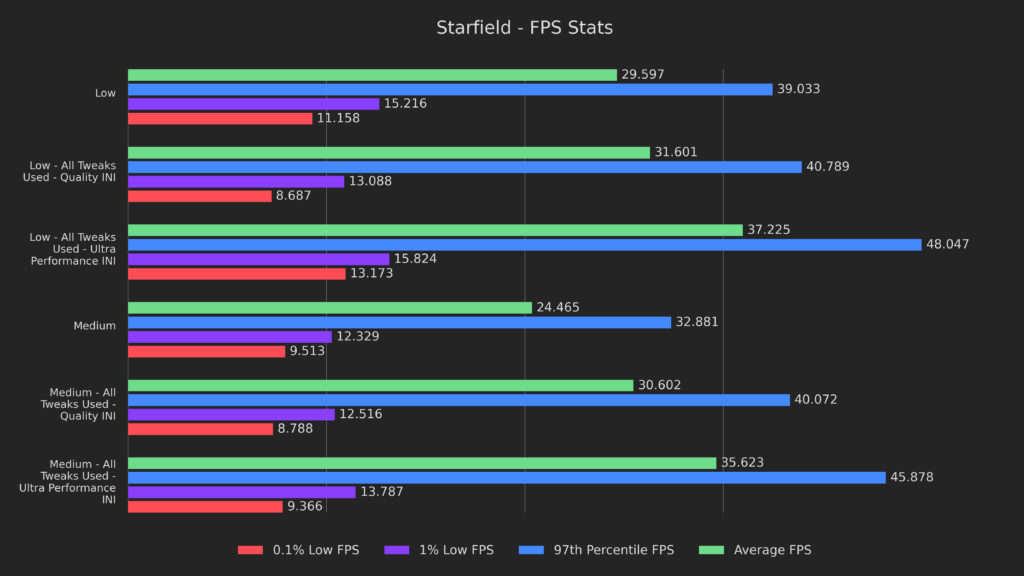
To recap, we increased average performance by 26% on the low preset and a huge 46% on the medium preset! Unfortunately, the lows just don’t budge, and there doesn’t seem to be anything to be done aside from a game update, but I’m very happy with the average gains.
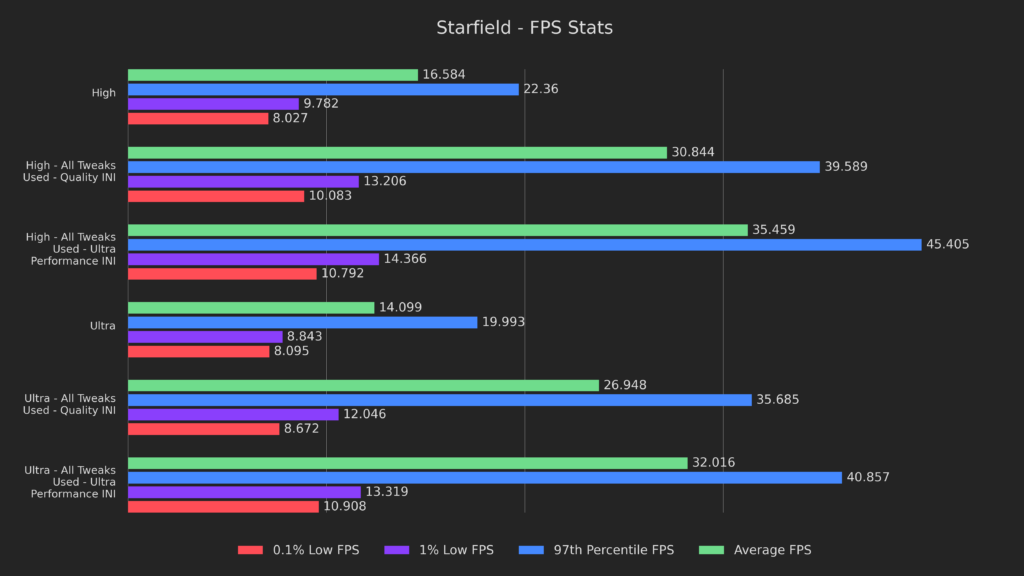
Looking at the high and ultra presets, we can see that even the lows were improved significantly! The high preset more than DOUBLED average framerate and 97th percentile, while the lows improved by 45% and 34%. The ultra preset also doubled the averages and 97th percentile and increased lows by 51 and 35%.
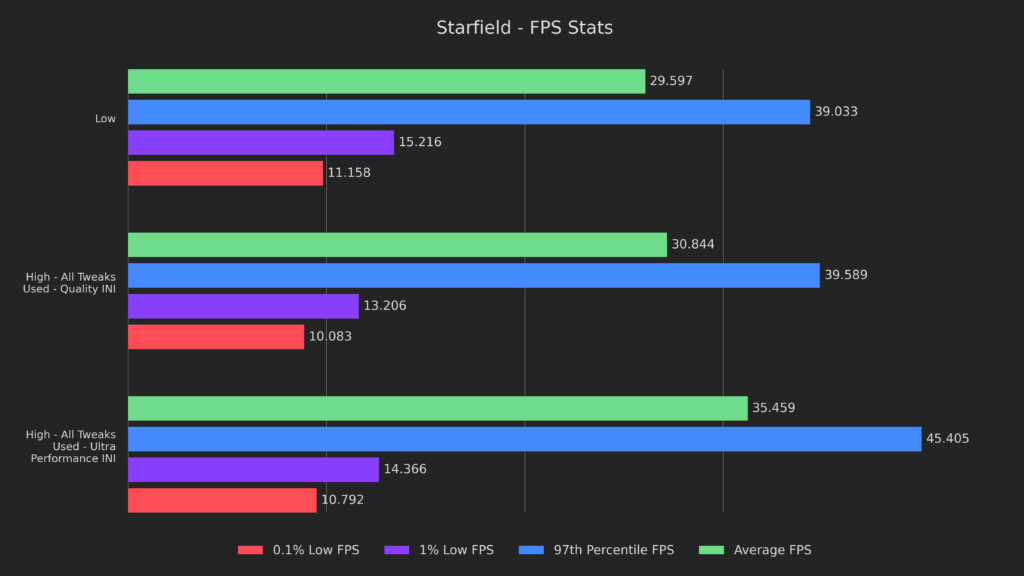
As a final illustration of how much performance we could gain, here is the high preset running better than the low did without any tweaks!
Recommended Presets
Overall, I’m VERY happy with the performance we were able to gain here, and my only wish is that Bethesda would fix the stuttering present during asset swaps.
I also tried:
- ZRAM
- CPU Performance Schedulers
- GPU and CPU Pinning
- Balanced INI (From Steam Deck Essentials)
- Disabling Variable Rate Shading (VRS)
- Enabling Half Rate Shading (HRS)
- Disabling FSR
- Altering Resolution Scale
- SteamOS 3.4
- Undervolting
- BIOS 110 and 113
- "Potato Quality" mods
The only thing to note is that there won’t be any overclocked profiles here today since we saw very minor gains, even with a major overclock. Aside from that, there will be 4 options to choose from, so let’s get into it!
Performance
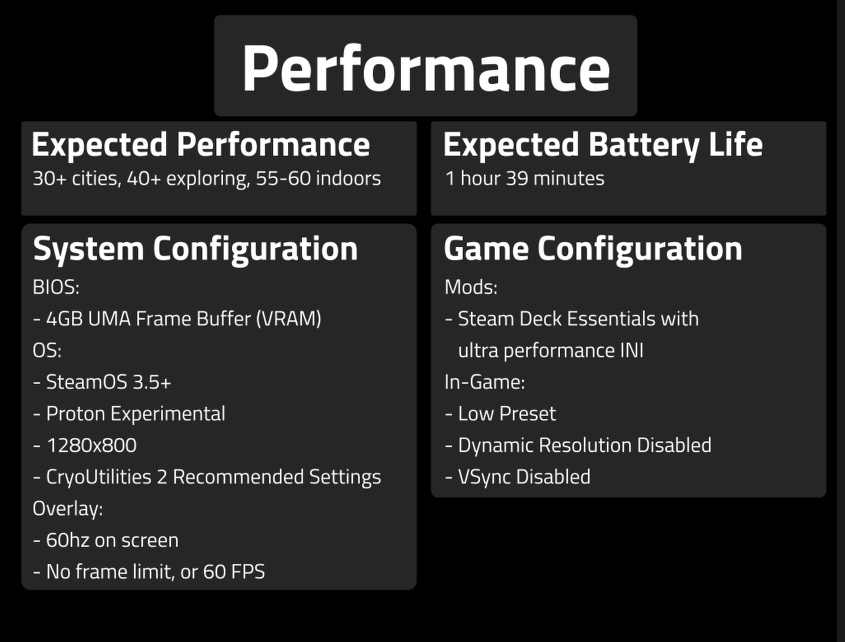
First up is the performance preset, where we prioritize getting as many frames as possible, regardless of visual quality.
If you want to go as fast as Bethesda did while backstepping from Fallout 76, use these settings.
Battery Saver
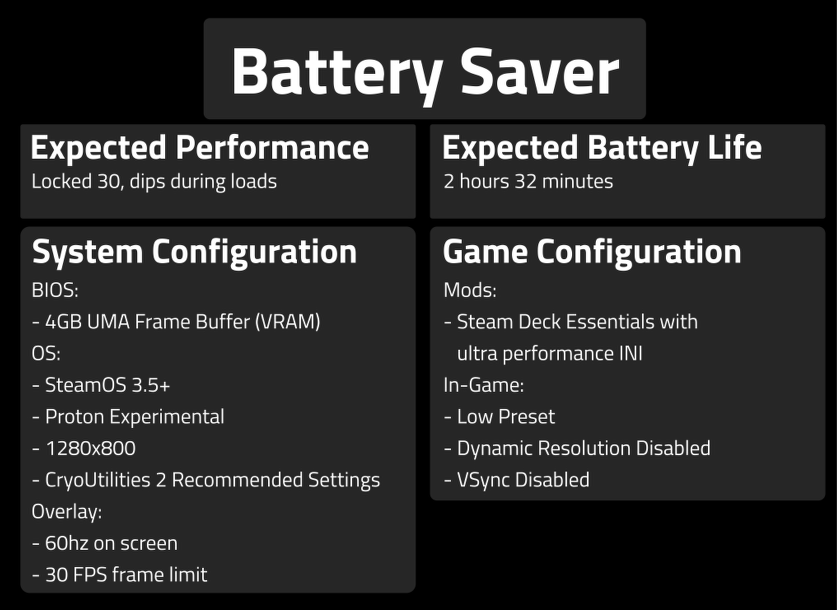
Second is battery saver, where we limit the power drain so you can play away from an outlet for as long as possible.
If you want your battery to last longer than the Starfield menu animations, use these settings.
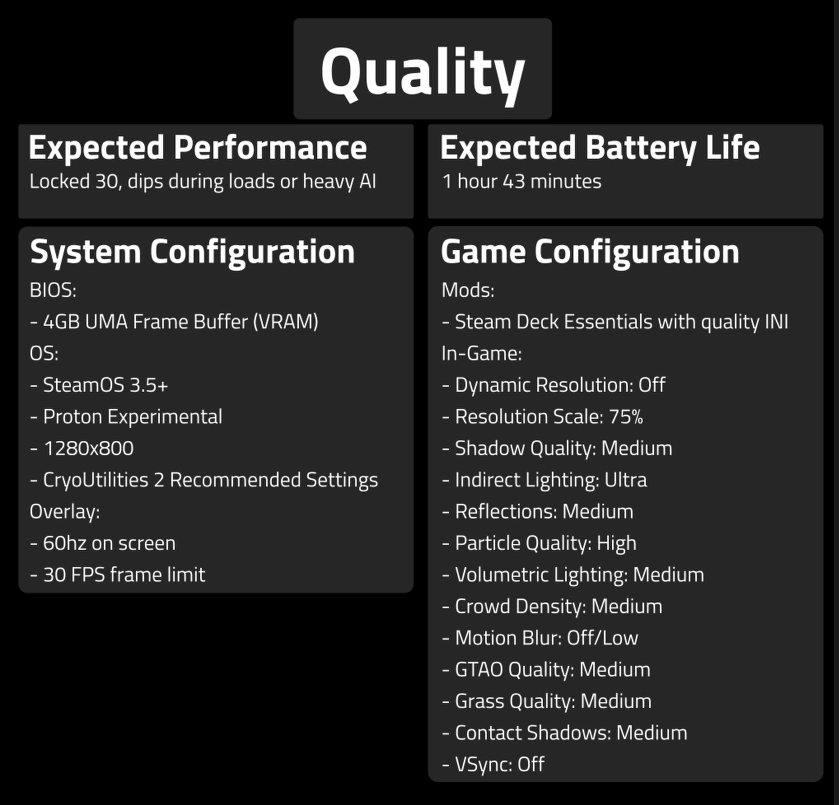
Quality
Third is quality, where we strive to get the best quality possible on the Deck.
If you want to experience the universe in its full NASA-punk glory, use these settings.
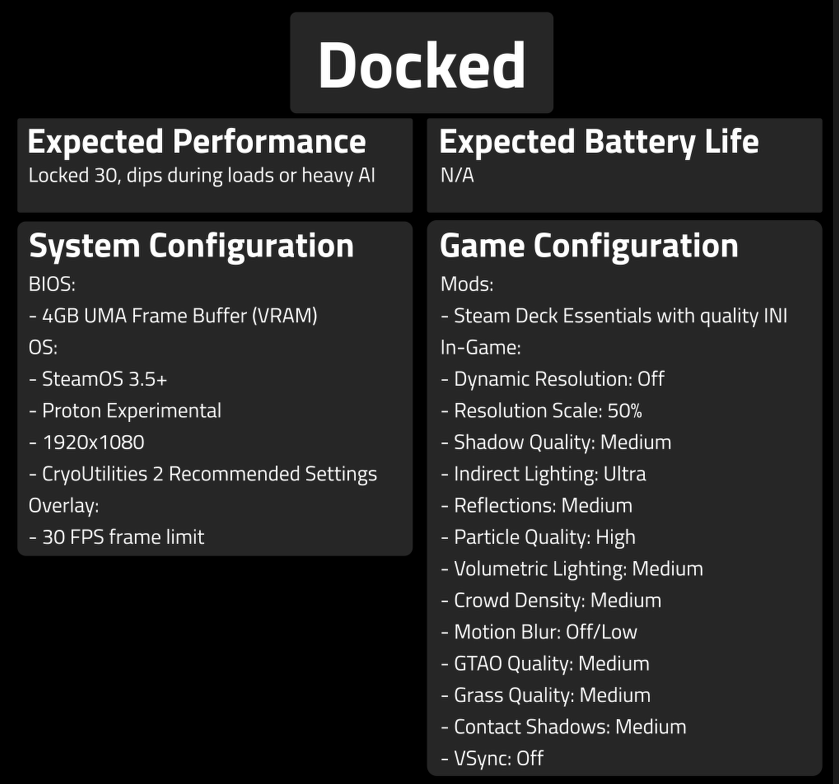
Docked
Fourth and last is docked, where we set the resolution to 1080p and push the Deck to make the best-docked experience possible.
If you want to share your adventures on the big screen or maybe a portable projector (hint to my previous video), use these settings.
Wrapping Up
Alright, that’s all for this Deck Dive! Don't forget to check out the video where I show off everything, and subscribe to my channel for more! You can always hit that bell to be notified whenever a new video is uploaded or check SteamDeckHQ, as I post most of my videos in article form here.
I’d like to take a moment to thank all my patrons, YouTube members, and super thanks for the amazing support. It has kept me fed this last month, and I cannot say enough kind words about all of you. If you want to support me directly, you can head over to my Patreon and get some nice benefits too!
Working on another Deck Dive after all this time was very refreshing, and I look forward to doing more soon.
Thank you all for reading, and have a great day!
If you enjoyed this handheld review, check out the rest of the content on SteamDeckHQ! We have a wide variety of game reviews and news that are sure to help your gaming experience. Whether you're looking for news, tips and tutorials, game settings and reviews, or just want to stay up-to-date on the latest trends, we've got your back.


