Today, we're going to be going over how to undervolt and overclock your Steam Deck to make it the absolute best it can be.
Stay tuned to get better battery life, make the fan quieter, or even boost the performance far beyond the default.
Introduction
I didn't want to risk my only Deck by pushing the limits of what's possible with overclocks and undervolts, so having another made this video release much earlier than I'd anticipated!
This video will cover undervolting the deck, increasing available TDP, and overclocking the CPU, SOC and GPU. I’ve been attempting to do memory overclocking, but neither of my Decks seem to have measurable improvements using it, so that requires further investigation and may be part of a future video.
Testing Methodology
On to testing methodology, all of my testing and overclocking was done with a Q1 2023 256GB Steam Deck with no hardware alterations whatsoever.
The only software changes I made were changes shown in this video, and installing CryoUtilities 2 to ensure that all possible bottlenecks were removed.
If you’ve ended up here prior to installing CryoUtilities, I recommend doing that first as there’s no risk.
Every benchmark present was tested with an in-game benchmarking tool if present, and I made sure to heat soak the Deck for 5 minutes prior to each boot of each game tested to ensure that ambient temperature wouldn’t play as big of a role.
On that note, the ambient temperature in my apartment is 17-18 degrees Celsius, or 62-65 degrees Farenheit.
Yes, the Cryo in my username is there because I like it very cold.
I don’t have a noise meter, so fan sound recordings were all done with my iPhone 13 Pro’s noise meter app and recorded manually, but each was tested from half a meter, or about 1.5 feet away, since that’s the distance I assume is most common.
The room where I recorded is 28 decibels by default, and I made sure to record at a time with no interference. The stock deck recorded an average noise of 33 decibels under load, which is 5 over ambient.
Warn about warranty and hardware damage
Alright, before I explain HOW to undervolt and overclock, a quick important disclaimer needs to be mentioned.
This video is intended to be an explanation and tutorial of both undervolting and overclocking. Unlike CryoUtilities, which has minimal to no risk, undervolting and overclocking can be VERY risky. By doing it incorrectly you could prevent your Deck from booting, or even damage it permanently.
If you know what you're doing, then you run very little risk of actual damage to the Deck, but please keep in mind that I am not responsible for anything that happens to your Deck if the process is done incorrectly.
Valve has been very good about doing RMAs on damaged Decks, but I can't guarantee that'll continue to be the case, so HERE BE DRAGONS.
How to Revert if Anything Goes Wrong
In the event that your Deck doesn't boot from a process I show in the video, then there's a way to revert the changes you've done, a CMOS reset. Fortunately, it's very simple:
First, make sure the Deck is completely powered down with the screen off.
Second, hold the volume down and 3 dot buttons, and then press the power button.
Hold the volume down and 3 dot buttons until the symbol appears on screen, and then release. Now, wait as your Deck reverts all the settings changes to default, it may take a few minutes.
If your Deck doesn't boot after this, then you'll likely need to reach out to Steam Support. With all of that out of the way, let's move on to our first major section, the Silicon Lottery and You.
Silicon Lottery Explanation
The Silicon Lottery is a cute name for a complex topic. Essentially, during the manufacturing process of any computer chips, there are natural deviations. Creating something with parts as small and delicate as modern-day circuits is incredibly difficult and even small deviations in materials can ruin the whole process. In some cases, these deviations can cause some parts to become useless, some parts are partially useless, and some parts are perfect.
For example, when making a processor, a chip manufacturer has a certain yield, some processors get outright scrapped! This is called “binning” and is something that happens on most computer chips. Some processors have a few cores that don't work, those usually get re-labelled to a different model with some cores disabled, then sold. Most of the processors are made successfully and are sold as-is. However, even in this group there are some deviations.
Some processors barely meet the required quality, and those are the ones that CPU manufacturers need to account for when selling them. They need to make sure that all of that model perform similarly, so they need to keep all of them at the speed and voltage of the weakest link, so to speak.
What that means, though, is that SOME processors can perform much better, even if they're the same model. If you get a processor that can handle much more than another, you've won the silicon lottery!
During my testing, I found that one of my Decks had fairly bad results, and the other had what I'd consider reasonably good results, so the variance is very high in my experience. Now that you know what the silicon lottery is, let's move on to the tool we'll be using to do both undervolting and overclocking.
Smokeless UMAF Intro and Creation
Smokeless_UMAF allows us to access a whole lot of BIOS settings that Valve's BIOS doesn't show us.
To use it you'll need:
- A USB hub with at least 2 USB ports that can be plugged into the Deck
- You can use a single port, but it's a real pain
- A flash drive of any size
- A real keyboard to plug in as well.
- Bluetooth won't work, so make sure it's either wired or has a USB dongle like this one.
Once you have those, plug the flash drive in to your Steam Deck and go to desktop mode.
Now, open KDE Partition Manager and enter your sudo password. You should already have one if you've used CryoUtilities.
Wipe USB first
Now, click on the flash drive in the section on the left, it'll probably be named USB DISK.
Next, press the "New" button in the bar near the top and a new window will pop up. Use the "File system" drop-down and select "fat32" and feel free to enter a name in the label field, then press "OK".
Last here, press "Apply" in the top bar, and press "Apply" in the popup. After it's complete, you'll get a notification and you can close the windows.
Next, click the USB drive in the taskbar and click "mount and open" on the USB drive in the menu. With that, our USB is formatted and we just need to install Smokeless_UMAF!
All you need to do is click UniversalAMDFormBrowser.zip and press the little download symbol in the upper right.
Once it's downloaded, open the zip file and drag the contents to the flash drive. After that's done, so are you! We have a fully functional Smokeless_UMAF installation.
Now that we have it, let's move on to an explanation of undervolting!
Undervolting Explanation
As mentioned before, chip manufacturers have to provide an amount of voltage that every chip is guaranteed to run with, but some can use far less power to do the same amount of work. Undervolting is the process of providing those chips with less voltage. Your Deck will typically run a lot cooler, which will keep the fan quieter.
Undervolting can help maintain higher speeds for longer, which can improve performance.
It usually even improves the battery life of the Deck! Let’s see how much it helps
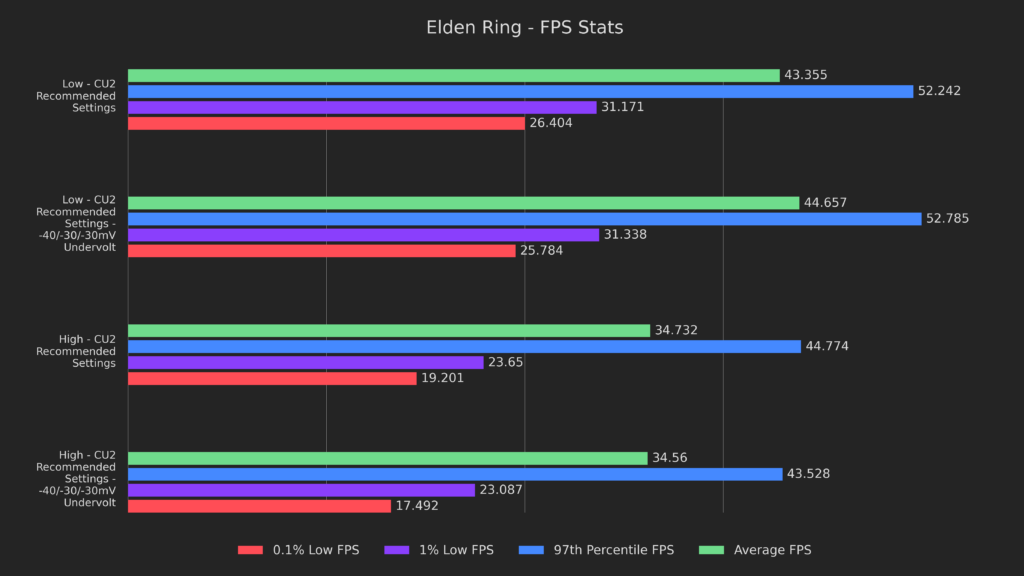
Elden Ring had similar results, with a small hit to the lows on the high preset.
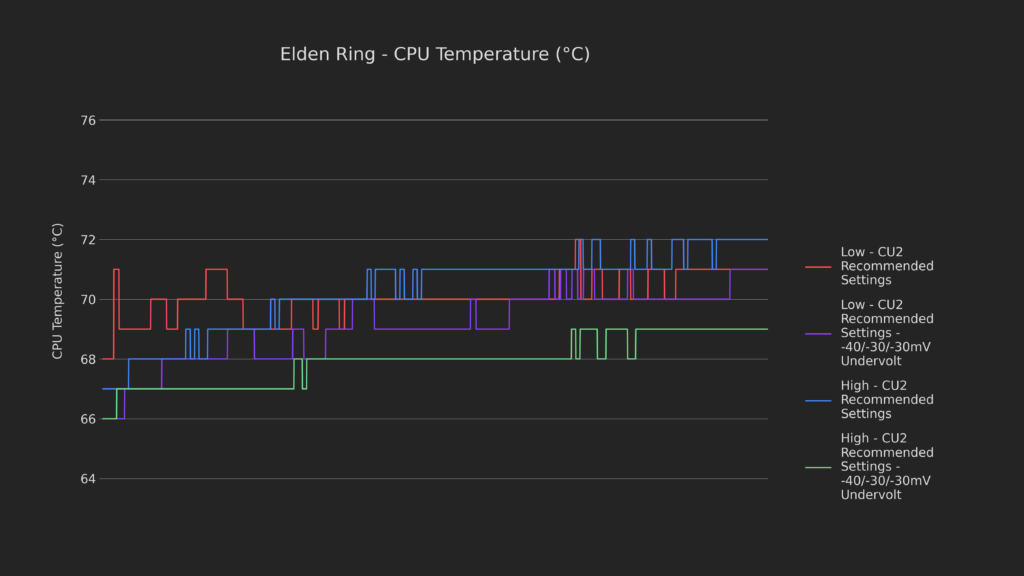
But CPU temperatures were 2-3 degrees cooler.
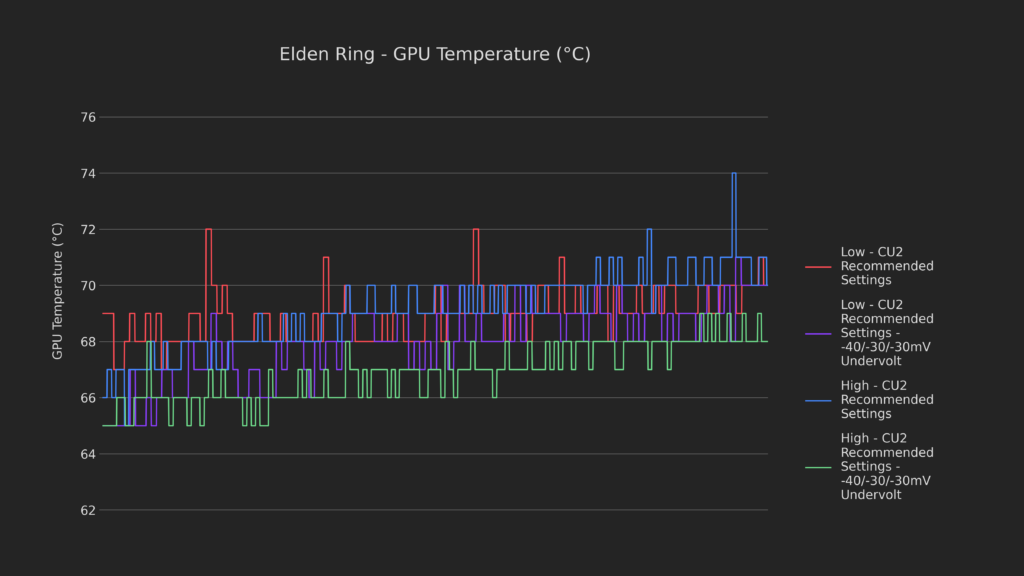
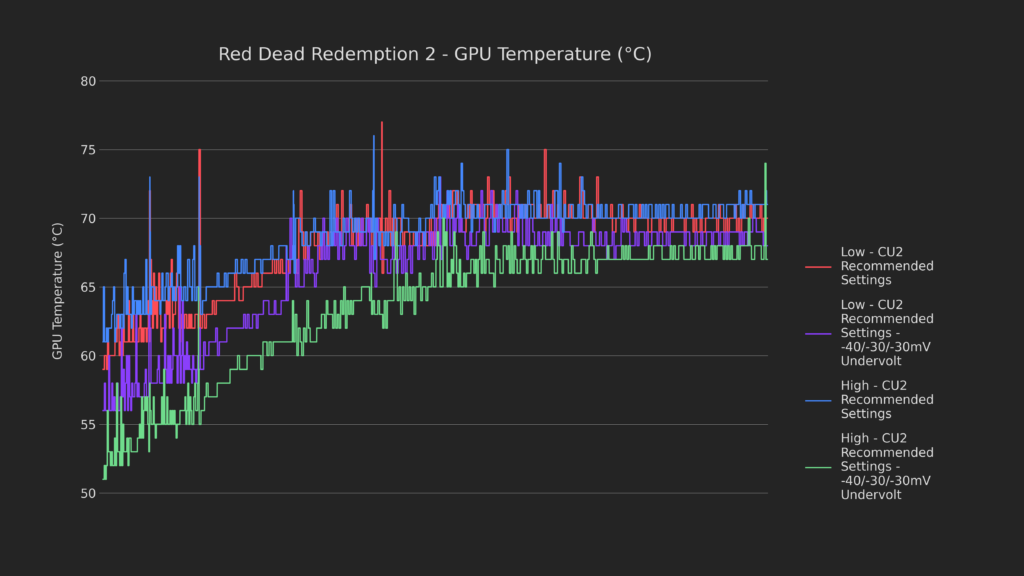
And GPU temperatures were 2-5 degrees cooler.
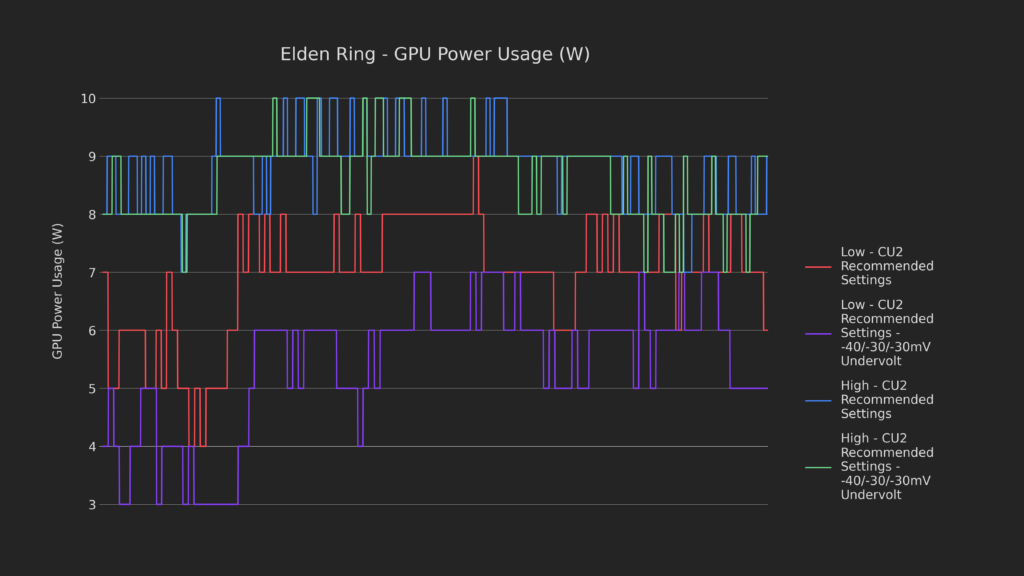
The GPU alone pulled 1-2 watts less when undervolted!
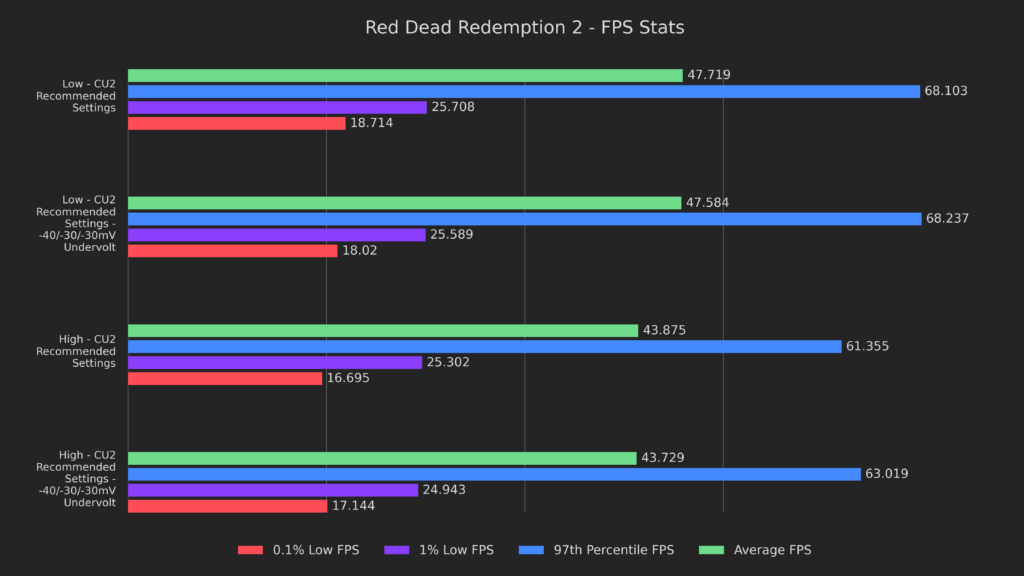
Red Dead 2 had nearly identical FPS statistics.
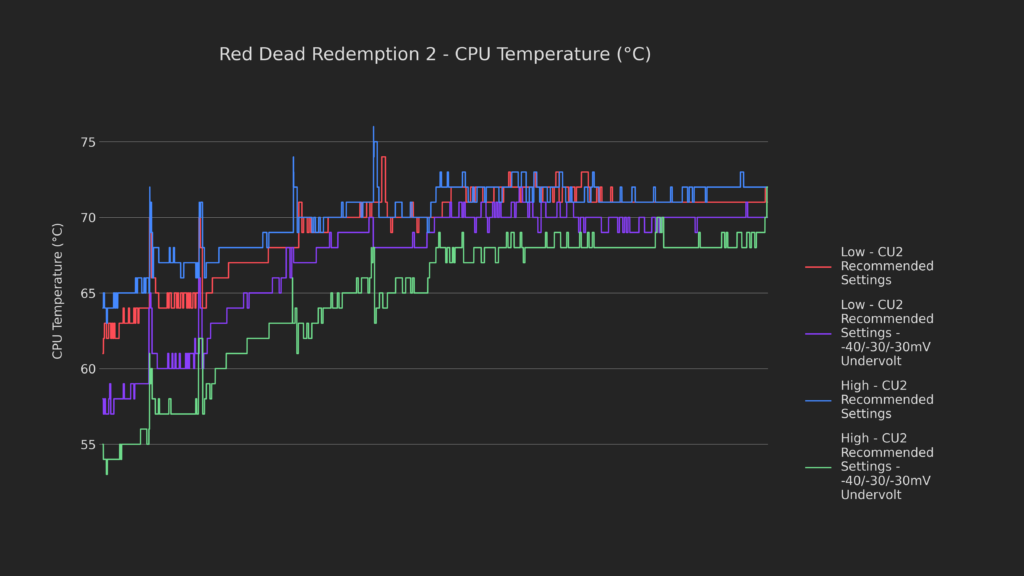
But the CPU was 5 degrees cooler and the GPU also remained frosty during the testing, even after an extensive heat soak!
With undervolting, I was able to go from 1 hour and 31 minutes of battery life to 1 hour and 46 minutes while stressing the Deck. That’s a boost of 16% to battery life, despite performance being nearly identical!
Fan noise when undervolted was slightly lower than stock, averaging out at 32 decibels under full load, only 4 decibels louder than ambient and 1 lower than stock.
Undervolting on the Steam Deck has fairly low risk, but if you lower the voltage too much your Deck may not be able to boot. Most people have been able to recover from this, but I'm aware of 1 case where an RMA needed to be done from pushing the Deck way too hard.
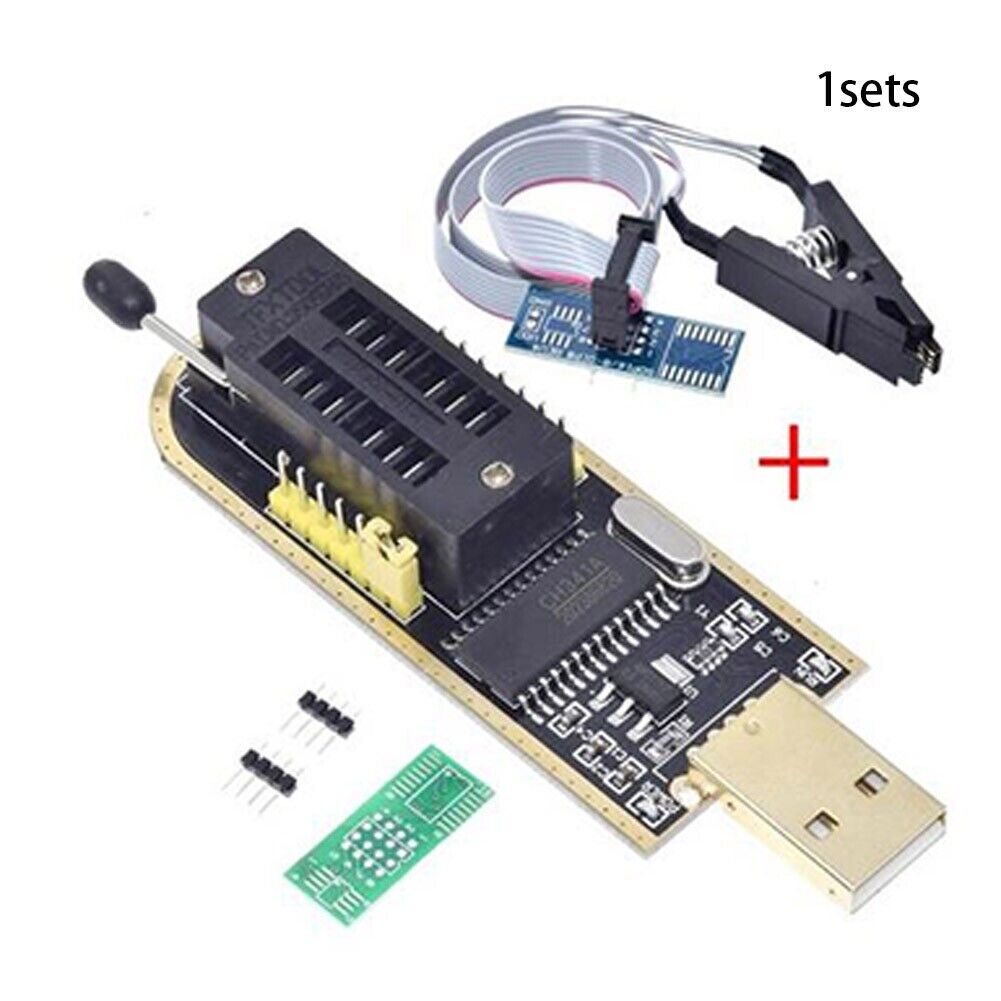
That said, if you have a ch341a programmer lying around you'd be able to recover with that. The bottom line is that you don't risk permanent damage while undervolting, but could need an RMA anyway.
With that out of the way, let’s get into the tutorial!
Undervolting Tutorial
In order to undervolt, we need to boot into Smokeless, which is very simple.
First, plug the USB with Smokeless installed into the Deck and shut the Deck completely down. I also recommend attaching your keyboard at this time.
Next, hold the volume down button and press the power on button. Keep holding volume down until the logo appears, then let it go.
Now, choose your USB drive in the menu that comes up and press A. It'll probably have the manufacturer in the name, but mine is a cheap no-name drive so I choose SMI here.
Smokeless_UMAF will boot and you may notice something odd, the screen is sideways! That's because the Steam Deck's screen is actually a sideways-mounted tablet screen and the software rotates it 90 degrees. Unfortunately, we don't have that benefit here, so the screen will be shown sideways when we're in here. I also recommend navigating with the keyboard starting now.
Go down to Device Manager, then press enter, then AMD CBS, enter, SMU debug options, enter, SMU feature config limits and press enter. This is where we'll be making most of the changes today, and you'll be back here plenty.
Go to SVI3 Voltage control and change it from auto to manual. you'll see a few new entries underneath.
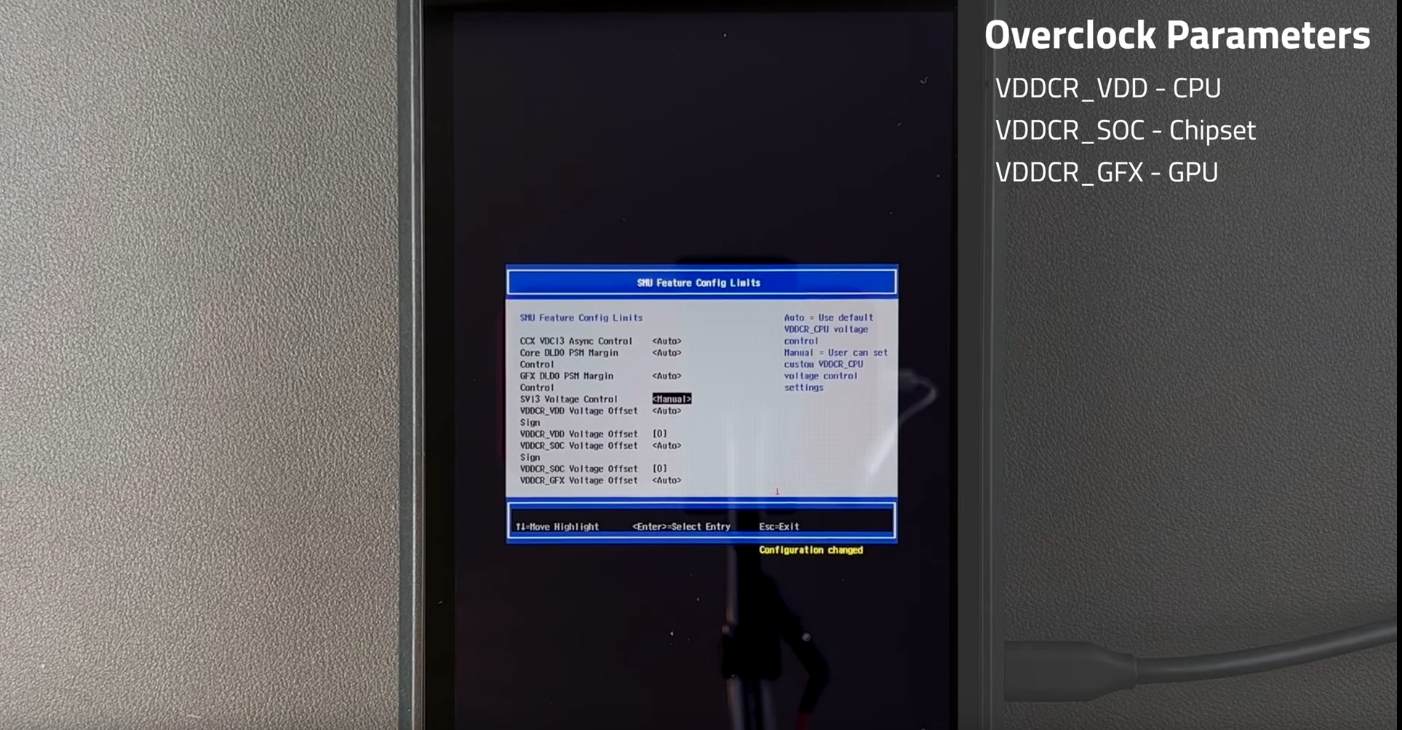
The 3 parts that we'll be undervolting are the CPU, chipset and GPU, which you can see below as VDDCR_VDD, SOC and GFX respectively.
The first thing we're going to want to do is to change VDDCR_VDD Voltage Offset Sign to Negative, and then the VDDCR_VDD Voltage offset to 10. This will undervolt the CPU by 10 millivolts.
After those are set, press escape 3 times until the prompt appears, then press Y, then escape and then move down to continue on this page. Press enter once to exit Smokeless, then again to reboot.
With that, you've officially undervolted! Unless you got incredibly unlucky in the silicon lottery, you'll boot right back up.
Now, boot up a demanding game and test, it should behave the same as before the undervolt, but maybe be a bit quieter and drain a bit less power. If you can play for a few minutes, you're likely good to push the undervolt further!
Push the undervolt further
When you're comfortable with the stability of the undervolt, boot back into Smokeless the same way as before and change the VDDCR_SOC voltage offset sign to negative, and the offset to 10, then repeat the testing.
If you're still happy with stability, do the same for VDDCR_GFX and repeat the testing. If you get this far, then all 3 parts are undervolted by 10 millivolts, which is a small but substantial undervolt! Now, if you want to push it further, then go through each setting again, increasing the voltage offset by 10 each time.
Eventually, you'll either have instability in a game, or your Deck will take a really long time to boot. If you get to this point, then I recommend getting back into Smokeless and reversing the last setting you changed. It's possible to try changing another offset to get a further undervolt, but you may not want to spend more time setting and reverting these repeatedly.
Once you're happy with the undervolt, then you're done! You can resume playing games, or continue on to overclocking if you want to.
Undervolting Summary
To recap the undervolting process:
- Boot into Smokeless
- Change SVI3 Voltage control to manual
- Change all 3 Voltage Offset Signs to Negative
- Set VDDCR_VDD to 10
- Boot and test
- Set VDDCR_SOC to 10
- Boot and test
- Set VDDCR_GFX to 10
- Boot and test
- Repeat steps 4-9, increasing the value by 10 each time until satisfied.
Undervolting questions
I'll take a moment to cover some questions that I think you guys will have about undervolting.
Will undervolting brick my Steam Deck?
As long as you follow the process I gave you and adequately test, there should be a very minimal risk of bricking.
If you DO somehow think you brick the Deck, then follow the process I specified earlier to reset CMOS and all your settings in Smokeless should be reverted.
Does undervolting work in Windows?
Yes, undervolting will work for any OS and anything running on the Deck.
What undervolt were you able to achieve?
One of my decks was able to reach -20 on all 3 offsets, and the other Deck was able to reach -40/-30-/30.
What do I do if my Deck takes a REALLY long time to boot, or doesn’t seem to?
I’d recommend holding the power button to turn the Deck off completely, leaving it alone for a few minutes, then trying again.
And with that, I'm going to reset my undervolt to stock and move on to increasing the TDP of the Deck!
TDP Increase Explanation
TDP, or thermal design power, is how much power a chip uses. On the Deck, when we say TDP we mean the amount of power that the APU can use, in watts. By default, the APU can use up to 15 watts, but you can change the limit right in the 3-dot overlay to limit it lower if you want.
15 watts is the sweet spot for performance per watt, but the fan in the Deck can actually handle much more, albeit at a louder volume and higher battery drain. In the case of overclocking, which we'll do later, we'll need to increase the TDP beyond 15 watts to provide the APU with more power, so how do you do it?
TDP Increase Tutorial
The TDP increase is a bit more difficult to do, and it's a several step process.
Old Fan Curve
Before we do anything else, we have to make sure that the OLD fan curve is enabled on the Deck. The new fan curve prioritizes sound over thermal performance and can cause some overheating if enabled.
In Game Mode, go to Settings > System and scroll to the bottom, and disable updated fan control. That’s it for the fan, let’s move on to actually increasing TDP.
TDP to Max
The first step is to set the TDP to maximum in the Deck's BIOS, so let's start there.
Shut the Deck down completely, then hold volume up and press the power button. When the logo appears, let go of the volume button and you'll see a screen with 4 large buttons. Go to Setup Utility, then advanced, then set power control to manual and make sure that both the Fast and Slow PPT limit are set to 15,000.
Now, press the select button and then yes.
Once that's done, you'll be back in SteamOS and the first step is complete.
Change in Smokeless
The second step is using Smokeless to set the desired TDP limit.
Boot back into Smokeless using the same instructions as before, but this time go to Device Manager, then AMD CBS, then SMU common options.
Here, we need to change the top 5 settings.
Set TDP control and PPT control to manual, then set the TDP, fast PPT limit and slow PPT limit to the desired wattage you want to use, followed by 3 zeroes.
I chose 18 watts, so I enter 18 000 in all 3 options.
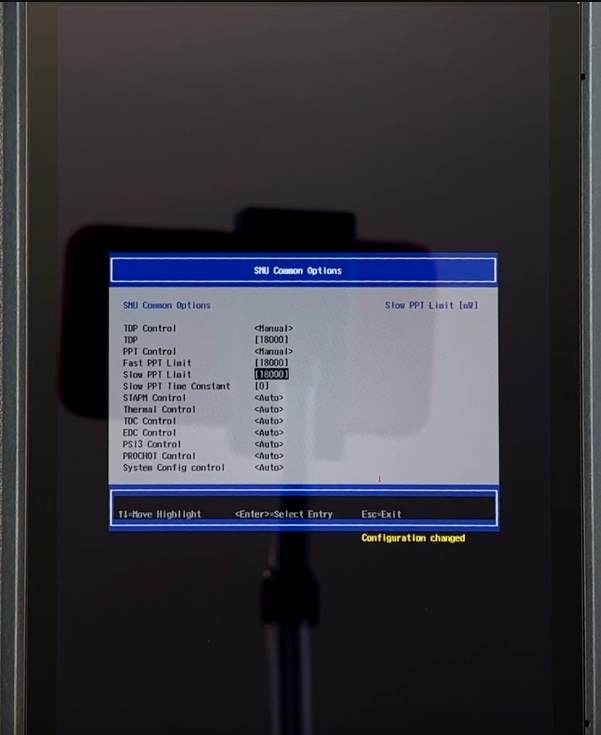
After those are set, press escape 3 times until the prompt appears, then press Y, then escape, then continue, then enter to exit Smokeless, the same as before.
With those 2 steps out of the way, the hardest is behind us.
PowerTools installation
The final step is to actually get SteamOS to use the higher TDP limit and for that we need to use PowerTools.
To get PowerTools, we first need Decky Loader.
Go to desktop mode and open your browser, then go to the Decky Loader repository on GitHub.
Next, we need to click on download, then move the downloaded file to the desktop. Double click on the "Install Decky" Link on the Desktop and enter your sudo password when asked, then choose release and press okay.
With Decky installed, return to game mode and press the 3 dot button.
You should notice a small plug symbol near the bottom of the panel, navigate to it, and then press A. Now, press the little marketplace icon near the top, which opens the plugin "store" on Decky.
Press down until you see the plugin PowerTools, then press install on it, and install again in the popup. After a moment, you should see the menu appear again and PowerTools will be present!
Let's move on to some probable questions about this process.
TDP Increase Summary
To recap the TDP change process:
- Disable the updated fan curve in SteamOS
- Boot into BIOS and set both PPT values to 15000
- Boot into Smokeless
- Change TDP control and PPT control to manual
- Set TDP, fast PPT limit and slow PPT limit to the desired wattage you want to use, followed by 3 zeroes
- Boot and test
- Repeat steps 5-6, increasing or decreasing the values until you’re satisfied
- Install Decky and PowerTools
TDP FAQ
I used PowerTools for overclocking before, where is the pt_oc.json?
The pt_oc.json isn’t necessary in PowerTools 1.3 or higher.
PowerTools 1.2 had a bug which had issues after sleep and resume.
This was caused by attempting to set the kernel to manual clock modes at frequencies it doesn’t support.
By avoiding pt_oc.json completely, using the newer version and not manually setting frequencies, the kernel will clock up to the limits you set and allow for you to set TDP, as you’ll see in a moment.
In the future it’s possible that the amdgpu module will begin accepting unsupported frequencies, but in the meantime there’s no benefit to maintaining the pt_oc.json.
What's a reasonable setting for wattage?
Unless you know what you're doing, I would recommend sticking to 20 watts or below.
Is this harmful for the Deck?
It shouldn't be, as long as you keep the numbers reasonable.
Will increasing the TDP work in Windows?
It should, as there shouldn't be any software holding it back. That said, I haven't tested it directly.
Isn't more heat REALLY bad for the Deck?
The Deck's APU is actually rated up to 105 degrees Celsius, and the Deck will forcefully shut off before that can be reached. If this happens, lower the TDP settings by a watt and try again.
This also applies to the upcoming overclocking process.
Do I need to do this?
Of course not, but it will allow your Deck to use more power to give you an edge in performance in many cases.
What were your best results?
One deck was able to sustain 21 watts, and the other was able to sustain 23 watts in all games.
Can I change the TDP limit in the Deck overlay still?
Avoid using the built-in TDP limiter, since it keeps you at 15 watts or lower. Instead, use the PowerTools section labelled "PowerPlay Limits" and set both bars to the wattage of your choosing.
Note that using a TDP higher than you currently have set in Smokeless will just use the value you set there. As an example, if you set the TDP to 18 watts in Smokeless and then use 30 in PowerTools, it will still only use 18 watts.
With questions hopefully answered, and enough power to feed the beast, let's move on to an explanation of overclocking!
Overclocking Explanation
So, what is clocking, and how does it go over?
Let's start with clocks, in regards to computer chips.
A clock is essentially a very small crystal in a chip that vibrates very quickly, and every time it vibrates the chip can do some work. The frequency at which it vibrates is expressed in a unit of hertz, with 1 hertz meaning 1 vibration per second, thus 1 operation per second.
The chips we have now are VERY fast, and the CPU in the Steam Deck has a clock speed of 3.5 Gigahertz, which means that the crystal inside vibrates 3.5 BILLION times per second! The process of overclocking is basically forcing the crystal to vibrate faster than it does by design, which in turn increases the amount of operations per second that a chip can perform.
Why is that important?
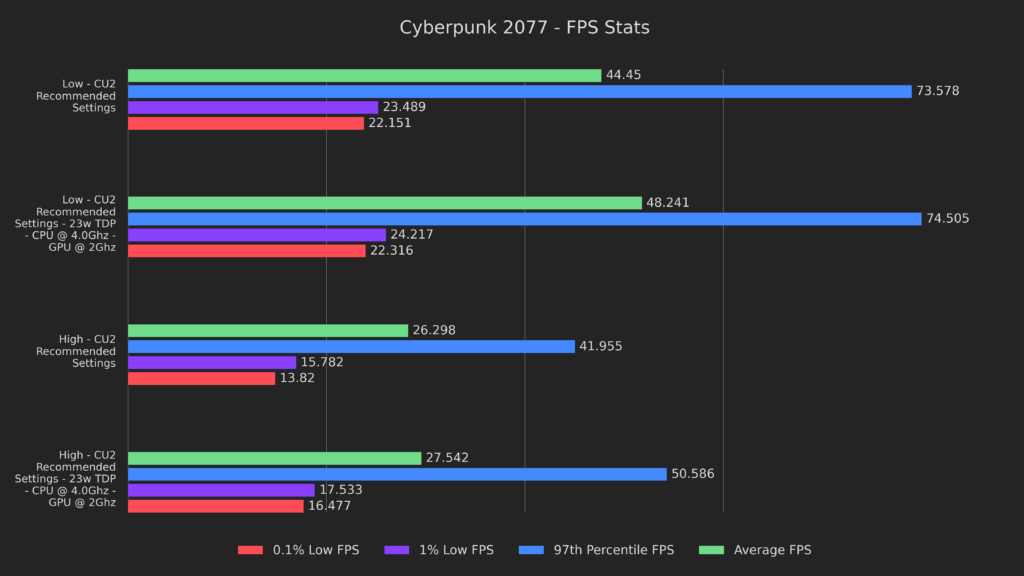
Cyberpunk had averages on low increase by 9% and averages on high increase by 5%, along with a substantial boost to lows AND 97th percentile on the high preset.
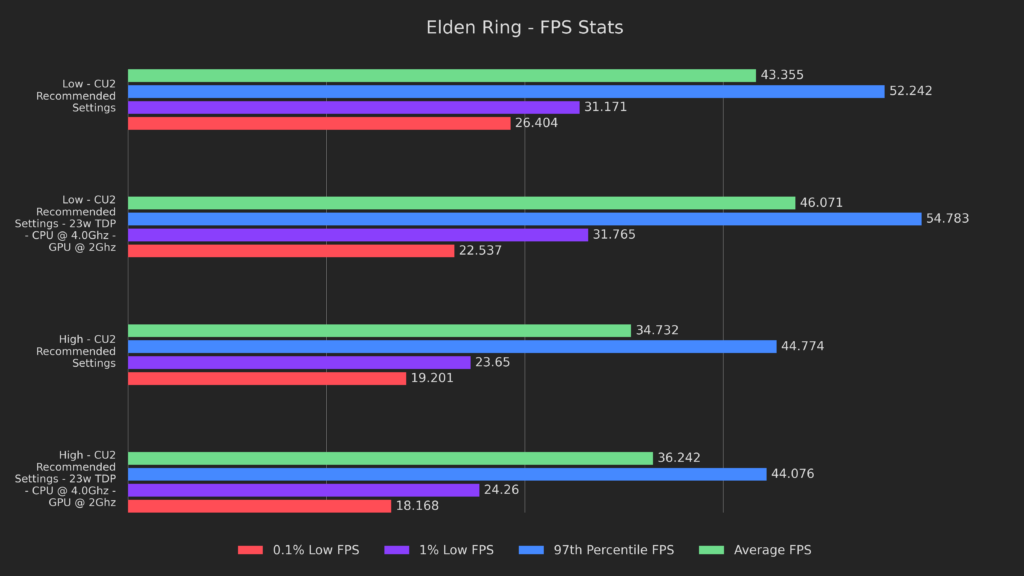
Elden Ring had a 6% and 4% boost to averages.
As a result of the chip doing more work, it consumes more power, which is why we increased the TDP earlier in the video.
As a side effect of this, the battery life is roughly 59 minutes when maxed out, which is a 35% reduction over my 1 hour and 31 minute baseline.
Fan noise when overclocked was higher than stock, averaging out at 36 decibels under full load, which is 8 decibels louder than ambient and 3 higher than stock.
If you want to know more about this make sure to subscribe because I plan to cover clock cycles and how we teach rocks to think in a future video, but for now this explanation should suffice for the Deck in particular.
Overclocking Tutorial
Overclock the CPU
First, we’ll overclock the CPU using our old pal Smokeless, once again! Boot back into Smokeless, Device Manager, AMD CBS, SMU debug options, and SMU feature config limits, the same place where we did undervolting earlier.
Scroll down to”CclkFmaxOverride Control” and change it from “Auto” to “Manual”, then down one to “CclkFmaxOverride” and set it to 3,600.
The stock frequency of the CPU is 3,500, so this means you’ll get a 100 megahertz overclock.
Exit out of Smokeless in the same way as before by pressing escape 3 times until the prompt appears, then press Y, then escape, then continue, then enter.
Now, boot the Deck and start a demanding game, then play for a few minutes to make sure everything is stable. Once you’re satisfied, your overclock is complete!
If you want to push the overclock further, increase the value of CclkFmaxOverride by 100 in Smokeless, then reboot. You can repeat this process until you have instability, the Deck gets too hot, or the fans get too loud. Once you find the right value for you, you can either be done, or you can continue on to overclocking the GPU as well!
Overclock the GPU
So the process to overclock the GPU is essentially the same as the CPU.
Boot back into Smokeless, Device Manager, AMD CBS, SMU debug options, and SMU feature config limits.
Scroll down to”GfxclkFmaxOverride Control” and change it from “Auto” to “Manual”, then down one to “GfxclkFmaxOverride” and set it to 1,700. The stock frequency of the GPU is 1,600, so we’re starting with a 100Mhz overclock, the same as the CPU.
Now, boot the Deck, and do the same testing you did earlier for the CPU overclock, making sure to pay attention to temperatures, fan noise and any potential crashing. Then, repeat the process by increasing the frequency by 100 until you’re satisfied or start seeing instability.
Overclocking Summary
To recap the overclocking process:
- Boot into Smokeless
- Change “CclkFmaxOverride Control” to Manual
- Set “CclkFmaxOverride” to 3600
- Boot and test
- Repeat steps 3-4, increasing “CclkFmaxOverride” by 100 each time until satisfied, or until numbers get higher than ~4200.
- Change “GfxclkFmaxOverride Control” to Manual
- Set “GfxclkFmaxOverride” to 1700
- Boot and test
- Repeat steps 7-8, increasing “GfxclkFmaxOverride” by 100 each time until satisfied, or until numbers get higher than ~2200.
Overclocking FAQ
What's a reasonable overclock on the Deck?
I would consider a CPU clock speed of 3800Mhz and a GPU clock speed of 1800Mhz to be fairly safe for mose people, as long as you haven’t lost the silicon lottery.
Is this harmful for the Deck?
It can be if you push the frequency too high. As long as you don’t set the numbers to something crazy, you should be fairly safe, though.
Will overclocking work in Windows?
Yes, it should.
What were your best results?
Deck 1: 3800/1900
Deck 2: 4000/2000
Combining Both UV + OC
Okay, so now that we’ve undervolted, increased the TDP and overclocked, where does that leave us? We can do all 3 at the same time!
Using the instructions from each section, you can find a really good balance where undervolting saves you some power and heat, then you use that overhead to push your overclock further!
In my case, I was able to set my Deck to -40/-30/-30 for undervolting, use a 23 watt TDP, and reach 4,000 Mhz on the CPU and 2,000Mhz on the GPU.
Let’s see some comparisons to see what this does for performance!
Overclocking + Undervolting Benchmarks
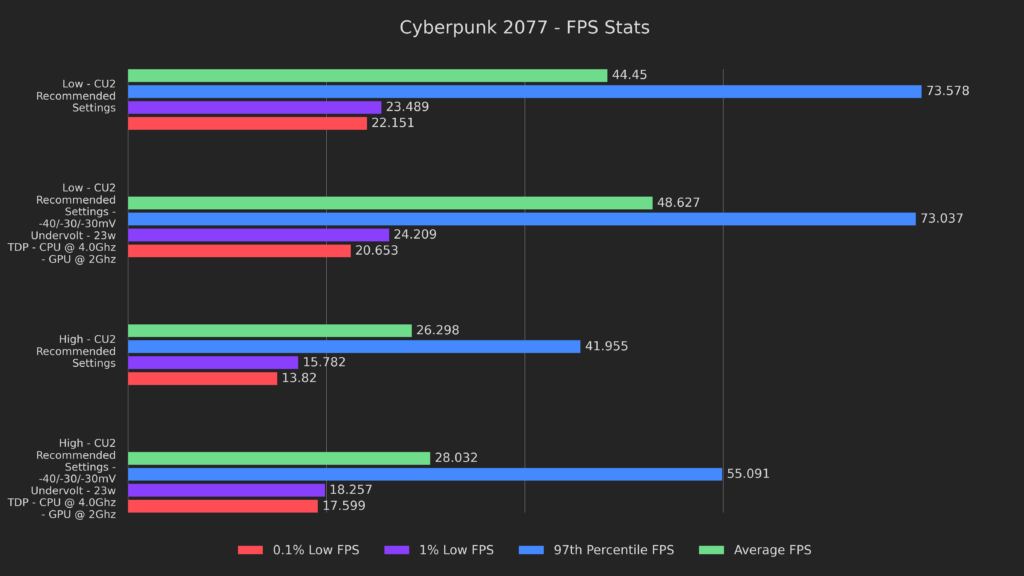
Cyberpunk gets 9% and 7% boost to averages for low and high respectively, but the major win here is in the lows with 1% getting a 16% boost and 0.1% getting a 27% boost on high.
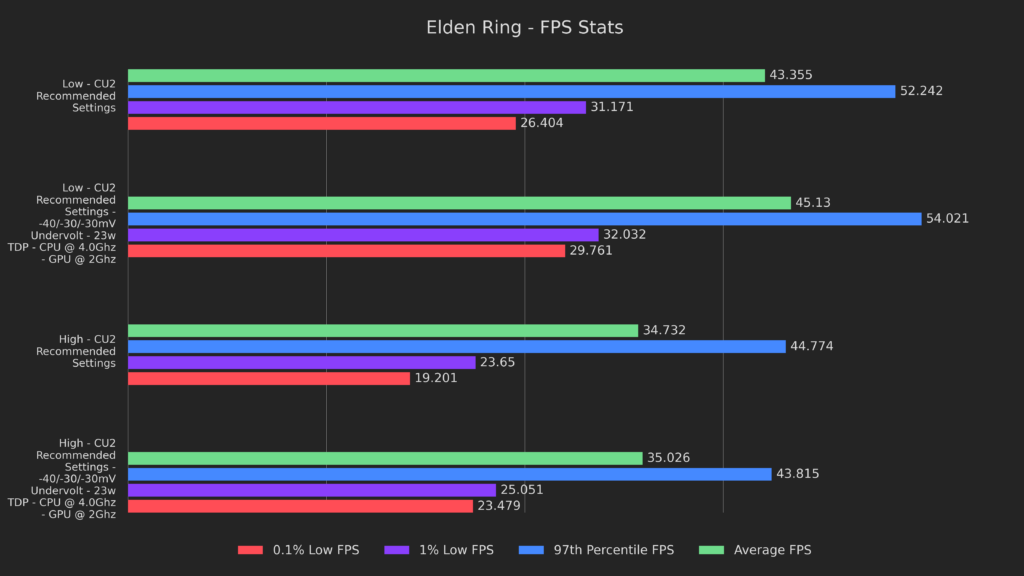
Elden Ring gets a modest boost of 4% to averages on low, but the lows are once again the star of the show here with boosts across the board.
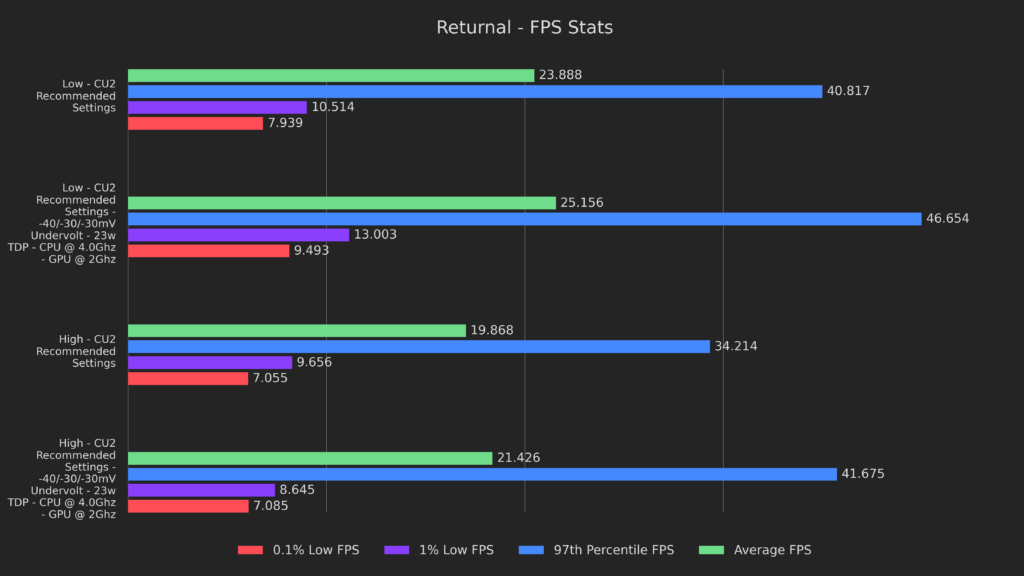
And Returnal gets 5% and 8% better averages for low and high respectively, plus MUCH higher 97th percentile results and a health boost to lows on the low preset.
Despite this looking like a fairly minor improvement, the actual gameplay felt quite a bit smoother, and was a locked 30 in some places, even without any upscaling whatsoever. With FSR, it got even smoother, although I didn’t take dedicated benchmarks for that.
All of this was while maintaining an average battery life of 1 hour and 25 minutes while going full tilt, which is only a 7% decrease from the 1 hour and 31 minutes I get in an identical situation without either overclocking or undervolting.
Fan noise when both overclocked and undervolted was identical to stock, averaging out at 33 decibels under full load, which is 5 decibels louder than ambient, even with the old fan curve!
One Last Disclaimer
Hopefully you can see that these modifications can be a HUGE boost to performance. I just want to take one second to reiterate that not everyone will be able to get the same results.
Some Steam Decks will have lower potential than my Deck, and some will have a higher potential, it all depends on how lucky you were with the silicon lottery!
The Next Deck Dive
You may want to see more overclocking in action, and I have good news for you!
My next video will be a Hogwarts Legacy Deck Dive with overclocking results. The performance with the tweaks I found was already a big boost, but I can promise that you won’t be disappointed by the performance with overclocking.
What I found was enough to move this video ahead of the Hogwarts video, so make sure you:
CTA 2.0!
Comment what values you managed to get for your undervolt and overclocks, I’d really like to know what the silicon lottery is like on the Steam Deck!
Subscribe and Ring the Bell to be notified when the new Hogwarts video releases, along with some really exciting hardware modding that I have planned!
Conclusion
Well, that’s a brief, but hopefully comprehensive, synopsis of undervolting and overclocking on the Steam Deck.
When researching for this video, I found that many resources weren’t very in-depth and assumed that you knew what to do already, I hope that this video taught you a bit and helped you out!
Shoutouts
I’d like to thank all of my Patrons, YouTube Members, and donors for helping me get the Steam Deck in order to make this video.
You get sneak peaks, ad-free viewing, and access to a patron-only section on Discord!
If you want more free performance boosts, or want to learn a little more about your computer, then check out my CryoUtilties 2 launch video!
If you enjoyed this article, be sure to check out the rest of the content on SteamDeckHQ! We have a wide variety game reviews and news that are sure to help your gaming experience. Whether you're looking for news, tips and tutorials, game settings and reviews, or just want to stay up-to-date on the latest trends, we've got your back!



60/60/60
LETS GOOOO
Hi All.
50/50/50 for me works 🙂
Thanks a lot for this.
I think I lost lottery haha though I have a couple questions, should I proceed to overclock if my undervolt params are not too optimal? (My deck works fine with 10/10/10 undervolt, haven't tried pushing higher values cuz I'm afraid tbh), I'm testing with hogwarts legacy so what in game and cryoutilities settings you suggest? Brand new to pc gaming so that's the only AAA game I have for now 🙁
Please help =]
There's no CMOS to reset. The settings are stored in the Winbond SPI flash chip in the UEFI BIOS. The button combination you've told people mainly puts the steam deck into 'battery storage mode' without going into the BIOS to do it - this is what I was told by Valve support, as I have bricked my Steam Deck from faulty Smokeless_UMAF settings before we knew about having to backup and reprogram the chip, and everyone insisted "it must be like a laptop with a CMOS!" - spoiler, it isn't.
The best advice to give is to tell people to backup their BIOS. There's a tool on the steam deck to do this already:
sudo /usr/share/jupiter_bios_updater/h2offt /home/deck/biosbkp.fd -O
And then backup biosbkp.fd somewhere that isn't the steam deck.
You'll need a hardware programmer to restore this to the winbond chip, and appropriate software to do it. The winbond chip is 1.8v, ideally you would desolder it from the steam deck but it's possible to programm it in place if you can connect to the pins, and you disconnect the steam deck battery.
The BIOS contains information that's unique to your steam deck, so you shouldn't share it. The backup is also a full backup, and is very different to the updates you get from Valve, the updates only patch 'part' of the UEFI BIOS.
Also BIOS 115 that's coming up (110/113 is common at the moment) removes the Smokeless_UMAF menus, another good reason to have a BIOS backup, and if you don't want to upgrade you need to disable the system services.
Oh, that's very interesting, I didn't know that! Everything I heard pointed to it being a full CMOS reset, than you so much for letting me know 🙏
As for BIOS 115, I'm aware of that and Smokeless is working on a fix as well!
Shouldn't the guide be altered if this is true? This is a very important thing for people to know if they don't have a CMOS option as a backup
The CMOS "reset" still works appropriately, even after some otherwise fatal undervolts. Several members of my Discord community have tested it in addition to the testing I originally did just to make sure mine wasn't a fluke 🙂
Since the creation of this blog post and video, the Steam Deck BIOS has undergone significant updates.
One of those has been a more 'robust reset' process as of BIOS 116. However, even though another comment on here says "it works and it's been tested" it has still been the case for users that it is not 100% reliable, and a BIOS backup is wholly recommended.
However, also the settings for unlocking overclocking have been 'locked away' in BIOS 115 and 116.
As of BIOS 118 and above, including 120, undervolting is included 'as standard' up to -50, but overclocking and the UEFI form browser for it have been removed from the BIOS and are not directly accessible, you have to downgrade your BIOS version.