While SDHQ is nowhere near the first to cover this, I recently wanted to play the new Call of Duty: Modern Warfare II campaign on my Steam Deck. Its RICOCHET anti-cheat engine isn't compatible with Proton, so my only choice was to install Windows. Windows is useful for other unsupported games as well, such as Fortnite and Destiny 2, which even bans players for attempting to play on their Steam Deck (c'mon Bungie!).
Before we begin, there are a few different ways to boot Windows on the Steam Deck:
- Alternative OS (Operating System) - This method involves using a separate device, like external SSD or Mircro SD card to boot Windows, keeping SteamOS dedicated to one device, and Windows dedicated to another.
- Dual Boot - Builds on the concept of an Alternative OS, but uses disk partitioning to share one section of a device with the other operating system. This method is especially useful if you have a large external drive or Micro SD card and want to use part of it for Windows, and the other part for extra game storage in SteamOS. Dual booting is not currently supported on the internal Steam Deck SSD.
In order to install windows on the Steam Deck, you'll need a few things:
- A Windows PC. While there are Mac compatible methods available, the tools we will be using make the process simpler and are only available for Windows. Did you know you can install Windows on your Mac alongside MacOS? Check out Parallels (Paid) or Boot Camp (Free).
- A Windows 10 ISO or Windows 11 ISO. For Windows 10, follow the instructions to "Create installation media for another PC" and for Windows 11, download the ISO directly from the page.
- A disk image writing utility. A free tool, such as RUFUS is recommended.
- An external SSD or Micro SD card with at least 64gb capacity (256gb+ is recommended for gaming)
- The Steam Deck Windows drivers
- A USB adapter for your external SSD (optional)
Download the Windows ISO
From the Microsoft web pages linked above, download the ISO image of the operating system you wish to install. Note: You will need a valid Windows product key to remove the "Activate Windows" watermark, but you can install and use most of Windows' features without activating. For this tutorial, we'll be using Windows 10.
Creating your Windows Boot Drive
Plug your external SSD or Micro SD card into your computer. Open up RUFUS (no installation necessary) and select "yes" if prompted to allow RUFUS to make changes to your system. In the RUFUS UI, select your removable drive and the Windows ISO you downloaded earlier.

Under "Image Option" select "Windows to Go" and click Start
Note: Everything on this drive will be erased once you click Start, so make a backup if you are repurposing a drive.

Let RUFUS run its course writing the image. This can take anywhere from 5-25 minutes depending on the speed of your device.
Booting Windows and Installing Drivers
If this drive will be dedicated to Windows and no portion will be shared with SteamOS, then you're almost done! Eject the drive, connect it to your Steam Deck, and access the bootloader by holding the Volume down button while powering on the Steam Deck. You'll see a few options and will want to select "EFI - SD/USB" to access Windows. Windows will finalize the setup process and present you with the desktop.
At this point, you'll want to install the Steam Deck drivers linked above. Simply run each setup.exe file and allow the installation to complete. For .inf drivers, right-click each one and click install. You'll receive a confirmation message after each driver installs successfully. Windows will want you to restart the Steam Deck, so go ahead and do so using the Windows menu, and holding the volume down button to access the bootloader once the system starts powering on. Access the EFI SD/USB again, and you'll be logged into a fully functioning Windows OS on the Steam Deck!
If you intend to split the drive's capacity between Windows and SteamOS, power down your Steam Deck, insert your Windows SSD or Micro SD card into your PC, and follow the steps below. Otherwise, happy gaming!
Section 2: For Dual Boot ONLY
The sections below only apply if you'll be sharing the drive capacity between Windows and SteamOS.
Let's say you have a 1-2TB external SSD or Micro SD card you're installing Windows on, and want a portion of that to be available to store games in SteamOS. There are a few extra steps required to partition and format the drive in a way where the space can be shared.
Note: Games installed via SteamOS will not be accessible in Windows. Even though both operating systems have access to the same physical storage device, Windows cannot read the Linux-based ext4 filesystem and each OS requires different user permissions to access the storage. You MUST install Windows first, as the process for creating a Windows to Go drive erases the entire disk. Therefore you cannot install to a partition on a drive currently used in SteamOS without erasing it. I tried a variety of tools to install and restore from an existing system image to no avail. Learn from my pain, install Windows first!
Partitioning
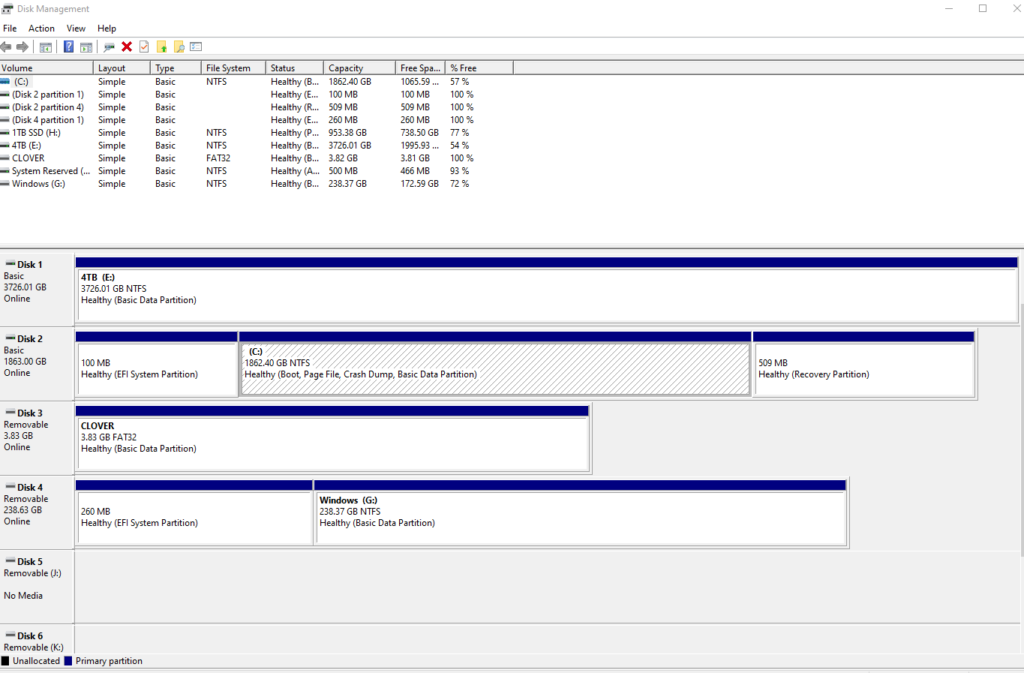
By this point in the guide, you have Windows installed on an external SSD or Micro SD card. Connect the drive to a PC and open Disk Management in Windows. You can find it by searching "partition" in Windows search. You'll be presented with a list of disk drives connected to your computer. In the screenshot below, Disk 4 is my Windows to Go Micro SD card.

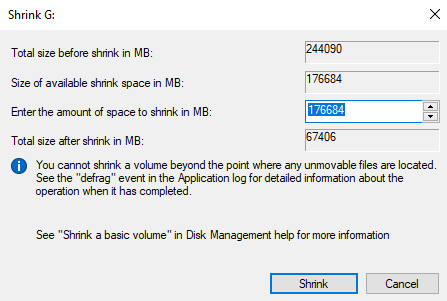
Right-click on the Windows partition and select Shrink Volume
Choose the amount of space to shrink your partition by. The space next to "Enter the amount of space to shrink in MB" will be the amount of storage available in SteamOS.

Once the operation completes, you'll see a block of Unallocated Space on your disk. You're all set on your computer and can eject your device.

Steam Game Library
Connect your SSD to your Steam Deck or insert the Micro SD card, and boot into Windows by holding Volume down during boot, and selecting "EFI SD/USB" from the bootloader menu. Once you've successfully booted into Windows, reboot your Steam Deck into SteamOS desktop mode. The next steps involve formatting the unallocated space with the ext4 filesystem, changing the partition permissions, adding the newly formatted space as a Steam game library, and if you're using an external SSD connected via USB, editing the fstab to auto-mount the drive. Luckily, SDHQ already has a guide covering these steps.
If you're using a Micro SD card, you can skip the steps about modifying fstab after adding the game library folder to Steam, since the Steam Deck automatically mounts the Micro SD card when powered on.
If you've gotten this far, you have a bootable Windows partition and SteamOS partition for use as a Steam games library folder! Happy gaming!


Why we need to choose Windows to Go over standard installation ?
Hi, if installing Windows to the internal SSD, standard installation media makes sense in some cases. Especially if you have already partitioned your internal SSD with unallocated space for a Windows install. If using a Micro SD card, Windows To Go is faster and easier, as you don't need to write the installation image and wait for install, just write the image (50% less time).
Hi everyone!
I need a clue. I've installed w10 into my internal eMMC drive (or how it is named correctly?). W10 launches OK, performance is OK. But SteamOS was "killed" expectedly. But I've made backup, using dd if=/... of=/dev/sda onto SD-card.
I've got SD-card with SteamOS, but I can't boot from UEFI. I think that's because of changed UUID of partitions. Guess UUID's are different on SD-card.
Thus, I need a clue what should I do next. Edit /etc/fstab on SD rootfs, and else.. I don't know which loader I'd better use to load SteamOS kernel...
I've got external SSD for any experiments.
In conclusion, it's OK with me that w10 loads from internal emmc, but an option to load SteamOS from SSD or even SD-card is "must have".
Any ideas how to do that welcome...
I have played hours on windows via u3 micro SD and an SSD external. By far the external ssd is the better option, the micro SD is so terrible at times. It has no chance at handling multitasking and this includes stupid background updates such as the windows ones). If anything like that is happening, everything takes soooooo long to load.
For me the sweet spot was using external SSD for Windows and gaming but you can do even better by using a separate device for games only.
Interesting! Which external SSD are you using? Are you connecting it directly to the Deck or keeping it docked?
Using I think a t1 Samsung external, it's pretty old. Hooked up to an Anker hub. I don't have a dock yet, just a stand + hub. Haven't gotten external display to work in Windows yet.
Check out this process for creating a Windows USB from Linux or macOS.
https://gist.github.com/dragon788/26921410d8de054366188c5c5435ae01